# Rendobar
> ## Agent Instructions
> Keep the API key in an env var (RENDOBAR_API_KEY), never in chat or committed code.
> Job types change, so fetch the live catalog from GET https://api.rendobar.com/jobs/types rather than relying on memory.
> The full integration prompt for coding agents is at https://rendobar.com/prompts/integrate.md.
# Run media jobs from Activepieces
Source: https://rendobar.com/docs/automation/activepieces
Install the Rendobar piece on Activepieces, add an API key, and run media jobs that pause the flow until they finish, with a trigger for finished jobs.
The Rendobar piece runs FFmpeg commands, compression, captions and image generation from an Activepieces flow, and a trigger starts a flow when a job finishes. **Run a Media Job** pauses the flow while the job runs, so an hour-long render holds no worker and does not count against the flow's timeout.
```text theme={null}
@rendobar/piece-rendobar
```

The Rendobar piece runs video and image jobs inside Activepieces flows.
## Before you start
* A Rendobar API key. Create one on the [API Keys](https://app.rendobar.com/api-keys) page of the dashboard.
* Platform admin access to Activepieces 0.36.1 or later. The piece installs from npm rather than from the Activepieces catalog, and installing a custom piece is a paid feature on Activepieces Cloud.
* An Activepieces that Rendobar can reach over HTTPS, for flows that pause and for the instant trigger. Without one, **Run a Media Job** polls instead and **Finished Job (Polling)** replaces the trigger.
## Install the piece
**1. Open Pieces**
In the platform admin, select **Pieces** under **Setup**.
**2. Install from npm**
Select **Install Piece**. Keep **Package Type** on **NPM Registry**, enter `@rendobar/piece-rendobar` as the package name, and confirm.
**3. Check the list**
Rendobar appears in the list with its package name and the installed version.

The Pieces page in the platform admin after an install. Rendobar is listed by its npm package name and version, and Install Piece at the top right adds the next one.
## Add your API key
Add a Rendobar step to a flow and create a connection with your API key, which starts with `rb_`. The piece checks the key against your account when you save the connection.
Use an API key rather than an OAuth token. **Finished Job** registers a webhook on your account, and Rendobar refuses webhook management over OAuth. If you restrict the key's [scopes](/docs/concepts/scopes), keep `webhooks:write` for that trigger.
## Run a job
Add **Run a Media Job** and pick a **Job Type**. The form below it is built from that job type's live schema, so a new job type shows up without a piece update.
* **Input Media** has one field per file the job reads. `ffmpeg` and `ffprobe` name their files inside the command, so they get a map from file name to URL instead.
* **Parameters** are the job's own settings. A job type with several models shows **Variant** first, and the fields change to match.
* **Deliver To** writes the output to buckets connected on the [Storage page](https://app.rendobar.com/storage), optionally under a **Delivery Folder or Path**.

Run a Media Job with compress.target selected. Variant is disabled because this job type has one mode, and Source, For and Target come from the job type's schema.
For a file produced earlier in the flow, run **Upload File** first and put its `url` in a media field. The upload goes straight to storage through a presigned URL, so the bytes never pass through the API.
### What comes out
Every job-shaped action and trigger returns the same flat row, so a table built on one step works with the others.
| Column | Holds |
| - | - |
| `id`, `type`, `status` | The job, its type and its status |
| `succeeded` | Whether the job completed |
| `file_url`, `file_size_bytes` | The headline output file |
| `data` | A job-specific result, such as a probe report or a transcript |
| `files` | Every output file |
| `cost_formatted`, `duration_ms` | What the job cost and how long it ran |
| `deliveries` | One entry per bucket under **Deliver To**, with `status`, `path`, `url` and `reason` |
`cost_formatted` can be `null` on a row read the moment a job completes, because billing settles a moment later. A later read carries it.
## How do I wait for a long job?

Polling holds a worker and repeats status calls for the whole job. A waitpoint submits once, parks the flow, and resumes it when Rendobar calls back.
**Wait for the Result** is on by default. The step creates a waitpoint, sends its resume URL as the job's callback, and pauses the flow. A paused flow holds no worker and does not count against the run timeout, which is 10 minutes on Activepieces Cloud. A pause can last 30 days, longer than any job runs.
When the job ends, Rendobar's callback resumes the flow. The step then re-reads the job over your connection rather than trusting the callback body.
If Rendobar cannot reach this Activepieces from the internet, there is nowhere to call back to. The step polls instead for up to **Maximum Wait (seconds)**, 300 by default, then returns the job as it stands. Keep that below the flow timeout. The job keeps running on Rendobar either way.
Turn **Wait for the Result** off to submit and move on, then pick up the result with [Finished Job](#how-do-i-start-a-flow-when-a-job-finishes). Two more settings shape the step:
* **Fail This Step if the Job Fails** is on by default, so a failed job runs the flow's error path. Turn it off to branch on `succeeded` instead.
* **Idempotency Key** is derived from the run, the step and the submission when left empty. An automatic retry then settles on the job it already created instead of billing a second one.
## How do I start a flow when a job finishes?
**Finished Job** registers a webhook on your Rendobar account when the flow is turned on, and deletes it when the flow is turned off. **Outcome** picks which jobs start the flow:
| Outcome | Starts on |
| - | - |
| Succeeded only | `job.completed`. This is the default |
| Failed only | `job.failed` |
| Any finished job, including cancelled | `job.completed`, `job.failed` or `job.cancelled` |
| Storage deliveries settled | `job.deliveries_settled`, once every bucket under **Deliver To** has resolved |
**Job Type** narrows it to one type, such as `compress.target`. The flow receives the same row **Get Job** returns, read fresh from the API. Each flow with this trigger uses one of the 10 [webhook endpoints](/docs/guides/webhooks) an organization can have.
**Finished Job (Polling)** does the same on a timer, for an Activepieces that Rendobar cannot reach.
## Actions
| Action | What it does |
| - | - |
| Run a Media Job | Submit a job and, by default, pause until it finishes |
| Upload File | Put a file from the flow into Rendobar and get a `url` a job can read |
| Get Job | Read a job's status, output and cost |
| Find Jobs | List recent jobs, filtered by status and type |
| Get Job Logs | Read what the runner reported, to diagnose a failure |
| Get Account | Read the plan, credit balance and limits |
| Cancel Job | Stop a job that has not started running |
| Share Output | Create a shareable link to a completed job's output file |
| Find Storage Connections | List the buckets connected on the Storage page |
| List Storage Files | List folders and files in a connected bucket, each with a `storage://` URI |
| Custom API Call | Call any other Rendobar endpoint with the connection's key |
## Troubleshooting
> **Install Piece is not available**
>
> Installing a custom piece needs platform admin access, and on Activepieces Cloud it is a paid feature. On a self-hosted platform, check that Activepieces is 0.36.1 or later.
> **The step polls instead of pausing**
>
> Activepieces builds the resume URL from `AP_FRONTEND_URL`. When that points at `localhost` or a private address, Rendobar cannot reach it, so the step polls. Set it to the platform's public HTTPS address and restart Activepieces.
> **Finished Job cannot be turned on**
>
> Rendobar could not register the webhook, and the error names the reason. A key without the `webhooks:write` scope is refused, and so is an OAuth token. If this Activepieces is not reachable from the internet, use **Finished Job (Polling)**.
> **Get Job reports that no job was given**
>
> The job id reached the step empty. A reference such as `{{step_1.id}}` resolves to nothing when the step name is wrong, so pick the value again from the data selector.
> **A large output file does not attach**
>
> Activepieces caps a step file at 10 MB on Cloud. Turn **Download the Output File** off and pass `file_url` to the next step, which most steps accept.
## See also
* [Callbacks](/docs/guides/callbacks): the per-job URL the waitpoint listens on
* [Storage connections](/docs/storage): the buckets **Deliver To** writes to
* [Package on npm](https://www.npmjs.com/package/@rendobar/piece-rendobar): versions and release notes
* [Source on GitHub](https://github.com/rendobar/activepieces-piece): MIT licensed
Next step: add **Run a Media Job** to a flow, pick `ffmpeg`, and run a command against a public video URL.
# Automate media jobs without code
Source: https://rendobar.com/docs/automation/index
Run Rendobar video and image jobs from n8n or Activepieces, and start from ready-made workflows that import and run on n8n Cloud.
Run Rendobar jobs from an automation platform instead of code.

Rendobar runs video and image jobs from the automation platforms you build workflows in.
## Platforms
> **[n8n](/docs/automation/n8n)**
>
> Verified node for n8n Cloud and self-hosted n8n.
> **[Activepieces](/docs/automation/activepieces)**
>
> Piece for self-hosted and paid Activepieces.
> **Make**
>
> Coming soon.
> **Zapier**
>
> Coming soon.
## Templates
Finished n8n workflows that run on n8n Cloud. Open a card, copy its address, and paste it into **Import from URL** in the n8n workflow menu. Each workflow lists its setup steps in a sticky note.
> **[Create YouTube quote videos in any language from Google Sheets](https://raw.githubusercontent.com/rendobar/n8n-nodes-rendobar/main/templates/quote-videos-from-google-sheets.json)**
>
> A new sheet row becomes a 9:16 quote video with music, in a font made for its language.
> **[Run FFmpeg commands on n8n Cloud with Google Drive and Slack](https://raw.githubusercontent.com/rendobar/n8n-nodes-rendobar/main/templates/run-ffmpeg-on-n8n-cloud.json)**
>
> A form takes a video URL and a command. Failed jobs post the FFmpeg error to Slack.
# Run media jobs from n8n
Source: https://rendobar.com/docs/automation/n8n
Install the verified Rendobar node on n8n Cloud or self-hosted n8n, add an API key, then run media jobs, wait without polling and hand the node to an AI Agent.
The Rendobar node runs FFmpeg commands, compression, captions, composition and image generation from an n8n workflow, and a trigger node starts a workflow when a job finishes. It's verified by n8n, so on n8n Cloud you install it from the nodes panel with no self-hosting.
```text theme={null}
@rendobar/n8n-nodes-rendobar
```

The verified Rendobar node runs video and image jobs inside n8n workflows.
## Before you start
* A Rendobar API key. Create one on the [API Keys](https://app.rendobar.com/api-keys) page of the dashboard.
* n8n Cloud, or self-hosted n8n 1.94.0 or later.
* On self-hosted n8n, a public HTTPS address, so the trigger node and the Wait node can receive Rendobar's calls. See [Start a workflow when a job ends](#how-do-i-start-a-workflow-when-a-job-ends).
## Install on n8n Cloud
**1. Open the nodes panel**
Open a workflow and press +, or Tab on the canvas.
**2. Search for Rendobar**
Type `Rendobar`. It's listed under **More from the community** with a verified badge.
**3. Install**
Select it and choose **Install**. The node is now available to everyone on the instance.

The node details panel before install. The verified badge means n8n reviewed the code and publishes the version itself, and Install node makes the node available to everyone on the instance.
If nothing appears under **More from the community**, an instance owner turns on **Verified Community Nodes** in the Cloud Admin Panel. A restart of the instance may be needed the first time.
## Install on self-hosted n8n
The same search works on n8n 1.94.0 and later. Two environment variables gate it, and both default to `true`:
```bash theme={null}
N8N_COMMUNITY_PACKAGES_ENABLED=true
N8N_VERIFIED_PACKAGES_ENABLED=true
```
The older route also works. Open **Settings > Community Nodes**, choose **Install**, and enter `@rendobar/n8n-nodes-rendobar`. n8n's [verified community nodes](https://docs.n8n.io/integrations/community-nodes/installation-and-management/install-verified-community-nodes) page covers both paths.
## Add your API key
The node authenticates with a Rendobar API key. Create one on the [API Keys](https://app.rendobar.com/api-keys) page of the dashboard, then add a **Rendobar API** credential in n8n and paste it in. The key starts with `rb_`. n8n checks it against your account when you save, so a wrong key fails at save time and not mid-workflow.
Leave **Base URL** at `https://api.rendobar.com` unless you're pointing at another environment.
## Run a job
The package ships two nodes. **Rendobar** runs operations against the API and **Rendobar Trigger** starts a workflow on an event. The common chain is three Rendobar nodes:
1. **File > Upload** streams a binary from the previous node and returns a `url`.
2. **Job > Create** picks a job type and references that `url` in its inputs.
3. **Job > Get** with **Download Output File** on fetches the finished file into a binary property.

The Create Job panel with caption.burn selected. The fields under Values to Send come from the job type's own schema, so a new job type appears here without a node update.
The **Job Type** dropdown loads live from your account. For `ffmpeg` and `ffprobe`, which name their files inside the command, switch **Specify Inputs** to **Using JSON** and give the inputs by name:
```json theme={null}
{ "source": "https://cdn.rendobar.com/assets/examples/sample.mp4" }
```
The command then refers to `source` and names its output:
```text theme={null}
-i source -vf scale=-2:720 -c:v libx264 -crf 28 -preset fast output.mp4
```
### What comes out
Every job type returns the same shape on completion, lifted to the top of the item. With **Output** set to **Simplified**, a finished job looks like this:
```json theme={null}
{
"id": "job_6f2a9c1d4b8e4f30",
"type": "compress.target",
"status": "complete",
"cost": 0.0034,
"data": null,
"file": {
"url": "https://cdn.rendobar.com/outputs/...",
"path": "output.mp4",
"type": "video",
"size": 8123904
},
"files": [{ "url": "...", "path": "output.mp4", "type": "video", "size": 8123904 }],
"expiresAt": 1789300000000,
"createdAt": 1789213600000,
"completedAt": 1789213640000
}
```
`file` is the headline result, or `null` for a job that computes data. `data` carries a probe report or a transcript, or `null` for a file-only job. `files` lists every output. **Raw** returns the full job and **Selected Fields** lets you pick.
## How do I wait for a long job?
A transcode can take minutes and an hour-long render can take an hour. The node offers three ways to get the result, and only one of them is right for a long job.

Wait for Completion holds a worker. Callback URL plus a Wait node parks the execution for free. The trigger node waits for nothing because a second workflow starts when the job ends.
**Wait for Completion**, under **Options** on Create, polls until the job ends and returns the result on the same item. It's the right choice for a clip of a few seconds and the wrong one for anything long, because the n8n worker is held for the whole job.
**Callback URL plus a Wait node** is the pattern for long jobs. Set **Callback URL** to the resume URL of a Wait node placed right after Create:
```text theme={null}
{{ $execution.resumeUrl }}
```
Then configure the Wait node:
* **Resume** on **Webhook Call**, with **HTTP Method** set to **POST**. Rendobar POSTs the callback and the Wait node defaults to GET.
* **Limit Wait Time** on, at ten hours. An execution whose callback never lands releases itself instead of parking forever.
The execution parks with no worker held. When the job ends, Rendobar's callback resumes it with the job in `$json.body.data`. Run **Job > Get** on that `jobId` to re-fetch the job over your own credential and download the file, so the payload that woke the Wait node is never trusted.
> [!WARNING]
>
> Leave **Wait for Completion** off when you set a Callback URL. The node refuses the combination rather than picking one, because a hidden field in n8n keeps its value.
## How do I start a workflow when a job ends?
**Rendobar Trigger** registers a webhook with Rendobar when the workflow activates and removes it on deactivation. Pick the events:
| Event | Fires when |
| - | - |
| `job.created` | A job is accepted |
| `job.started` | A runner picks it up |
| `job.completed` | It finishes with output |
| `job.failed` | It stops with an error |
| `job.cancelled` | Someone cancels it |
| `job.delivery_succeeded` | A destination write succeeds |
| `job.delivery_failed` | A destination write fails |
| `job.deliveries_settled` | Every destination has resolved |
| `balance.low` | The account balance crosses the low mark |
| `balance.depleted` | The balance reaches zero |
Pair `job.failed` with **Job > Get Logs** and the item carries the runner's log, including FFmpeg's stderr, so a Slack or email node can post the actual error. Pair `balance.low` with **Account > Get** to read how low.
Rendobar must reach the webhook URL over HTTPS. That's true on n8n Cloud and on any publicly hosted instance. A `localhost` n8n is not reachable, so test locally through a tunnel such as `cloudflared tunnel --url http://localhost:5678` and set `WEBHOOK_URL` to its hostname.
## Can I use it as an AI Agent tool?
The node is marked usable as a tool, so it attaches to the AI Agent node's tool port and n8n builds the tool schema from the node's own parameters. Nothing else to define.

An agent with three Rendobar tools. Account Get reads the balance before the agent spends, Job Create runs the work, and Job Get Logs reads FFmpeg's stderr when a job fails.
Three tools cover most agents:
* **Account > Get** before anything that spends. `balance.amount` tells the agent how much it has and `plan.limits` what a submission is measured against.
* **Job > Create** for the work itself. The agent picks the job type and fills the parameters.
* **Job > Get Logs** after a `job.failed` event, so the agent reads the real FFmpeg error, fixes the command and resubmits.
Give an agent **Callback URL** and a Wait node rather than **Wait for Completion**, for the same reason as above. On self-hosted n8n, community tools need `N8N_COMMUNITY_PACKAGES_ALLOW_TOOL_USAGE=true`.
## Operations
| Resource | Operation | What it does |
| - | - | - |
| Job | Create | Submit a job. Sends an idempotency key per item, so a retried step never double-creates. |
| Job | Get | Fetch a job by ID, optionally downloading the headline file. |
| Job | Get Many | List jobs with filters on status, type, client and date. |
| Job | Get Logs | Read what the runner reported for a job. |
| Job | Download Output | Fetch a completed job's file into a binary property. |
| Job | Cancel | Stop a running job. |
| File | Upload | Stream a binary to Rendobar and get a `url` to use as a job input. Uploads expire after 24 hours. |
| Account | Get | Read the balance and plan limits. |
| Storage Connection | Get Many | List the buckets connected on the Storage page. |
| Storage File | Get Many | List the folders and files in a connected bucket, each with a `storage://` URI a job input accepts. |
### Storage
Create Job's **Destinations** option writes the output to buckets connected on the [Storage page](https://app.rendobar.com/storage): one row per bucket, each with an optional folder or path. The job's `deliveries` reports every write. **Storage Connection** lists the connections, and **Storage File** lists the folders and files in one, each with a `storage://` URI that a job input accepts. See [Storage connections](/docs/storage).
> [!NOTE]
>
> Destinations, the Storage resources and the three delivery events need version 0.6.0 or later. An install from the nodes panel gets the version n8n has verified, which can trail the latest npm release.
## Templates
Ready-made workflows that import and run on n8n Cloud are listed on the [Automation overview](/docs/automation#templates).
## Troubleshooting
> **Rendobar does not appear in the nodes panel**
>
> On n8n Cloud, an instance owner enables **Verified Community Nodes** in the Cloud Admin Panel. On self-hosted n8n, check `N8N_VERIFIED_PACKAGES_ENABLED` and that the version is 1.94.0 or later. The manual route under **Settings > Community Nodes** works either way.
> **The Wait node never resumes**
>
> Its **HTTP Method** must be **POST**. Check that **Callback URL** on Create is exactly `{{ $execution.resumeUrl }}` and that **Wait for Completion** is off. On a self-hosted instance, the resume URL must be reachable from the internet, so set `WEBHOOK_URL` to your public hostname.
> **The item stops with INSUFFICIENT\_CREDITS**
>
> The account balance is below the job's estimated cost. Put **Account > Get** in front of the submission and branch on `balance.amount`, or top up in the dashboard.
> **Download Output File returns nothing**
>
> A file exists once the job is `complete` and produced one. A data-only job such as `ffprobe` never produces a file and puts its result under `data`. A job past its retention window has had its files removed. Run **Job > Get** to see which applies.
> **The trigger registered but never fires**
>
> Rendobar could not reach the webhook URL. A `localhost` URL is the usual cause. Use a tunnel and set `WEBHOOK_URL`, then deactivate and reactivate the workflow so the node re-registers.
## See also
* [Job lifecycle](/docs/concepts/job): the six statuses a job moves through
* [Webhooks](/docs/guides/webhooks): the events the trigger node subscribes to
* [Rendobar on n8n.io](https://n8n.io/integrations/rendobar/): the verified listing
* [Source on GitHub](https://github.com/rendobar/n8n-nodes-rendobar): MIT licensed, published from CI with npm provenance
Next step: import a [template](/docs/automation#templates) and run it.
# Let your AI agent integrate the API
Source: https://rendobar.com/docs/build-with-ai
Add media processing to your app by handing your AI agent one prompt. Open it in ChatGPT or Cursor, paste it into Claude, or save it as a repo rule.
Your coding agent can do the whole integration: install the [SDK](/docs/sdk), wire the key from env, submit a job, and verify the result. Paste this into any agent that can fetch a URL:
```text theme={null}
Add Rendobar to my app: read and follow https://rendobar.com/prompts/integrate.md
```
The hosted prompt at [rendobar.com/prompts/integrate.md](https://rendobar.com/prompts/integrate.md) is the same text as the block below and stays current.
## The full prompt
Agent can't fetch URLs? Copy the whole prompt instead:
```md theme={null}
# Add Rendobar to this project
You are integrating Rendobar (https://rendobar.com), a media processing and AI generation API, into this codebase. These instructions supersede anything you remember about Rendobar. Work from the live sources below, not from memory.
Live sources of truth:
- Job catalog: GET https://api.rendobar.com/jobs/types (public, no auth). Per-type parameters AND the media each type reads: GET https://api.rendobar.com/jobs/types/{type}/schema (the `inputs` object names each media input, whether it takes a URL or a list, and whether the type accepts any filename)
- OpenAPI 3.1 spec: https://api.rendobar.com/openapi.json
- Capability map: https://rendobar.com/llms.txt
- Docs text for AI: https://rendobar.com/docs/llms-full.txt (human docs at https://rendobar.com/docs)
- Error reference: https://rendobar.com/docs/support/errors
- Plan limits (file size, timeouts, concurrency): https://rendobar.com/docs/support/limits
- What changed lately: https://rendobar.com/changelog/feed.json (JSON Feed, newest first). New job types, new parameters and behavior changes land here, most of them after your training data.
- Each job type has its own docs page under https://rendobar.com/docs/jobs/. Every Compose feature is shown rendered, with the exact request, at https://rendobar.com/compose/features/
API key rules, follow exactly:
- I created an API key in the Rendobar dashboard. Ask me to put it in this project's env as RENDOBAR_API_KEY, in a gitignored env file, and wait for my confirmation before running anything that calls the API.
- Never ask me to paste the key into this chat. Never print, log, or commit it. Never put it in client-side code.
Stay current, every time:
- Before writing code, read the newest changelog entries and the live schema of every job type you use. Trust them over your memory and over older code in this project.
- Install the latest @rendobar/sdk (check with npm view @rendobar/sdk version). Never pin a version from memory.
- If a parameter, field or error code is missing, renamed or new, re-read the schema and the changelog before guessing.
- Compose timelines: check each one with POST https://api.rendobar.com/compose/validate before submitting.
Step 0, detect the stack before writing code:
- Inspect the project (package.json, requirements.txt, go.mod, composer.json, Gemfile). JavaScript or TypeScript: use the official SDK, @rendobar/sdk. Anything else: call the REST API directly using the OpenAPI spec above. Same endpoints, same shapes.
- If the project is empty, ask me which stack I want.
Steps (SDK path; mirror with plain HTTP on the REST path):
1. Install @rendobar/sdk. Create the client with createClient({ apiKey: process.env.RENDOBAR_API_KEY }).
2. Read the live job catalog and pick the job types this project needs from what it actually lists. Do not invent job types or parameters.
3. Submit with client.jobs.create({ type, inputs, params }). Media inputs are URLs. Pass an idempotencyKey anywhere a retry could double-submit.
4. Results: client.jobs.wait(job.id) is fine for scripts. For a production server, use webhooks: ask me to add an endpoint at https://app.rendobar.com/webhooks, then verify signatures with verifyWebhook from "@rendobar/sdk/webhooks".
5. Handle errors by machine code (error.code), never message text. INSUFFICIENT_CREDITS: tell me to top up at https://app.rendobar.com/billing. RATE_LIMITED: retry with backoff. Full list in the error reference.
6. Local files: upload through the assets flow (POST https://api.rendobar.com/assets, documented in the docs), then pass the returned asset url as the job input.
7. Definition of done: a runnable check that submits an ffprobe job on https://cdn.rendobar.com/assets/examples/sample.mp4 and prints the result. Read that job type's schema first, its parameters are not the same as every other type. Show me the one command that runs it. On a 401, check both causes before reporting: the key may not be reaching the process env, or the key itself may be invalid for this API (revoked, mistyped, or issued for a different environment such as staging). Tell me which one it is.
Hard rules:
- The API base is https://api.rendobar.com with no version prefix. There is no batch endpoint. One job produces one output.
- Additive changes only. Do not refactor or remove unrelated code.
- When something is ambiguous, choose the smallest default that keeps the app compiling and tell me what you chose. Ask me only when it is a product decision.
If I am talking to you inside an MCP-capable client (Claude, Cursor, and others), also offer to connect Rendobar's MCP server for running jobs in conversation: https://api.rendobar.com/mcp over OAuth, or npx -y @rendobar/mcp with the key read from env. That is separate from the codebase integration above.
For later work in this project, offer to install Rendobar's agent skills so future sessions start from current Rendobar knowledge: npx skills add rendobar/agent-skills (in Claude Code: /plugin marketplace add rendobar/agent-skills).
```
## Open it in one click
* [Open in ChatGPT](https://chatgpt.com/?q=%23%20Add%20Rendobar%20to%20this%20project%0A%0AYou%20are%20integrating%20Rendobar%20\(https%3A%2F%2Frendobar.com\)%2C%20a%20media%20processing%20and%20AI%20generation%20API%2C%20into%20this%20codebase.%20These%20instructions%20supersede%20anything%20you%20remember%20about%20Rendobar.%20Work%20from%20the%20live%20sources%20below%2C%20not%20from%20memory.%0A%0ALive%20sources%20of%20truth%3A%0A-%20Job%20catalog%3A%20GET%20https%3A%2F%2Fapi.rendobar.com%2Fjobs%2Ftypes%20\(public%2C%20no%20auth\).%20Per-type%20parameters%20AND%20the%20media%20each%20type%20reads%3A%20GET%20https%3A%2F%2Fapi.rendobar.com%2Fjobs%2Ftypes%2F%7Btype%7D%2Fschema%20\(the%20%60inputs%60%20object%20names%20each%20media%20input%2C%20whether%20it%20takes%20a%20URL%20or%20a%20list%2C%20and%20whether%20the%20type%20accepts%20any%20filename\)%0A-%20OpenAPI%203.1%20spec%3A%20https%3A%2F%2Fapi.rendobar.com%2Fopenapi.json%0A-%20Capability%20map%3A%20https%3A%2F%2Frendobar.com%2Fllms.txt%0A-%20Docs%20text%20for%20AI%3A%20https%3A%2F%2Frendobar.com%2Fdocs%2Fllms-full.txt%20\(human%20docs%20at%20https%3A%2F%2Frendobar.com%2Fdocs\)%0A-%20Error%20reference%3A%20https%3A%2F%2Frendobar.com%2Fdocs%2Fsupport%2Ferrors%0A-%20Plan%20limits%20\(file%20size%2C%20timeouts%2C%20concurrency\)%3A%20https%3A%2F%2Frendobar.com%2Fdocs%2Fsupport%2Flimits%0A-%20What%20changed%20lately%3A%20https%3A%2F%2Frendobar.com%2Fchangelog%2Ffeed.json%20\(JSON%20Feed%2C%20newest%20first\).%20New%20job%20types%2C%20new%20parameters%20and%20behavior%20changes%20land%20here%2C%20most%20of%20them%20after%20your%20training%20data.%0A-%20Each%20job%20type%20has%20its%20own%20docs%20page%20under%20https%3A%2F%2Frendobar.com%2Fdocs%2Fjobs%2F.%20Every%20Compose%20feature%20is%20shown%20rendered%2C%20with%20the%20exact%20request%2C%20at%20https%3A%2F%2Frendobar.com%2Fcompose%2Ffeatures%2F%0A%0AAPI%20key%20rules%2C%20follow%20exactly%3A%0A-%20I%20created%20an%20API%20key%20in%20the%20Rendobar%20dashboard.%20Ask%20me%20to%20put%20it%20in%20this%20project's%20env%20as%20RENDOBAR_API_KEY%2C%20in%20a%20gitignored%20env%20file%2C%20and%20wait%20for%20my%20confirmation%20before%20running%20anything%20that%20calls%20the%20API.%0A-%20Never%20ask%20me%20to%20paste%20the%20key%20into%20this%20chat.%20Never%20print%2C%20log%2C%20or%20commit%20it.%20Never%20put%20it%20in%20client-side%20code.%0A%0AStay%20current%2C%20every%20time%3A%0A-%20Before%20writing%20code%2C%20read%20the%20newest%20changelog%20entries%20and%20the%20live%20schema%20of%20every%20job%20type%20you%20use.%20Trust%20them%20over%20your%20memory%20and%20over%20older%20code%20in%20this%20project.%0A-%20Install%20the%20latest%20%40rendobar%2Fsdk%20\(check%20with%20npm%20view%20%40rendobar%2Fsdk%20version\).%20Never%20pin%20a%20version%20from%20memory.%0A-%20If%20a%20parameter%2C%20field%20or%20error%20code%20is%20missing%2C%20renamed%20or%20new%2C%20re-read%20the%20schema%20and%20the%20changelog%20before%20guessing.%0A-%20Compose%20timelines%3A%20check%20each%20one%20with%20POST%20https%3A%2F%2Fapi.rendobar.com%2Fcompose%2Fvalidate%20before%20submitting.%0A%0AStep%200%2C%20detect%20the%20stack%20before%20writing%20code%3A%0A-%20Inspect%20the%20project%20\(package.json%2C%20requirements.txt%2C%20go.mod%2C%20composer.json%2C%20Gemfile\).%20JavaScript%20or%20TypeScript%3A%20use%20the%20official%20SDK%2C%20%40rendobar%2Fsdk.%20Anything%20else%3A%20call%20the%20REST%20API%20directly%20using%20the%20OpenAPI%20spec%20above.%20Same%20endpoints%2C%20same%20shapes.%0A-%20If%20the%20project%20is%20empty%2C%20ask%20me%20which%20stack%20I%20want.%0A%0ASteps%20\(SDK%20path%3B%20mirror%20with%20plain%20HTTP%20on%20the%20REST%20path\)%3A%0A1.%20Install%20%40rendobar%2Fsdk.%20Create%20the%20client%20with%20createClient\(%7B%20apiKey%3A%20process.env.RENDOBAR_API_KEY%20%7D\).%0A2.%20Read%20the%20live%20job%20catalog%20and%20pick%20the%20job%20types%20this%20project%20needs%20from%20what%20it%20actually%20lists.%20Do%20not%20invent%20job%20types%20or%20parameters.%0A3.%20Submit%20with%20client.jobs.create\(%7B%20type%2C%20inputs%2C%20params%20%7D\).%20Media%20inputs%20are%20URLs.%20Pass%20an%20idempotencyKey%20anywhere%20a%20retry%20could%20double-submit.%0A4.%20Results%3A%20client.jobs.wait\(job.id\)%20is%20fine%20for%20scripts.%20For%20a%20production%20server%2C%20use%20webhooks%3A%20ask%20me%20to%20add%20an%20endpoint%20at%20https%3A%2F%2Fapp.rendobar.com%2Fwebhooks%2C%20then%20verify%20signatures%20with%20verifyWebhook%20from%20%22%40rendobar%2Fsdk%2Fwebhooks%22.%0A5.%20Handle%20errors%20by%20machine%20code%20\(error.code\)%2C%20never%20message%20text.%20INSUFFICIENT_CREDITS%3A%20tell%20me%20to%20top%20up%20at%20https%3A%2F%2Fapp.rendobar.com%2Fbilling.%20RATE_LIMITED%3A%20retry%20with%20backoff.%20Full%20list%20in%20the%20error%20reference.%0A6.%20Local%20files%3A%20upload%20through%20the%20assets%20flow%20\(POST%20https%3A%2F%2Fapi.rendobar.com%2Fassets%2C%20documented%20in%20the%20docs\)%2C%20then%20pass%20the%20returned%20asset%20url%20as%20the%20job%20input.%0A7.%20Definition%20of%20done%3A%20a%20runnable%20check%20that%20submits%20an%20ffprobe%20job%20on%20https%3A%2F%2Fcdn.rendobar.com%2Fassets%2Fexamples%2Fsample.mp4%20and%20prints%20the%20result.%20Read%20that%20job%20type's%20schema%20first%2C%20its%20parameters%20are%20not%20the%20same%20as%20every%20other%20type.%20Show%20me%20the%20one%20command%20that%20runs%20it.%20On%20a%20401%2C%20check%20both%20causes%20before%20reporting%3A%20the%20key%20may%20not%20be%20reaching%20the%20process%20env%2C%20or%20the%20key%20itself%20may%20be%20invalid%20for%20this%20API%20\(revoked%2C%20mistyped%2C%20or%20issued%20for%20a%20different%20environment%20such%20as%20staging\).%20Tell%20me%20which%20one%20it%20is.%0A%0AHard%20rules%3A%0A-%20The%20API%20base%20is%20https%3A%2F%2Fapi.rendobar.com%20with%20no%20version%20prefix.%20There%20is%20no%20batch%20endpoint.%20One%20job%20produces%20one%20output.%0A-%20Additive%20changes%20only.%20Do%20not%20refactor%20or%20remove%20unrelated%20code.%0A-%20When%20something%20is%20ambiguous%2C%20choose%20the%20smallest%20default%20that%20keeps%20the%20app%20compiling%20and%20tell%20me%20what%20you%20chose.%20Ask%20me%20only%20when%20it%20is%20a%20product%20decision.%0A%0AIf%20I%20am%20talking%20to%20you%20inside%20an%20MCP-capable%20client%20\(Claude%2C%20Cursor%2C%20and%20others\)%2C%20also%20offer%20to%20connect%20Rendobar's%20MCP%20server%20for%20running%20jobs%20in%20conversation%3A%20https%3A%2F%2Fapi.rendobar.com%2Fmcp%20over%20OAuth%2C%20or%20npx%20-y%20%40rendobar%2Fmcp%20with%20the%20key%20read%20from%20env.%20That%20is%20separate%20from%20the%20codebase%20integration%20above.%0A%0AFor%20later%20work%20in%20this%20project%2C%20offer%20to%20install%20Rendobar's%20agent%20skills%20so%20future%20sessions%20start%20from%20current%20Rendobar%20knowledge%3A%20npx%20skills%20add%20rendobar%2Fagent-skills%20\(in%20Claude%20Code%3A%20%2Fplugin%20marketplace%20add%20rendobar%2Fagent-skills\).) submits the prompt as soon as the page loads.
* [Open in Cursor](https://cursor.com/link/prompt?text=%23%20Add%20Rendobar%20to%20this%20project%0A%0AYou%20are%20integrating%20Rendobar%20\(https%3A%2F%2Frendobar.com\)%2C%20a%20media%20processing%20and%20AI%20generation%20API%2C%20into%20this%20codebase.%20These%20instructions%20supersede%20anything%20you%20remember%20about%20Rendobar.%20Work%20from%20the%20live%20sources%20below%2C%20not%20from%20memory.%0A%0ALive%20sources%20of%20truth%3A%0A-%20Job%20catalog%3A%20GET%20https%3A%2F%2Fapi.rendobar.com%2Fjobs%2Ftypes%20\(public%2C%20no%20auth\).%20Per-type%20parameters%20AND%20the%20media%20each%20type%20reads%3A%20GET%20https%3A%2F%2Fapi.rendobar.com%2Fjobs%2Ftypes%2F%7Btype%7D%2Fschema%20\(the%20%60inputs%60%20object%20names%20each%20media%20input%2C%20whether%20it%20takes%20a%20URL%20or%20a%20list%2C%20and%20whether%20the%20type%20accepts%20any%20filename\)%0A-%20OpenAPI%203.1%20spec%3A%20https%3A%2F%2Fapi.rendobar.com%2Fopenapi.json%0A-%20Capability%20map%3A%20https%3A%2F%2Frendobar.com%2Fllms.txt%0A-%20Docs%20text%20for%20AI%3A%20https%3A%2F%2Frendobar.com%2Fdocs%2Fllms-full.txt%20\(human%20docs%20at%20https%3A%2F%2Frendobar.com%2Fdocs\)%0A-%20Error%20reference%3A%20https%3A%2F%2Frendobar.com%2Fdocs%2Fsupport%2Ferrors%0A-%20Plan%20limits%20\(file%20size%2C%20timeouts%2C%20concurrency\)%3A%20https%3A%2F%2Frendobar.com%2Fdocs%2Fsupport%2Flimits%0A-%20What%20changed%20lately%3A%20https%3A%2F%2Frendobar.com%2Fchangelog%2Ffeed.json%20\(JSON%20Feed%2C%20newest%20first\).%20New%20job%20types%2C%20new%20parameters%20and%20behavior%20changes%20land%20here%2C%20most%20of%20them%20after%20your%20training%20data.%0A-%20Each%20job%20type%20has%20its%20own%20docs%20page%20under%20https%3A%2F%2Frendobar.com%2Fdocs%2Fjobs%2F.%20Every%20Compose%20feature%20is%20shown%20rendered%2C%20with%20the%20exact%20request%2C%20at%20https%3A%2F%2Frendobar.com%2Fcompose%2Ffeatures%2F%0A%0AAPI%20key%20rules%2C%20follow%20exactly%3A%0A-%20I%20created%20an%20API%20key%20in%20the%20Rendobar%20dashboard.%20Ask%20me%20to%20put%20it%20in%20this%20project's%20env%20as%20RENDOBAR_API_KEY%2C%20in%20a%20gitignored%20env%20file%2C%20and%20wait%20for%20my%20confirmation%20before%20running%20anything%20that%20calls%20the%20API.%0A-%20Never%20ask%20me%20to%20paste%20the%20key%20into%20this%20chat.%20Never%20print%2C%20log%2C%20or%20commit%20it.%20Never%20put%20it%20in%20client-side%20code.%0A%0AStay%20current%2C%20every%20time%3A%0A-%20Before%20writing%20code%2C%20read%20the%20newest%20changelog%20entries%20and%20the%20live%20schema%20of%20every%20job%20type%20you%20use.%20Trust%20them%20over%20your%20memory%20and%20over%20older%20code%20in%20this%20project.%0A-%20Install%20the%20latest%20%40rendobar%2Fsdk%20\(check%20with%20npm%20view%20%40rendobar%2Fsdk%20version\).%20Never%20pin%20a%20version%20from%20memory.%0A-%20If%20a%20parameter%2C%20field%20or%20error%20code%20is%20missing%2C%20renamed%20or%20new%2C%20re-read%20the%20schema%20and%20the%20changelog%20before%20guessing.%0A-%20Compose%20timelines%3A%20check%20each%20one%20with%20POST%20https%3A%2F%2Fapi.rendobar.com%2Fcompose%2Fvalidate%20before%20submitting.%0A%0AStep%200%2C%20detect%20the%20stack%20before%20writing%20code%3A%0A-%20Inspect%20the%20project%20\(package.json%2C%20requirements.txt%2C%20go.mod%2C%20composer.json%2C%20Gemfile\).%20JavaScript%20or%20TypeScript%3A%20use%20the%20official%20SDK%2C%20%40rendobar%2Fsdk.%20Anything%20else%3A%20call%20the%20REST%20API%20directly%20using%20the%20OpenAPI%20spec%20above.%20Same%20endpoints%2C%20same%20shapes.%0A-%20If%20the%20project%20is%20empty%2C%20ask%20me%20which%20stack%20I%20want.%0A%0ASteps%20\(SDK%20path%3B%20mirror%20with%20plain%20HTTP%20on%20the%20REST%20path\)%3A%0A1.%20Install%20%40rendobar%2Fsdk.%20Create%20the%20client%20with%20createClient\(%7B%20apiKey%3A%20process.env.RENDOBAR_API_KEY%20%7D\).%0A2.%20Read%20the%20live%20job%20catalog%20and%20pick%20the%20job%20types%20this%20project%20needs%20from%20what%20it%20actually%20lists.%20Do%20not%20invent%20job%20types%20or%20parameters.%0A3.%20Submit%20with%20client.jobs.create\(%7B%20type%2C%20inputs%2C%20params%20%7D\).%20Media%20inputs%20are%20URLs.%20Pass%20an%20idempotencyKey%20anywhere%20a%20retry%20could%20double-submit.%0A4.%20Results%3A%20client.jobs.wait\(job.id\)%20is%20fine%20for%20scripts.%20For%20a%20production%20server%2C%20use%20webhooks%3A%20ask%20me%20to%20add%20an%20endpoint%20at%20https%3A%2F%2Fapp.rendobar.com%2Fwebhooks%2C%20then%20verify%20signatures%20with%20verifyWebhook%20from%20%22%40rendobar%2Fsdk%2Fwebhooks%22.%0A5.%20Handle%20errors%20by%20machine%20code%20\(error.code\)%2C%20never%20message%20text.%20INSUFFICIENT_CREDITS%3A%20tell%20me%20to%20top%20up%20at%20https%3A%2F%2Fapp.rendobar.com%2Fbilling.%20RATE_LIMITED%3A%20retry%20with%20backoff.%20Full%20list%20in%20the%20error%20reference.%0A6.%20Local%20files%3A%20upload%20through%20the%20assets%20flow%20\(POST%20https%3A%2F%2Fapi.rendobar.com%2Fassets%2C%20documented%20in%20the%20docs\)%2C%20then%20pass%20the%20returned%20asset%20url%20as%20the%20job%20input.%0A7.%20Definition%20of%20done%3A%20a%20runnable%20check%20that%20submits%20an%20ffprobe%20job%20on%20https%3A%2F%2Fcdn.rendobar.com%2Fassets%2Fexamples%2Fsample.mp4%20and%20prints%20the%20result.%20Read%20that%20job%20type's%20schema%20first%2C%20its%20parameters%20are%20not%20the%20same%20as%20every%20other%20type.%20Show%20me%20the%20one%20command%20that%20runs%20it.%20On%20a%20401%2C%20check%20both%20causes%20before%20reporting%3A%20the%20key%20may%20not%20be%20reaching%20the%20process%20env%2C%20or%20the%20key%20itself%20may%20be%20invalid%20for%20this%20API%20\(revoked%2C%20mistyped%2C%20or%20issued%20for%20a%20different%20environment%20such%20as%20staging\).%20Tell%20me%20which%20one%20it%20is.%0A%0AHard%20rules%3A%0A-%20The%20API%20base%20is%20https%3A%2F%2Fapi.rendobar.com%20with%20no%20version%20prefix.%20There%20is%20no%20batch%20endpoint.%20One%20job%20produces%20one%20output.%0A-%20Additive%20changes%20only.%20Do%20not%20refactor%20or%20remove%20unrelated%20code.%0A-%20When%20something%20is%20ambiguous%2C%20choose%20the%20smallest%20default%20that%20keeps%20the%20app%20compiling%20and%20tell%20me%20what%20you%20chose.%20Ask%20me%20only%20when%20it%20is%20a%20product%20decision.%0A%0AIf%20I%20am%20talking%20to%20you%20inside%20an%20MCP-capable%20client%20\(Claude%2C%20Cursor%2C%20and%20others\)%2C%20also%20offer%20to%20connect%20Rendobar's%20MCP%20server%20for%20running%20jobs%20in%20conversation%3A%20https%3A%2F%2Fapi.rendobar.com%2Fmcp%20over%20OAuth%2C%20or%20npx%20-y%20%40rendobar%2Fmcp%20with%20the%20key%20read%20from%20env.%20That%20is%20separate%20from%20the%20codebase%20integration%20above.%0A%0AFor%20later%20work%20in%20this%20project%2C%20offer%20to%20install%20Rendobar's%20agent%20skills%20so%20future%20sessions%20start%20from%20current%20Rendobar%20knowledge%3A%20npx%20skills%20add%20rendobar%2Fagent-skills%20\(in%20Claude%20Code%3A%20%2Fplugin%20marketplace%20add%20rendobar%2Fagent-skills\).) loads the prompt into the agent. Review it, then run.
Claude has no link that prefills a prompt. In claude.ai or Claude Code, paste the prompt above. To run jobs straight from the conversation, [add Rendobar to Claude](https://claude.ai/customize/connectors?modal=add-custom-connector\&connectorName=Rendobar\&connectorUrl=https%3A%2F%2Fapi.rendobar.com%2Fmcp) as a connector, which opens the dialog with the [MCP server](/docs/mcp-server) URL filled in.
## How do I keep it in my repo?
Save the prompt as an agent rule so the context survives past the first session:
* Cursor: `.cursor/rules/rendobar.md`
* Claude Code: add it to `CLAUDE.md` or `AGENTS.md`
* GitHub Copilot: `.github/copilot-instructions.md`
## Install the agent skills
Skill-aware agents such as Claude Code can install Rendobar's skills instead of carrying a prompt:
```bash theme={null}
npx skills add rendobar/agent-skills
```
Skills cover the same integration playbook and update independently of your repo.
## See also
* [MCP server](/docs/mcp-server): run jobs from the chat over OAuth, no API key to copy
* [API quickstart](/docs/quickstart): do the integration by hand in under 5 minutes
* [SDK](/docs/sdk): the TypeScript client the prompt installs
# Run FFmpeg from your terminal
Source: https://rendobar.com/docs/cli
Install the rb binary, sign in, and run any ffmpeg command in the cloud from your shell. Local files upload and download for you.
`rb` runs FFmpeg in the cloud from your shell. Write the same `ffmpeg` command you'd run locally, prefix it with `rb`, and it uploads your inputs, runs the job, and downloads the result.
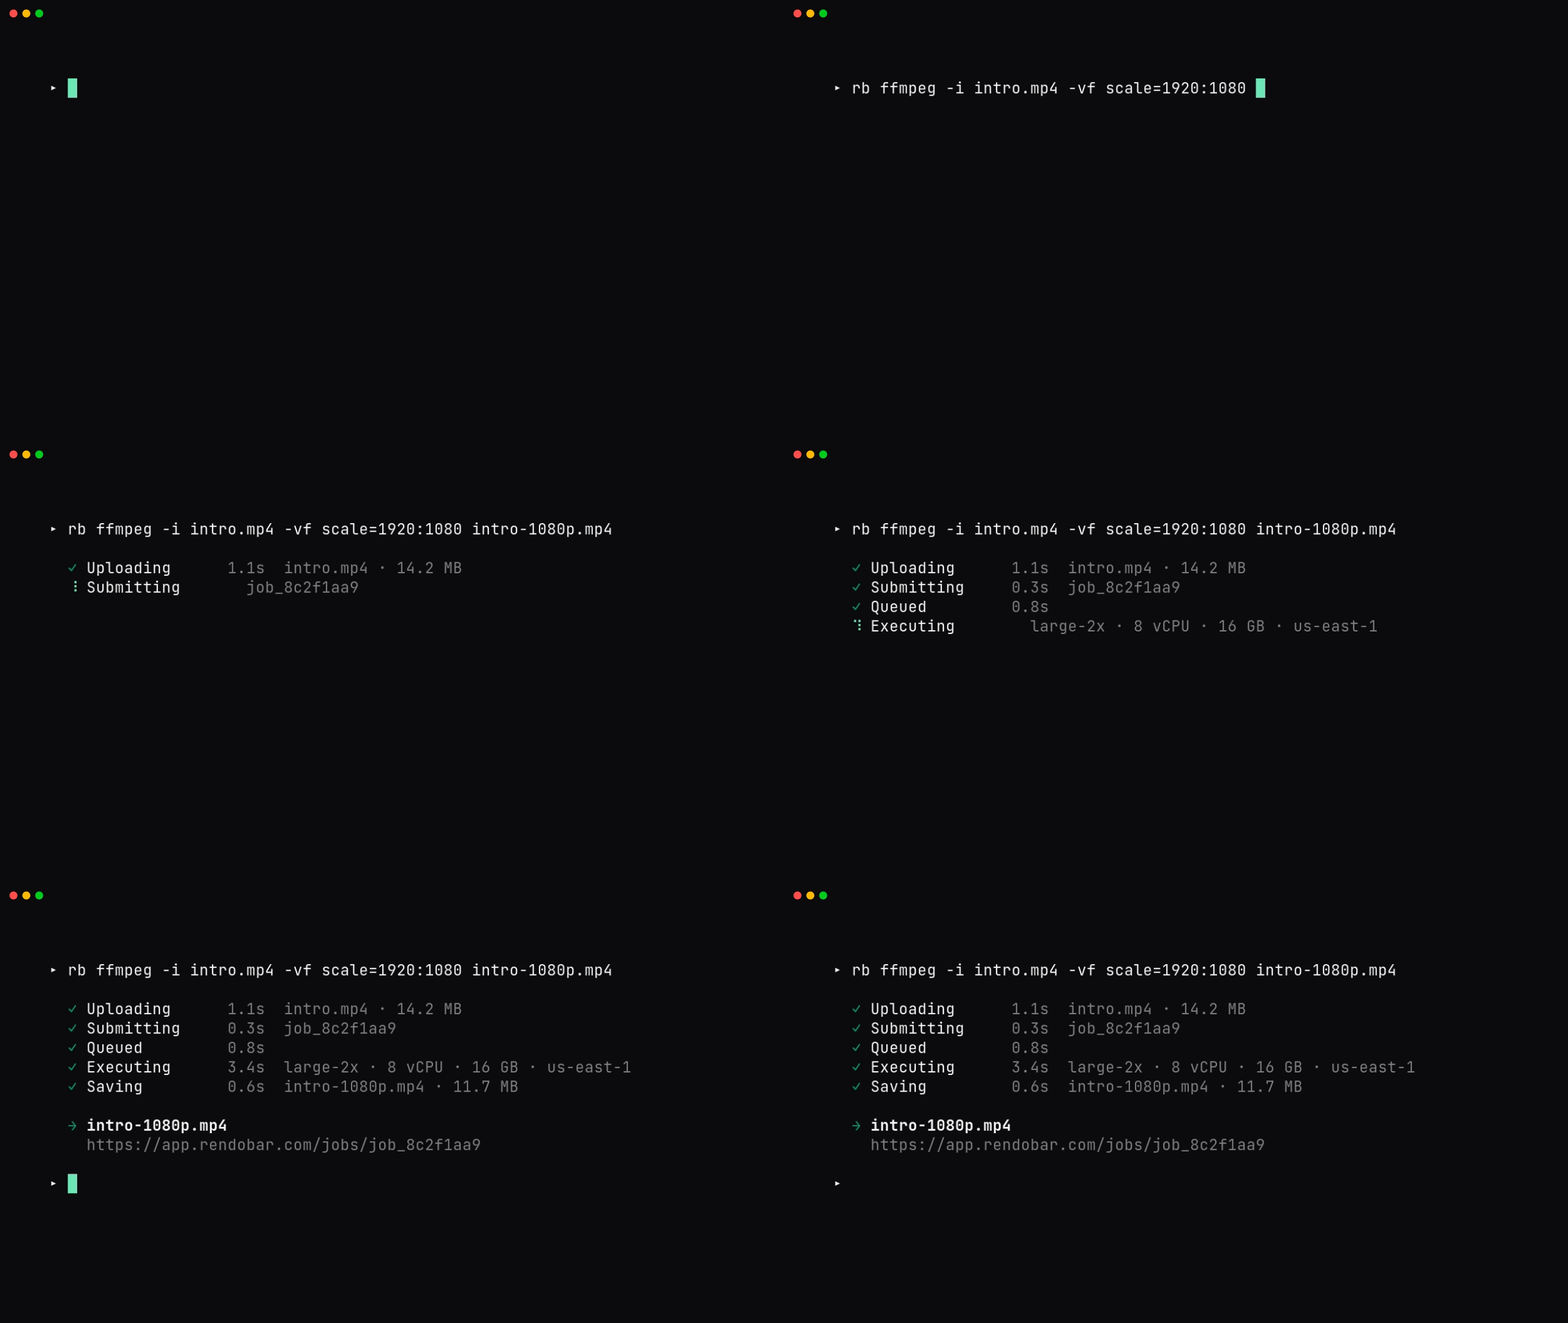
```bash theme={null}
curl -fsSL https://rendobar.com/install.sh | sh
rb login
rb ffmpeg -i clip.mp4 -vf scale=1280:720 -c:v libx264 -crf 23 out.mp4
```
That's the whole loop. `rb login` opens your browser for OAuth. The render command uploads `clip.mp4`, runs an [`ffmpeg`](/docs/jobs/ffmpeg) job, and writes the output to `out.mp4`. Progress goes to stderr, so stdout stays clean for piping.
For a Node or TypeScript program, or for any job type other than `ffmpeg`, use the [SDK](https://www.npmjs.com/package/@rendobar/sdk) instead. The CLI runs `ffmpeg` jobs and the auth around them, nothing else.
## Install
**macOS / Linux**
```bash theme={null}
curl -fsSL https://rendobar.com/install.sh | sh
```
**Windows**
```powershell theme={null}
irm https://rendobar.com/install.ps1 | iex
```
The installer pulls the matching release from [github.com/rendobar/cli/releases](https://github.com/rendobar/cli/releases), checks a SHA-256, drops `rb` at `~/.rendobar/bin/rb` (or `%USERPROFILE%\.rendobar\bin\rb.exe`), and adds it to your PATH. Open a new shell, then verify:
```bash theme={null}
rb --version
rb doctor
```
To pin a version for a Dockerfile or provisioning script, set `RENDOBAR_VERSION` before piping:
```bash theme={null}
RENDOBAR_VERSION=v1.0.0 curl -fsSL https://rendobar.com/install.sh | sh
```
`rb update` self-replaces the binary in place (SHA-256 verified, rolls back on failure). To remove `rb`, run `curl -fsSL https://rendobar.com/uninstall.sh | sh` (or the `.ps1` on Windows).
## Authenticate
The CLI reads credentials in priority order: the `RENDOBAR_API_KEY` env var, then a saved API key, then a saved OAuth token.
```bash theme={null}
rb login # browser OAuth, saves a refreshing token
rb login --key rb_xxx # paste a key for headless or SSH sessions
rb whoami # print org, plan, balance
rb logout # revoke the token and delete the credential file
```
`rb login` runs an OAuth 2.1 PKCE flow on `http://127.0.0.1:14832/callback`. Access tokens expire after 1 hour and refresh automatically, so you won't see a re-login prompt unless the token is revoked. Credentials live at `~/.config/rendobar/credentials.json` (`%APPDATA%\rendobar\credentials.json` on Windows). Treat that file as a secret.
Get an API key from [app.rendobar.com](https://app.rendobar.com) under Settings, API keys. Keys start with `rb_`.
## Commands
| Command | What it does |
| - | - |
| `rb ffmpeg ` | Run FFmpeg in the cloud. Pass real `ffmpeg` flags. Local `-i` inputs upload automatically |
| `rb storage list` | List the buckets connected on the [Storage page](https://app.rendobar.com/storage) |
| `rb storage ls [/folder]` | List folders and files in a connected bucket, each with its `storage://` URI. `--all` reads every page |
| `rb login [--key ]` | Sign in via browser OAuth, or save an API key with `--key` |
| `rb logout` | Revoke the token and delete the credential file |
| `rb whoami` | Print the current org, plan, and balance |
| `rb doctor [--fix]` | Run install and connectivity checks. `--fix` clears the macOS quarantine bit |
| `rb update` | Update `rb` to the latest release |
### rb ffmpeg flags
These flags belong to `rb ffmpeg`. Everything else after the subcommand passes through to FFmpeg verbatim.
| Flag | Effect |
| - | - |
| `--json` | Print the full job result as JSON to stdout |
| `--url-only` | Print only the signed result URL to stdout |
| `--quiet` | Print nothing. Read the exit code |
| `--no-wait` | Submit and exit, printing the job ID |
| `--timeout N` | Server-side execution timeout in seconds. Range 1 to 900, default 120 |
| `--deliver ` | Also write the output to connected storage, for example `storage://prod-media/exports`. Repeat for more buckets. Also on `rb generate` and `rb edit` |
Local inputs (`-i ./clip.mp4`) upload before submission and are rewritten to short-lived URLs. Remote inputs (`-i https://...`) pass through untouched. The trailing output filename is where the result downloads to.
A delivery starts after the job completes. rb waits up to five minutes for it and prints where each one landed.
`rb storage` needs storage access. If you signed in before rb asked for it, run `rb login` again, or use an API key made on or after September 13, 2026.
### Exit codes
| Code | Meaning |
| - | - |
| `0` | Success |
| `1` | Job failed, a delivery did not land, or a generic runtime error |
| `2` | Not authenticated, bad arguments, port in use, or insufficient credits |
| `130` | Cancelled with `Ctrl+C`. The CLI tries to cancel the in-flight job first |
## How do I run it in CI?
`RENDOBAR_API_KEY` is the only auth path for CI. It beats any saved credential and writes nothing to disk. Don't run `rb login` in a pipeline, the browser flow will hang.
```yaml title=".github/workflows/render.yml" theme={null}
jobs:
render:
runs-on: ubuntu-latest
steps:
- uses: actions/checkout@v4
- name: Install Rendobar CLI
run: |
curl -fsSL https://rendobar.com/install.sh | sh
echo "$HOME/.rendobar/bin" >> "$GITHUB_PATH"
env:
RENDOBAR_VERSION: v1.0.0
- name: Render
run: rb ffmpeg -i ./input.mp4 -c:v libx264 -crf 23 out.mp4
env:
RENDOBAR_API_KEY: ${{ secrets.RENDOBAR_API_KEY }}
- uses: actions/upload-artifact@v4
with:
name: rendered
path: out.mp4
```
`install.sh` updates PATH via shell rc files that later steps don't read, so the `echo … >> "$GITHUB_PATH"` line carries the install dir forward. The same pattern works in GitLab CI or Docker: install with `RENDOBAR_NO_MODIFY_PATH=1`, pass the key as a masked secret, and parse output with `--json` or `--url-only`.
```bash theme={null}
URL=$(rb ffmpeg --url-only -i in.mp4 -c:v libx264 out.mp4)
rb ffmpeg --json -i in.mp4 -c:v libx264 out.mp4 | jq -r '.id'
```
The CLI has no `--idempotency-key`. If a retried step must not double-charge, submit via the [SDK](https://www.npmjs.com/package/@rendobar/sdk) or [`POST /jobs`](/docs/jobs/ffmpeg) with an `idempotencyKey` field.
## What do I do when a command fails?
`rb doctor` runs the install and connectivity checks and prints a `fix:` line under any failure. Run it first. The three you'll actually hit:
> **rb: command not found after install**
>
> The shell hasn't reloaded. Open a new terminal, or `source ~/.zshrc` / `~/.bashrc`. If you set `RENDOBAR_NO_MODIFY_PATH=1` or a custom `RENDOBAR_INSTALL_DIR`, add it yourself: `export PATH="$HOME/.rendobar/bin:$PATH"`.
> **curl 403 or 429 during install**
>
> GitHub Releases rate-limits at 60/hr per IP when unauthenticated. Pass a token: `RENDOBAR_GITHUB_TOKEN=ghp_xxx curl -fsSL https://rendobar.com/install.sh | sh`. In GitHub Actions the default `GITHUB_TOKEN` is picked up automatically.
> **Login fails or port 14832 is in use**
>
> Another process holds the OAuth callback port, or your network blocks loopback HTTP. Skip the browser entirely: `rb login --key rb_xxx`. A `Refresh failed: invalid_grant` means the token was revoked, so run `rb logout && rb login`.
For anything else, run `rb doctor --json` and file a bug at [github.com/rendobar/cli/issues](https://github.com/rendobar/cli/issues).
## See also
* [FFmpeg job reference](/docs/jobs/ffmpeg): the API the CLI calls per run
* [API authentication](/docs/quickstart): keys and OAuth across REST and MCP
* [SDK](https://www.npmjs.com/package/@rendobar/sdk): every job type, typed, for Node and TypeScript
* [Changelog](https://rendobar.com/changelog/): version history and release notes
# Credits and billing
Source: https://rendobar.com/docs/concepts/credits
Get per-job nanodollar billing from a prepaid credit balance. Free includes a signup grant, Pro and Studio add monthly credits, and credits never expire.
Per-job billing from a prepaid credit balance. New accounts get \$5 free. [Compose](/docs/jobs/compose/pricing) bills per minute of the video you get back. Every other job type bills for the compute it consumed, including jobs that fail.
## Plans
| | Free | Pro | Studio |
| - | - | - | - |
| Price | \$0/mo | \$9/mo | \$29/mo |
| Signup credits | \$5 (one-time) | - | - |
| Monthly credits included | - | \$5 | \$20 |
| Credit-purchase bonus | - | +25% | +25% |
| Concurrent jobs | 1 | 20 | 50 |
| Queued backlog | 50 | 1000 | 2500 |
| API requests/min | 120 | 600 | 1200 |
| Max input file | 500 MB | 10 GB | 20 GB |
| Job timeout | 1 hour | 9 hours | 9 hours |
| Output retention | 7 days | 30 days | 90 days |
| Compose frame | Up to 1080p at 30 fps | Up to 1440p at 30 fps | Up to 4K at 60 fps |
| Compose with animated graphics | Up to 1080p at 30 fps | Up to 1080p at 30 fps | Up to 1080p at 30 fps |
| GPU FFmpeg (NVENC/CUDA) | No | Yes | Yes |
| Faster output delivery (an output of 512 MB or more streams into your bucket while it uploads) | No | No | Yes |
`ffmpeg`, MCP, and webhooks are on every plan. Compose costs the same per output minute on every plan. Animated graphics above 1080p or 30 fps need an enterprise plan. Full limits table: [Limits](/docs/support/limits).
For a full pricing breakdown and plan comparison, see [rendobar.com/pricing/](https://rendobar.com/pricing/).
## Credit packs
\$10 / \$25 / \$50 / \$100 (or custom, \$10 minimum). Pro and Studio add **+25%** to every purchase. Buy \$25, get \$31.25. Credits never expire.
## How does nanodollar billing work?
Every job is billed in nanodollars (one-billionth of a US dollar) drawn from your prepaid balance. This differs from tier-based quotas where you buy a plan with a bucket of minutes:
* **Cost matches the work.** Compute-billed jobs pay for the seconds they ran, and compose pays for the seconds of video it delivers. A 30-second 1080p job shouldn't cost the same as a 10-minute 4K render of a large master.
* **Prepaid means predictable budgets.** You top up when you want. Jobs run only if affordable. No end-of-month surprise bill.
## When is a job charged?
1. **Submit gate.** Submit is atomic and does not reject on concurrency. If your balance is greater than zero the job is accepted. Jobs run at your plan's concurrency and any extra wait in a queue, starting in order as slots free. We do not estimate cost at submit. For compose, `POST /compose/validate` returns the price before you submit. A zero balance returns `402 INSUFFICIENT_CREDITS`, and a full queue returns `429 QUEUE_FULL`.
2. **Execution.** Job runs. Balance untouched.
3. **Debit on terminal status.** Every terminal job (`complete`, `failed`, or `cancelled`) settles its charge here. The debit is atomic with the status update. [How is a job priced?](#how-is-a-job-priced) covers what each job type pays for.
4. **No auto-refund.** Failed compute-billed jobs are still charged for the compute they consumed. A failed compose render follows its own rule, below. If you believe a job failed due to a platform bug, contact support. Refunds are issued at our discretion via the dispute process.
## What happens when a balance goes negative?
Because the submit gate checks `balance > 0` rather than an estimate, a single long-running job can drive your balance briefly negative when the terminal debit lands. When that happens, further submits are blocked with `402 INSUFFICIENT_CREDITS` until you top up. Once your balance is positive again, jobs are accepted immediately. Nothing else on the account changes.
## How is a job priced?
`ffmpeg` bills per compute second, which is the wall-clock time FFmpeg ran your command, excluding upload and download. The same per-second rate applies whether the job completes successfully or fails partway through. Every job type except compose bills this way.
`compose` bills per second of the video you get back, at \$0.04 per minute of output on every plan, with a 15-second minimum per render. Frame size and animated graphics do not change the rate. Plans differ in what they can render. 1440p needs Pro, 4K and 60 fps need Studio, and a video above your plan returns `403 PLAN_LIMIT` before it renders. An enterprise plan carries its own contract rate. Email `hello@rendobar.com`.
A compose render that fails on Rendobar's side is free. When the failure may come from your input, such as the render tool exiting on a bad file, it pays for the compute it used at 2x. `POST /compose/validate` returns the price before you render. Full detail: [compose pricing](/docs/jobs/compose/pricing).
If your balance is at or below zero when you submit:
```json theme={null}
{ "error": { "code": "INSUFFICIENT_CREDITS", "message": "Balance is depleted. Add credits at https://app.rendobar.com/billing to keep submitting jobs." } }
```
HTTP `402`. Top up at [app.rendobar.com/billing](https://app.rendobar.com/billing).
## How do I check my balance?
```bash theme={null}
curl https://api.rendobar.com/billing/state \
-H "Authorization: Bearer rb_YOUR_KEY"
```
```json theme={null}
{
"data": {
"balance": { "amount": 5.0 },
"plan": { "slug": "free", "name": "Free" },
"subscription": { "status": "active", "cancelAtPeriodEnd": false },
"isPro": false
}
}
```
`balance.amount` is in dollars. Internally balances are stored in nanodollars (1 USD = 1,000,000,000).
## How do I track usage?
```bash theme={null}
curl "https://api.rendobar.com/billing/usage?start=2026-02-01&end=2026-02-09" \
-H "Authorization: Bearer rb_YOUR_KEY"
```
Returns daily usage by job type: count, amount charged, and compute seconds.
## Practical advice
* **Start on Free.** The \$5 signup grant covers 125 minutes of compose output, or many hundreds of small FFmpeg jobs.
* **Store `cost.nanodollars` from every response.** Reconcile against your monthly invoice.
## See also
* [Job lifecycle](/docs/concepts/job): where the debit happens
* [Limits](/docs/support/limits): full quota table
* [FFmpeg reference](/docs/jobs/ffmpeg): the per-compute-second cost model
* [Compose pricing](/docs/jobs/compose/pricing): the per-output-minute cost model
## Related
* [Plan limits and quotas](/docs/support/limits): exact rate, file, and storage caps per plan
* [Job lifecycle](/docs/concepts/job): when the debit lands and what statuses mean
* [Error codes](/docs/support/errors): `INSUFFICIENT_CREDITS`, `PLAN_LIMIT`, and friends
* [Pricing](https://rendobar.com/pricing/): plan comparison and credit packs
* [FAQ on cost](/docs/support/faq): common pricing and billing questions
# The Generation API
Source: https://rendobar.com/docs/concepts/generation
Generate images from a text prompt or edit them from an instruction on hosted diffusion models. One async API, one job shape, many models.
Rendobar's Generation API creates new media from a prompt on hosted diffusion models. It is one of the platform's products, and it submits, runs, and returns like every other job. You describe what you want, the job runs on a GPU, and the result comes back as a signed file URL.
## Modalities
Images are the first modality. You can generate an image from a text prompt, or edit existing images from a written instruction.
> **[Image generate](/docs/jobs/image-generate)**
>
> Turn a text prompt into a webp image. Pick a tier or pin an exact model.
> **[Image edit](/docs/jobs/image-edit)**
>
> Edit one to four reference images from a plain-language instruction.
More modalities will join the same surface over time. Only image generation and editing are available today.
## Should I pick a tier or an exact model?
Every generation job takes a `model`. You can name a tier and let the platform choose, or pin an exact model id.
* **Tiers** (`economy`, `standard`, `premium`) express a price and quality posture without naming a model. Omit `model` and you get `economy`.
* **Exact ids** (for example `qwen-image-2512`) pin the model and unlock its own controls, such as denoise steps, guidance, and a negative prompt.
Tier aliases can be re-pointed to newer models as the catalog grows. Pin an exact id when you need a result to stay stable across that change.
## How do I discover models?
`GET /models` returns the live catalog: every model with its supported jobs, tier, relative price, capabilities, and step range. Filter to one job type with `?job=`. Build a model picker against this endpoint instead of hardcoding the list.
```bash theme={null}
curl "https://api.rendobar.com/models" \
-H "Authorization: Bearer rb_YOUR_KEY"
```
```json theme={null}
{
"data": [
{
"id": "qwen-image-2512",
"jobs": ["image.generate"],
"tier": "premium",
"underReview": false,
"priceTier": "$$$$",
"maxRefImages": 0,
"steps": { "default": 50, "min": 20, "max": 50 },
"supports": { "negativePrompt": true, "guidance": true },
"enhanceDefault": false,
"status": "active"
}
]
}
```
`priceTier` compares models against each other, from `$` to `$$$$`. It is not a per-image charge, because jobs bill on the compute they actually use, cost-plus. See [credits and billing](/docs/concepts/credits).
A model with `underReview: true` is pulled from tier resolution while we re-evaluate its cost and quality. It stays listed so a caller pinning it can see why the submit was rejected, but no tier resolves to it and pinning it returns `VALIDATION_ERROR`.
## Does every model use the same job shape?
A generation job is a [job](/docs/concepts/job) like any other. You submit it to `POST /jobs`, it runs async, and you poll, [wait](/docs/sdk#wait), or receive a [webhook](/docs/guides/webhooks). The image jobs return a single webp file in `output.file`, with `output.data` set to `null`.
One thing is specific to generation. While the model denoises, the job emits `job.preview` events carrying a small frame of the image as it resolves, so a client can show the picture arriving instead of a spinner. Previews are decoration: they are never replayed, and a model can emit none. See [watch it render](/docs/jobs/image-generate#watch-it-render).
```ts theme={null}
import { createClient, outputUrl } from "@rendobar/sdk";
const client = createClient({ apiKey: "rb_YOUR_KEY" });
const job = await client.jobs.run({
type: "image.generate",
params: { prompt: "A paper boat on a still pond at dawn", model: "standard" },
});
console.log(outputUrl(job)); // signed URL to the webp
```
## See also
* [Image generate](/docs/jobs/image-generate): text to image, with the full model catalog
* [Image edit](/docs/jobs/image-edit): instruction editing with one to four reference images
* [Image upscale](/docs/jobs/image-upscale): enlarge an image without a prompt
* [How a job works](/docs/concepts/job): statuses and the output shape
* [SDK](/docs/sdk): `jobs.run`, `jobs.wait`, and reading the output
* [Credits and billing](/docs/concepts/credits): how compute-based billing works
# How a job works
Source: https://rendobar.com/docs/concepts/job
Run a job from a typed request, through async execution on our runners, to a signed output. The lifecycle, the statuses, and the output shape, in one place.
A job is one unit of media work. You describe it, submit it, and it runs on its own while you poll or wait for a webhook. Everything on Rendobar is a job, whether that is an FFmpeg command or animated captions. They all submit the same way and they all return the same shape.
Here is the whole round trip:
```mermaid theme={null}
sequenceDiagram
participant You
participant API as Rendobar API
participant Runner
You->>API: POST /jobs
API-->>You: id, status waiting
API->>Runner: dispatch with signed URLs
Runner->>Runner: download, run, upload
Runner-->>API: result callback
API-->>You: webhook job.completed
You->>API: poll GET /jobs
API-->>You: status complete, output
```
## What does a job look like?
Every job is a `type` plus the `inputs` and `params` that type expects:
```json theme={null}
{ "type": "ffmpeg", "inputs": { "source": "https://..." }, "params": { "command": "ffmpeg -i source out.mp4" } }
```
`type` picks the operation, `inputs` maps names to source URLs, and `params` carries the options for that type. `POST` it to `/jobs` and you get back an id and a `waiting` status. Each [job type](/docs/jobs/ffmpeg) documents its own `inputs` and `params`.
To also write the output to a bucket you own, add `destinations`. An input can come from that bucket too, as a `storage://` URI:
```json theme={null}
{ "type": "ffmpeg", "inputs": { "source": "storage://demo-bucket/raw/clip.mp4" }, "params": { "command": "ffmpeg -i source out.mp4" }, "destinations": ["storage://demo-bucket/exports"] }
```
See [storage connections](/docs/storage) for connecting a bucket and how outputs are named.
## What are the job statuses?
A job moves through six statuses. Three are terminal.
```mermaid theme={null}
flowchart LR
waiting --> dispatched --> running --> complete
running --> failed
waiting --> cancelled
dispatched --> cancelled
running --> cancelled
```
| Status | What it means |
| - | - |
| `waiting` | Saved and queued. The submit gate passed: auth, plan and rate limits, a balance check, and schema validation. |
| `dispatched` | Sent to a runner with presigned URLs for download and upload. |
| `running` | The runner is downloading inputs, running the work, and uploading the result. |
| `complete` | Finished. The `output` is ready. |
| `failed` | Errored. Read `error.code` and `error.message`. |
| `cancelled` | Stopped before it finished. |
On any terminal status the job is billed for the compute it used ([compose](/docs/jobs/compose/pricing) bills per second of output it delivers, and its failures follow their own rule), and a [webhook](/docs/guides/webhooks) fires if you configured one. A job that never started settles free. Failures carry an `error.code` from the [error catalogue](/docs/support/errors). A job that runs past its plan's time limit fails with `JOB_TIMEOUT` and is billed for the compute it consumed, except a compose render, which is free. A job a runner accepted but never started fails with `RUNNER_TIMEOUT` and is not charged. Cancelling a `running` job stops the upstream execution too.
## What does a job return?
A `complete` job carries one `output`. The shape is the same for every type, so you never branch on the job type to find the result.
```json theme={null}
{
"data": | null,
"file": | null,
"files": [],
"expiresAt": | null
}
```
**data** `object | null`
The computed answer for jobs that return one, such as a probe result or a transcript. `null` for jobs that only write files.
**file** `File | null`
The headline result you play or download: a single file, or a stream manifest (`.m3u8` / `.mpd`). `null` for data-only jobs and pure file sets. Always one of `files`.
**files** `File[]`
Every file the job produced. One entry for a single output, the manifest plus segments for a stream, every member for a set. `[]` for data-only jobs.
**expiresAt** `integer | null`
Unix ms when the URLs expire. Re-fetch the job with `GET /jobs/{id}` to mint fresh ones.
> [!TIP]
>
> Expecting one output? Read `output.file.url` and you are done. Handling a job that can write many files (frames, HLS segments, a resolution ladder)? Iterate `output.files`. The two always agree: `file`, when set, is one of `files`.
### The File type
Each entry in `file` and `files` is the same shape:
```json theme={null}
{
"url": "https://api.rendobar.com/dl/job_abc123?token=",
"path": "output.mp4",
"type": "video",
"size": 4194304,
"sha256": "9f2c41d0b7a3e5f48c1d6e02a97b3c5f1e8d4a60b2c7f9e3d5a1b8c4e6f0a41e",
"meta": { "format": "mp4", "width": 1280, "height": 720, "durationMs": 30000 }
}
```
`url` is a signed link that expires at `output.expiresAt`. `path` is the filename the job wrote. `type` is an open enum (`video`, `image`, `audio`, `captions`, `playlist`, `data`, `other`), so tolerate values you do not recognize. `size` is bytes, and `meta` carries probed `format`, `width`, `height`, and `durationMs` when known.
`sha256` is the SHA-256 of the file's bytes as 64 lowercase hex characters. Hash your download, or the copy delivered to your own bucket, and compare the two strings to confirm you have the file the job produced. The field is always present. It is `null` for a job that completed before 10 October 2026 and for the individual files of a multi-file output.
### Four patterns, one shape
Which fields are populated depends on what the job produced.
**Single file**
The common case for transform jobs. `file` is the output, `files` lists it, `data` is null.
```json theme={null}
{
"data": null,
"file": { "url": "https://api.rendobar.com/dl/job_abc123?token=", "path": "output.mp4", "type": "video", "size": 4194304, "sha256": "9f2c41d0b7a3e5f48c1d6e02a97b3c5f1e8d4a60b2c7f9e3d5a1b8c4e6f0a41e" },
"files": [
{ "url": "https://api.rendobar.com/dl/job_abc123?token=", "path": "output.mp4", "type": "video", "size": 4194304, "sha256": "9f2c41d0b7a3e5f48c1d6e02a97b3c5f1e8d4a60b2c7f9e3d5a1b8c4e6f0a41e" }
],
"expiresAt": 1735689600000
}
```
**Stream**
An HLS or DASH stream. `file` is the manifest, typed `playlist`. Point a player at `file.url`. `files` carries the manifest plus every segment.
```json theme={null}
{
"data": null,
"file": { "url": "https://api.rendobar.com/v/job_abc123//master.m3u8", "path": "master.m3u8", "type": "playlist", "size": 412, "sha256": null },
"files": [
{ "url": "https://api.rendobar.com/v/job_abc123//master.m3u8", "path": "master.m3u8", "type": "playlist", "size": 412, "sha256": null },
{ "url": "https://api.rendobar.com/v/job_abc123//seg_000.ts", "path": "seg_000.ts", "type": "video", "size": 1048576, "sha256": null }
],
"expiresAt": 1735689600000
}
```
**Set**
An unordered set with no single headline, such as an image sequence or a resolution ladder. `file` is `null`, read `files`.
```json theme={null}
{
"data": null,
"file": null,
"files": [
{ "url": "https://api.rendobar.com/v/job_abc123//frame_000.png", "path": "frame_000.png", "type": "image", "size": 204800, "sha256": null },
{ "url": "https://api.rendobar.com/v/job_abc123//frame_001.png", "path": "frame_001.png", "type": "image", "size": 205120, "sha256": null }
],
"expiresAt": 1735689600000
}
```
**Data only**
A job that computes an answer instead of writing files. `data` carries it, the rest are empty.
```json theme={null}
{
"data": { "width": 1280, "height": 720, "durationMs": 30000, "codec": "h264", "fps": 30 },
"file": null,
"files": [],
"expiresAt": null
}
```
### Reading it
The read path is the same every time. No job-type discriminator.
```ts theme={null}
const { data: job } = await res.json();
if (job.output.data) console.log(job.output.data); // computed answer
if (job.output.file) console.log(job.output.file.url); // the thing to play or download
for (const f of job.output.files) console.log(f.path, f.type, f.size); // the full list
```
Three invariants hold for every type, so you can code against them: `output.file` is always one of `output.files` (or `null`), `expiresAt` is set whenever `files` is non-empty, and a `complete` job always has `output.data` or `output.files`. It never returns nothing.
## Should I poll or use webhooks?
Poll `GET /jobs/{id}` every second or two until the status is terminal, or skip polling entirely: register a [webhook](/docs/guides/webhooks) and Rendobar pushes `job.completed` to your server the moment the job lands.
## See also
* [Webhooks](/docs/guides/webhooks): push status changes instead of polling
* [Credits and billing](/docs/concepts/credits): how the terminal debit works
* [Error codes](/docs/support/errors): every `error.code` a failed job returns
* [FFmpeg](/docs/jobs/ffmpeg): a job type end to end
* [Compose](/docs/jobs/compose): a render described as a JSON timeline
* [Compress](/docs/jobs/compress): a job that searches encodes to hit a budget
* [Animated captions](/docs/jobs/captions/animate): a job that transcribes and renders
* [Generate an image](/docs/jobs/image-generate): the same job shape on a diffusion model
# Scopes and access
Source: https://rendobar.com/docs/concepts/scopes
Configure an API key to hold only what your code needs, see what an app asks for before you allow it, and read the 403 that names a missing scope.
Every credential carries scopes, and every endpoint states the one it needs. What a caller may do
comes from what it was granted, not from whether it authenticated with an API key, an OAuth token
or a dashboard session.
## Which scopes exist?
Seven resources, each with a read and a write scope.
| Resource | Read | Write | Write lets it |
| - | - | - | - |
| Jobs | `jobs:read` | `jobs:write` | Run jobs, which spends credits |
| Assets | `assets:read` | `assets:write` | Upload and delete files |
| Webhooks | `webhooks:read` | `webhooks:write` | Change where events are delivered |
| Billing | `billing:read` | `billing:write` | Change the plan and what you are charged |
| Organization | `orgs:read` | `orgs:write` | Add and remove members |
| API keys | `keys:read` | `keys:write` | Create keys that act outside the session |
| Storage | `storage:read` | `storage:write` | Connect, change and remove buckets |
Two rules cover the rest:
* **`write` includes `read`.** A credential holding `jobs:write` can list jobs. You never need both.
* **Self-description is never scoped.** Any credential can ask which workspace it acts for and what
limits apply, whatever else it holds.
## How do I narrow an API key?
Pass `scopes` when you create a key and it can do only that.
```ts SDK theme={null}
const key = await rendobar.apiKeys.create({
name: "CI deploy key",
scopes: ["jobs:write", "assets:write"],
});
key.scopes; // what it actually got
```
```bash cURL theme={null}
curl -X POST https://api.rendobar.com/api-keys \
-H "Authorization: Bearer $RENDOBAR_API_KEY" \
-H "Content-Type: application/json" \
-d '{"name":"CI deploy key","scopes":["jobs:write","assets:write"]}'
```
Omit `scopes` and the key gets everything the credential creating it can pass on, which for a
dashboard session is everything a key may hold. The response reports what the key actually
received, which is not always what was asked for.
Two limits apply to every key, however it was made:
* **A key can never hold `keys:write`.** A key that can create keys survives its own revocation, so
one leak becomes permanent access. Create and revoke keys from the dashboard, or from an app you
granted key management to.
* **A key is never broader than what created it.** Asking for more than the creating credential
holds is refused rather than quietly narrowed.
## What is an app asking for?
When you connect an app over OAuth, the consent screen lists what it requested, area by area, with
what each one lets it do. You can grant less than it asked for, and the app receives exactly what
you allowed.
A grant is bound to **one workspace**, the one named on the screen when you approved it. The same
app connected to a second workspace is a second grant.
[Account, Security](https://app.rendobar.com/account/security) lists every connected app with what
it can reach and where. Revoking deletes the grant and every stored token, so the app cannot get new
access or renew what it has. An access token it already holds stays valid until it expires, which is
under an hour.
## What happens when a scope is missing?
A request outside a credential's scopes is refused with `403` and a header naming what was missing,
per [RFC 6750](https://datatracker.ietf.org/doc/html/rfc6750#section-3.1).
```http theme={null}
HTTP/1.1 403 Forbidden
WWW-Authenticate: Bearer error="insufficient_scope",
error_description="This endpoint requires the jobs:write scope.",
scope="jobs:write"
```
```json theme={null}
{
"error": {
"code": "INSUFFICIENT_SCOPE",
"message": "This endpoint requires the jobs:write scope."
}
}
```
It is a `403`, not a `401`: the credential authenticated correctly and presenting it again cannot
help. Read the `scope` parameter to see what to ask for, then create a key that carries it or
reconnect the app and allow that area.
Storage scopes were added on 2026-09-13. Keys created and apps connected before then do not hold
them, so the [storage](/docs/storage) endpoints and `client.storage` answer them with this `403`. Create a
new key, or reconnect the app and allow Storage. A job that reads from or delivers to a connected
bucket needs only `jobs:write`, so existing keys still run those.
## See also
* [MCP server](/docs/mcp-server): connecting an app over OAuth
* [Error codes](/docs/support/errors): every code the API returns
* [Plan limits](/docs/support/limits): what a plan allows, which is a separate question from what a
credential may do
# Per-job completion callbacks
Source: https://rendobar.com/docs/guides/callbacks
Add a completion callback to a single job, POST the result to a per-job URL, and resume a Cloudflare Workflow without polling.
A callback attaches a completion hook to one [job](/docs/concepts/job). You pass `callback.url` when you create the job, and the moment that job reaches a terminal state Rendobar POSTs the result there. The body is byte-identical to the [webhook](/docs/guides/webhooks) envelope, so the same receiver code handles both. The correlation lives in the URL you chose, so the receiver stays stateless and never polls `GET /jobs/{id}`.
## How do I attach a callback?
Add a `callback` object to `client.jobs.create(...)`. The only required field is `url`.
```ts theme={null}
import { createClient } from "@rendobar/sdk";
const client = createClient({ apiKey: process.env.RENDOBAR_API_KEY });
await client.jobs.create({
type: "ffmpeg",
params: { command: "ffmpeg -i input.mp4 -t 1 output.mp4" },
callback: { url: "https://your-app.example.com/rb/job_a1b2c3d4" },
});
```
| Field | Type | Purpose |
| - | - | - |
| `callback.url` | string, HTTPS | Where Rendobar POSTs the job envelope on any terminal state (`complete`, `failed`, `cancelled`). SSRF-validated, HTTPS only. |
| `callback.headers` | object, optional | Extra request headers on the POST, for example `{ Authorization: "Bearer ..." }`, so the callback can hit an authenticated target directly. |
| `callback.verify` | boolean, optional | Sign the POST with `X-Rendobar-Signature`. Default `false`. |
| `callback.events` | string\[], optional | Opt into extra non-terminal events. The only value today is `"job.started"`. |
> [!NOTE]
>
> Terminal events (`complete`, `failed`, `cancelled`) always fire and cannot be filtered out, so a step waiting on a callback can never hang. `callback.events` only adds non-terminal pings on top. The one available today is `"job.started"`, a progress signal sent when the job begins running.
A job with `destinations` also sends `job.deliveries_settled` to `callback.url` once every destination has resolved. It is the only [delivery event](/docs/storage#delivery-events) a callback receives.
Custom headers let the POST reach an authenticated endpoint with no receiver of your own. Framing headers and any `X-Rendobar-*` header are reserved. If you set one, the platform's value wins.
> [!WARNING]
>
> Rendobar never returns `callback.url` or `callback.headers` in any API response. Both are secrets. `GET /jobs/{id}` reports only `callback.status`.
## Resume a Cloudflare Workflow
Callbacks were built for this pattern. A Cloudflare Workflow dispatches a job and suspends until it finishes, with no polling in between. There are two shapes.
### Shape A: receiver Worker with sendEvent
The Workflow's own `fetch` handler is the receiver. The callback URL carries `event.instanceId`, the receiver route turns the POST into `instance.sendEvent(...)`, and that resumes the suspended `waitForEvent`. This exact suspend and resume loop was verified end to end.
```ts theme={null}
import { WorkflowEntrypoint, WorkflowStep, WorkflowEvent } from "cloudflare:workers";
import { createClient } from "@rendobar/sdk";
export class RenderJob extends WorkflowEntrypoint {
async run(event: WorkflowEvent<{ source: string }>, step: WorkflowStep) {
await step.do("submit rendobar job", async () => {
const client = createClient({ apiKey: this.env.RENDOBAR_API_KEY });
await client.jobs.create({
type: "ffmpeg",
params: { command: `ffmpeg -i ${event.payload.source} -t 1 output.mp4` },
// The instance id in the path is how the callback finds this exact run.
callback: { url: `https://your-worker.example.com/rb/${event.instanceId}` },
});
});
// Suspend the whole workflow until Rendobar calls back. No polling.
const done = await step.waitForEvent("await rendobar callback", {
type: "rb-job",
timeout: "10 minutes",
});
return { url: done.payload?.data?.output?.file?.url };
}
}
export default {
async fetch(req: Request, env: Env): Promise {
const url = new URL(req.url);
const m = url.pathname.match(/^\/rb\/(.+)$/);
if (req.method === "POST" && m) {
const instance = await env.RENDER_JOB.get(m[1]);
await instance.sendEvent({ type: "rb-job", payload: await req.json() });
return new Response("ok");
}
return new Response("not found", { status: 404 });
},
};
```
### Shape B: no receiver Worker
Point `callback.url` straight at Cloudflare's Workflows "send event" REST endpoint for the instance, and put your Cloudflare API token in `callback.headers`. Rendobar POSTs the job result directly to Cloudflare, so there is no shim to deploy. This is the zero-infrastructure option. The caller authenticates the callback itself through the header, so signing is usually unnecessary here.
```ts theme={null}
await client.jobs.create({
type: "ffmpeg",
params: { command: `ffmpeg -i ${source} -t 1 output.mp4` },
callback: {
url: `https://api.cloudflare.com/client/v4/accounts/${ACCOUNT_ID}/workflows/render-job/instances/${instanceId}/events/rb-job`,
headers: { Authorization: `Bearer ${CF_API_TOKEN}` },
},
});
```
The waiting Workflow is the same as Shape A. It calls `waitForEvent({ type: "rb-job" })` and resumes when Cloudflare delivers the event.
## How do I secure a callback?
Callbacks are unsigned by default because the URL itself is the capability. Set `callback.verify: true` to sign the POST, then check it on your receiver. The signature is the same HMAC-SHA256 scheme as webhooks, over `${timestamp}.${body}`, and the SDK ships the same verifier.
```ts theme={null}
import { verifyCallback } from "@rendobar/sdk/webhooks";
// Raw body (a string, not parsed JSON) plus the request headers.
const ok = await verifyCallback(rawBody, req.headers, process.env.CALLBACK_SECRET);
if (!ok) throw new Error("invalid signature");
```
`verifyCallback` is the same function as `verifyWebhook`. Fetch the organization callback signing secret once and store it in your secret manager.
```ts theme={null}
// GET /orgs/current/callback-secret -> { data: { secret: "cbsec_..." } }
const { data } = await client.orgs.getCallbackSecret();
```
Rotate the secret with `POST /orgs/current/callback-secret/rotate`. Reach for signing when the callback lands on an endpoint you own and you want to prove the POST came from Rendobar. For Shape B, where you already authenticate to Cloudflare through `callback.headers`, signing usually adds nothing.
## How do I watch delivery?
Once a job carries a callback, `GET /jobs/{id}` reports its delivery state under `callback.status`.
| Status | Meaning |
| - | - |
| `pending` | The job is not terminal yet, or the callback is queued for delivery |
| `delivered` | The receiver returned `2xx` |
| `failed` | Delivery exhausted its retries and moved to the dead-letter path |
The dashboard job detail view shows the same status. Delivery is at-least-once, with retries and a dead-letter path, so the same event can arrive more than once. Deduplicate on the `X-Rendobar-Delivery` header, a `whd_...` id that is unique per delivery. Every POST carries these headers.
```
X-Rendobar-Event: job.completed
X-Rendobar-Delivery: whd_x1y2z3
X-Rendobar-Timestamp: 1707436815
X-Rendobar-Attempt: 1
```
## How do callbacks compare to org webhooks?
[Webhooks](/docs/guides/webhooks) and callbacks carry the identical envelope and verify with the same code. The difference is scope. A webhook is one static URL registered in the dashboard that receives events for every job in the organization. A callback is a per-job URL, set at create time, that receives events for exactly one job. Webhooks fit a central event pipeline. Callbacks fit an orchestrator that dispatches a job and waits on that one job, such as the Cloudflare Workflow above.
## Related
* [Webhooks for job events](/docs/guides/webhooks): the shared envelope, signature scheme, and retry behavior
* [Job output](/docs/concepts/job#the-output): the `output` and `error` shape a callback carries
* [Job lifecycle](/docs/concepts/job): what each terminal state means
* [Changelog](https://rendobar.com/changelog/): callback and webhook payload changes
# Webhooks for job events
Source: https://rendobar.com/docs/guides/webhooks
Receive job and account events as signed HMAC POSTs. Create an endpoint in the dashboard, verify with one SDK call, and handle retries.
Webhooks push events to your server the moment a [job](/docs/concepts/job) changes status or your balance runs low. No polling. Rendobar POSTs a signed JSON payload, your server verifies it and reacts.
> [!NOTE]
>
> Want a hook scoped to a single job instead of every job in the organization? See [per-job callbacks](/docs/guides/callbacks).
## How do I create an endpoint?
Create and manage endpoints on the [**Webhooks page**](https://app.rendobar.com/webhooks) in the dashboard.
1. Open [**Webhooks**](https://app.rendobar.com/webhooks) and click **New Endpoint**.
2. Name it, paste your **HTTPS** URL, and check the events you want. New endpoints start with `job.completed`, `job.failed`, and `job.cancelled` selected.
3. Click **Create Endpoint**, then copy the signing secret (`whsec_...`). It is shown once, so store it in your secret manager.
Each endpoint gets a card where you edit events, rotate the secret, send a test delivery, and re-send anything that failed. An organization can have up to 10.
> [!TIP]
>
> Hit **Send Test** on the card to fire a sample event and confirm your receiver returns `2xx` before real jobs start flowing.
## Events
| Event | When |
| - | - |
| `job.created` | Job accepted and queued |
| `job.started` | Job started executing on a runner |
| `job.completed` | Job finished successfully. Carries the unified `output` and `cost` |
| `job.failed` | Job failed. Carries the unified `error` (`code`, `message`, `detail`, `retryable`) |
| `job.cancelled` | Job was cancelled |
| `job.delivery_succeeded` | The output was written to one [storage destination](/docs/storage#delivery-events). Carries `storageId`, `path`, and `url` |
| `job.delivery_failed` | Writing the output to one storage destination failed. Carries `storageId` and the [`reason`](/docs/storage#delivery-errors) |
| `job.deliveries_settled` | Every storage destination of the job has resolved. Sent once, with every outcome |
| `balance.low` | Credit balance crossed the low threshold |
| `balance.depleted` | Credit balance reached zero |
## How do I verify a delivery?
Rendobar signs each payload. Check the signature before you trust the body. The SDK does it in one call.
```ts theme={null}
import { verifyWebhook } from "@rendobar/sdk/webhooks";
// Raw body (a string, not parsed JSON) plus the request headers.
const ok = await verifyWebhook(rawBody, req.headers, process.env.WEBHOOK_SECRET);
if (!ok) throw new Error("invalid signature");
```
`verifyWebhook` rebuilds the signed string, checks the HMAC, rejects stale deliveries so a captured request cannot be replayed, and accepts either secret during a [rotation](#how-do-i-rotate-the-signing-secret). It has no dependencies and runs on Node, Deno, Bun, Cloudflare Workers, and the browser.
A full receiver on Express. The one rule: verify the raw bytes, before any JSON parser touches them.
```ts theme={null}
import express from "express";
import { verifyWebhook } from "@rendobar/sdk/webhooks";
const app = express();
app.post(
"/webhooks/rendobar",
express.raw({ type: "application/json" }),
async (req, res) => {
const raw = req.body.toString("utf8");
if (!(await verifyWebhook(raw, req.headers, process.env.WEBHOOK_SECRET))) {
return res.status(401).send("invalid signature");
}
res.status(200).send("ok"); // ack fast, then work off the request path
const { event, data } = JSON.parse(raw);
if (event === "job.completed") console.log(data.jobId, data.output.file?.url);
},
);
app.listen(3000);
```
Not on Node? The signature is HMAC-SHA256 over `{timestamp}.{body}`, hex-encoded, in `X-Rendobar-Signature` as `sha256=`.
```javascript Node.js theme={null}
import { createHmac, timingSafeEqual } from "crypto";
function verify(body, signature, timestamp, secret) {
const message = `${timestamp}.${body}`;
const expected = createHmac("sha256", secret).update(message).digest("hex");
const received = signature.replace("sha256=", "");
return timingSafeEqual(Buffer.from(expected, "hex"), Buffer.from(received, "hex"));
}
```
```python Python theme={null}
import hmac, hashlib
def verify_webhook(body: bytes, signature: str, timestamp: str, secret: str) -> bool:
message = f"{timestamp}.{body.decode()}"
expected = hmac.new(secret.encode(), message.encode(), hashlib.sha256).hexdigest()
return hmac.compare_digest(expected, signature.replace("sha256=", ""))
```
> [!WARNING]
>
> Compare with a timing-safe function (`timingSafeEqual`, `hmac.compare_digest`). Plain string equality leaks the signature one byte at a time.
## What is in the payload?
Every delivery carries these headers.
```
X-Rendobar-Signature: sha256=abc123...
X-Rendobar-Timestamp: 1707436815
X-Rendobar-Event: job.completed
X-Rendobar-Delivery: whd_x1y2z3
X-Rendobar-Attempt: 1
```
The body is a versioned envelope. The envelope fields identify the event and delivery. The event payload lives under `data`, which for job events matches [GET /jobs/](/docs/concepts/job#the-output).
| Field | Meaning |
| - | - |
| `version` | Envelope schema version (currently `"1"`) |
| `event` | The event name |
| `deliveryId` | Unique per delivery. Use it to deduplicate |
| `timestamp` | When the envelope was built (unix ms) |
| `orgId` | Your organization ID |
| `data` | Event-specific payload |
A `job.completed` delivery. `output.file.url` is a signed, time-limited URL, and `output.files` lists every produced file.
```json theme={null}
{
"version": "1",
"event": "job.completed",
"deliveryId": "whd_x1y2z3",
"timestamp": 1707436815000,
"orgId": "org_abc123",
"data": {
"jobId": "job_a1b2c3d4",
"jobType": "ffmpeg",
"status": "complete",
"output": {
"data": null,
"file": {
"url": "https://r2.rendobar.com/...",
"path": "output.mp4",
"type": "video",
"size": 15234567,
"sha256": "9f2c41d0b7a3e5f48c1d6e02a97b3c5f1e8d4a60b2c7f9e3d5a1b8c4e6f0a41e",
"meta": { "format": "mp4", "width": 1920, "height": 1080, "durationMs": 127500 }
},
"files": [{ "url": "https://r2.rendobar.com/...", "path": "output.mp4", "type": "video", "size": 15234567, "sha256": "9f2c41d0b7a3e5f48c1d6e02a97b3c5f1e8d4a60b2c7f9e3d5a1b8c4e6f0a41e" }],
"expiresAt": 1707440415000
},
"cost": { "amount": 50000000, "currency": "USD", "formatted": "$0.05" },
"timing": { "createdAt": 1707436800000, "startedAt": 1707436805000, "completedAt": 1707436815000 }
}
}
```
The `output` shape is identical for every job type. A data-only job (such as `ffprobe`) puts its answer in `output.data` with `file` null. See [Job output](/docs/concepts/job#the-output) for each pattern.
For `job.failed`, `data` carries `error` instead of `output`.
```json theme={null}
"data": {
"jobId": "job_a1b2c3d4",
"jobType": "ffmpeg",
"status": "failed",
"error": {
"code": "RUNNER_ERROR",
"message": "FFmpeg process exited with code 1",
"detail": "Invalid data found when processing input",
"retryable": false
}
}
```
## What happens when a delivery fails?
If your endpoint does not return `2xx` within 10 seconds, Rendobar retries up to 5 times, doubling the wait each attempt.
| Retry | Wait |
| - | - |
| 1st | 10 s |
| 2nd | 20 s |
| 3rd | 40 s |
| 4th | 80 s |
| 5th | 160 s |
After that the delivery is marked `failed`. Re-send a `failed` or `cancelled` delivery from the card, or from code:
```ts theme={null}
await client.webhooks.retryDelivery(deliveryId);
```
An endpoint that fails 10 deliveries in a row is disabled automatically and flagged in the dashboard. Update or re-enable it to reset the counter.
## How do I rotate the signing secret?
Rotate from the card, or with `client.webhooks.rotateSecret(endpointId)`. For 24 hours Rendobar signs with both secrets, sending `X-Rendobar-Signature` (new) and `X-Rendobar-Signature-Previous` (old), so `verifyWebhook` keeps passing while you roll the new one out. After the window the old secret stops signing. An endpoint can rotate once per 24 hours.
> [!NOTE]
>
> Endpoint URLs must be HTTPS. Delivery to private and reserved ranges (`10.x`, `172.16-31.x`, `192.168.x`, `127.x`, `::1`) is blocked to prevent SSRF, so point webhooks at a publicly reachable host.
## Best practices
* **Return 200 fast.** Acknowledge, then process asynchronously. A slow handler trips the 10-second timeout and earns a duplicate delivery.
* **Deduplicate** on `X-Rendobar-Delivery` (or `data.jobId`). The same event can arrive twice after a retry.
* **Verify every signature** before you read the body.
## Related
* [Job output](/docs/concepts/job#the-output): the `output` and `error` shape this payload carries
* [Job lifecycle](/docs/concepts/job): what each status means
* [Error codes](/docs/support/errors): the codes inside `job.failed` payloads
* [Changelog](https://rendobar.com/changelog/): webhook payload changes and new events
# Docs for the media processing API
Source: https://rendobar.com/docs/index
Start with the quickstart, then browse job types, storage connections, automation platforms, and the SDK, CLI and MCP server.
Rendobar runs media jobs on our infrastructure and hands back a finished file. You POST a job with your inputs, we execute it on isolated cloud workers, and you collect the output by webhook or by polling. One endpoint covers raw FFmpeg, media inspection, timeline composition, compression, captions, and image generation.
> **[Quickstart](/docs/quickstart)**
>
> Submit your first job, poll it to completion, and download the result.
> **[Build with AI](/docs/build-with-ai)**
>
> Hand your coding agent one prompt and let it write the integration.
## How does a job work?
Every job shares the same shape, whatever its type. Read [how a job works](/docs/concepts/job) for the lifecycle and the output contract, [scopes and access](/docs/concepts/scopes) for what an API key is allowed to do, and [credits](/docs/concepts/credits) for how work is billed.
Results arrive two ways: [webhooks](/docs/guides/webhooks) for signed delivery to your endpoint, or [callbacks](/docs/guides/callbacks) when you want the job to call your own service.
## Job types
> **[FFmpeg](/docs/jobs/ffmpeg)**
>
> Run any FFmpeg command in a sandbox, with guardrails.
> **[ffprobe](/docs/jobs/ffprobe)**
>
> Probe media metadata from a URL, normalized plus raw.
> **[Compose](/docs/jobs/compose)**
>
> Render video from a declarative JSON timeline.
> **[Compress](/docs/jobs/compress)**
>
> Shrink a file to a target size or quality budget.
> **[Captions](/docs/jobs/captions/animate)**
>
> Burn static subtitles or animate word-level captions.
> **[Generate images](/docs/jobs/image-generate)**
>
> Generate, edit and upscale images on hosted models.
## Bring your own storage
Connect a bucket you own and jobs read inputs from it and write outputs back, so your files never need to be public. Start at [storage connections](/docs/storage), then pick your provider: [Cloudflare R2](/docs/storage/cloudflare-r2), [Amazon S3](/docs/storage/amazon-s3), [Supabase](/docs/storage/supabase), or any [S3-compatible](/docs/storage/s3-compatible) bucket.
## Automation and tooling
> **[Automation](/docs/automation)**
>
> Run jobs from n8n or Activepieces, no code required.
> **[SDK and CLI](/docs/sdk)**
>
> TypeScript SDK, plus the rb command line tool.
> **[MCP server](/docs/mcp-server)**
>
> Let Claude, Cursor and other agents run jobs directly.
## What do I do when something goes wrong?
Check the [FAQ](/docs/support/faq) first, then [error codes](/docs/support/errors) to handle failures by machine code rather than message text. [Limits](/docs/support/limits) covers plan caps, and [versioning](/docs/support/versioning) covers how the API changes.
# Animated word-level captions
Source: https://rendobar.com/docs/jobs/captions/animate
Generate animated word-level captions from a video, with 11 style presets, custom fonts, auto-emphasis, and translation.
The `captions.animate` job returns a video with word-level animated captions burned in. Speech is automatically transcribed, segmented into timed cues, and rendered as styled subtitles burned onto the source.
> [!NOTE]
>
> **Accepts:** video · **Type:** `captions.animate`
## Request
```ts SDK theme={null}
import { createClient, outputUrl } from "@rendobar/sdk";
const client = createClient({ apiKey: "rb_YOUR_KEY" });
const job = await client.jobs.create({
type: "captions.animate",
inputs: {
source: "https://cdn.rendobar.com/assets/examples/sample.mp4",
},
params: { preset: "hormozi", mode: "balanced" },
});
const result = await client.jobs.wait(job.id);
console.log(outputUrl(result));
```
```python Python theme={null}
import requests
res = requests.post(
"https://api.rendobar.com/jobs",
headers={"Authorization": "Bearer rb_YOUR_KEY"},
json={
"type": "captions.animate",
"inputs": {
"source": "https://cdn.rendobar.com/assets/examples/sample.mp4",
},
"params": {
"preset": "hormozi",
"mode": "balanced",
},
},
)
```
```bash cURL theme={null}
curl -X POST https://api.rendobar.com/jobs \
-H "Authorization: Bearer rb_YOUR_KEY" \
-H "Content-Type: application/json" \
-d '{
"type": "captions.animate",
"inputs": {
"source": "https://cdn.rendobar.com/assets/examples/sample.mp4"
},
"params": {
"preset": "hormozi",
"mode": "balanced"
}
}'
```
## Parameters
**preset** `enum` (default: hormozi)
Built-in caption style. One of: `hormozi`, `mrbeast`, `tiktok`, `pill`, `karaoke`, `word-pop`, `minimal`, `subtitle-block`, `neon`, `gold`, `reveal`.
**language** `string`
ISO-639-1 language hint (e.g. `en`, `es`). Absent = English. Non-English forces the `large-v3-turbo` model regardless of `mode`.
**mode** `enum` (default: balanced)
Speed-vs-accuracy tradeoff for transcription.
* `fast`: `base.en`, English only, \~3× faster, \~7-9% WER
* `balanced`: `small.en`, default, \~5-7% WER
* `accurate`: `large-v3-turbo`, \~3× slower, \~3-4% WER
**style** `object`
Style overrides layered on top of `preset`. Any field set here wins. Unset fields fall through to the preset. Key fields:
* `font`: font family name. A [bundled family](#which-fonts-can-i-use) or the family name of a custom font you pass via the `font` input.
* `layout`: `phrase` (up to two balanced lines) or `word` (one word at a time).
* `position`: `top`, `center`, or `bottom`.
* `entrance`: `fade`, `pop`, or `bounce`. Each word reveals at its spoken moment.
* `highlight`: active-word treatment. `{ "mode": "color" | "box", "color": "#RRGGBB", "textColor": "#RRGGBB", "scale": 100-200 }`.
* `fill`, `stroke`, `shadow`, `bold`, `case`, `marginV`: colour, outline, and weight controls.
**autoEmphasis** `boolean` (default: false)
Let an in-stack model mark the important words so they render in the accent colour (the "gold words" look).
**translateTo** `enum`
Translate captions before animating. One of `es`, `fr`, `de`, `pt`, `it`, `nl`. Omit to keep the original language.
**captionData** `boolean` (default: false)
Also return the word-level transcript plus SRT and VTT on `output.data`.
## What inputs does it take?
**source** `string` *required*
URL of the source video. An uploaded asset's content URL works too.
**subtitles** `string`
URL of an SRT or VTT file. When provided, its text is animated and transcription is skipped.
**font** `string`
URL of your own font file (TTF, OTF, TTC, WOFF, WOFF2). Captions render in it, and it takes priority over `style.font`, so you do not need to know the family name inside your own file. See [Fonts](#which-fonts-can-i-use).
## Which fonts can I use?
Eleven presets ship with sensible default fonts. To pick a different one, set `style.font` to a bundled family. No upload needed.
Any [Google Fonts](https://fonts.google.com) family also works by name and is fetched at render time, and `style.font` accepts a CSS fallback stack like `"Lato, Inter, sans-serif"` that falls through in order.
| Bundled family | Pass as `style.font` |
| - | - |
| Inter | `"Inter"` |
| Bebas Neue | `"Bebas Neue"` |
| Anton | `"Anton"` |
| Montserrat | `"Montserrat"` |
| Poppins | `"Poppins"` |
| Roboto | `"Roboto"` |
| Oswald | `"Oswald"` |
To use your own font, pass its URL as the `font` input. It wins over
`style.font`, so nothing else is required:
```json theme={null}
{
"type": "captions.animate",
"inputs": {
"source": "https://cdn.rendobar.com/assets/examples/sample.mp4",
"font": "https://example.com/MyBrand.ttf"
},
"params": { "preset": "gold" }
}
```
Naming the family embedded in the file as `style.font` still works, so an
existing integration that does both keeps rendering the same way.
`style.font` must match the family name baked into the file, not the filename or URL. If it does not match, the renderer falls back to the preset font.
Like every job, this returns the standard response. See [Job output](/docs/concepts/job#the-output) for the shape and how to read the result.
To burn existing subtitles instead, see [caption.burn](/docs/jobs/captions/burn).
## See also
* [Burn subtitles](/docs/jobs/captions/burn): static SRT or VTT burned into the frame
* [Compose](/docs/jobs/compose): build the video these captions sit on
* [Compress](/docs/jobs/compress): shrink the captioned output before you deliver it
* [ffprobe](/docs/jobs/ffprobe): check the audio stream before transcribing it
* [Plan limits](/docs/support/limits): duration and file-size caps per plan
# Burn captions into a video
Source: https://rendobar.com/docs/jobs/captions/burn
Burn subtitles into a video from an SRT, VTT, or ASS file, or auto-transcribe in any language, with full styling control.
The `caption.burn` job burns subtitles permanently into a video. Provide an SRT, VTT, or ASS file as the `subtitles` input, or omit it to auto-transcribe the audio. Style the text with web-hex colors, an outline, a background box, and a position.
> [!NOTE]
>
> **Accepts:** video · **Type:** `caption.burn`
## Request
```ts SDK theme={null}
import { createClient, outputUrl } from "@rendobar/sdk";
const client = createClient({ apiKey: "rb_YOUR_KEY" });
const job = await client.jobs.create({
type: "caption.burn",
inputs: {
source: "https://cdn.rendobar.com/assets/examples/sample.mp4",
subtitles: "https://cdn.rendobar.com/assets/examples/sample.srt",
},
params: { fontFamily: "Inter", fontSize: 48, boxEnabled: true },
});
const result = await client.jobs.wait(job.id);
console.log(outputUrl(result));
```
```python Python theme={null}
import requests
res = requests.post(
"https://api.rendobar.com/jobs",
headers={"Authorization": "Bearer rb_live_YOUR_KEY"},
json={
"type": "caption.burn",
"inputs": {
"source": "https://cdn.rendobar.com/assets/examples/sample.mp4",
"subtitles": "https://cdn.rendobar.com/assets/examples/sample.srt",
},
"params": {"fontFamily": "Inter", "fontSize": 48, "boxEnabled": True},
},
)
```
```bash cURL theme={null}
curl -X POST https://api.rendobar.com/jobs \
-H "Authorization: Bearer rb_live_YOUR_KEY" \
-H "Content-Type: application/json" \
-d '{
"type": "caption.burn",
"inputs": {
"source": "https://cdn.rendobar.com/assets/examples/sample.mp4",
"subtitles": "https://cdn.rendobar.com/assets/examples/sample.srt"
},
"params": { "fontFamily": "Inter", "fontSize": 48, "boxEnabled": true }
}'
```
Omit `subtitles` to auto-transcribe. The spoken language is detected by default (`language: "auto"`). Pass an ISO-639-1 code to skip detection.
## What inputs does it take?
**source** `string` *required*
URL of the source video to caption.
**subtitles** `string`
URL of an SRT, VTT, or ASS subtitle file. A provided ASS file is burned as-is, preserving its own styling. Omit to auto-transcribe the audio.
**font** `string`
URL of your own font file (TTF, OTF, TTC, WOFF, WOFF2). Captions render in it, and it takes priority over `fontFamily`, so you do not need to know the family name inside your own file. An uploaded asset's content URL works here.
## Parameters
**language** `enum` (default: auto)
Spoken language for the auto-transcribe path, as an ISO-639-1 code (e.g. `en`, `es`, `ja`) or `auto` to detect. English uses a faster model. Everything else routes to multilingual transcription. Ignored when a subtitle file is provided.
**font** `string` (default: Inter)
Font family, or a CSS fallback stack. Any [Google Fonts](https://fonts.google.com) family works by name and is fetched at render time. Seven are bundled and resolve instantly: `Inter`, `Roboto`, `Montserrat`, `Poppins`, `Oswald`, `Anton`, `Bebas Neue`. A stack falls through in order, so `"Lato, Inter, sans-serif"` tries each in turn. To render in your own file, pass its URL as the `font` **input**, which wins over this parameter.
**fontFamily** `string` *deprecated*
Deprecated alias for `font`. Still accepted so existing clients keep working. `font` wins when both are present.
**fontSize** `integer` (default: 48)
Font size in output pixels. Range 8–400.
**fontColor** `string` (default: #FFFFFF)
Text fill color as web hex (`#RRGGBB` or `#AARRGGBB`, alpha first).
**bold** `boolean` (default: true)
Render the text bold.
**italic** `boolean` (default: false)
Render the text italic.
**outlineColor** `string` (default: #000000)
Outline (stroke) color as web hex.
**outlineWidth** `number` (default: 2)
Outline thickness in pixels. Range 0–20.
**shadow** `number` (default: 1)
Drop-shadow depth in pixels. Range 0–20. `0` disables the shadow.
**boxEnabled** `boolean` (default: false)
Draw a filled background box behind the text (the accessibility "subtitle bar").
**boxColor** `string` (default: #000000)
Background box color as web hex. Applies when `boxEnabled` is `true`.
**boxOpacity** `number` (default: 0.6)
Background box opacity, `0` (transparent) to `1` (opaque).
**position** `enum` (default: bottom)
Vertical placement. One of `bottom`, `center`, `top`.
**alignment** `enum` (default: center)
Horizontal alignment. One of `left`, `center`, `right`.
**marginV** `integer` (default: 60)
Vertical margin in pixels. Range 0–2000.
**marginH** `integer` (default: 40)
Horizontal margin in pixels. Range 0–2000. Also bounds the line-wrap width.
**maxCharsPerLine** `integer`
Maximum characters per line on the auto-transcribe path. Range 10–80.
Like every job, this returns the standard response. See [Job output](/docs/concepts/job#the-output) for the shape and how to read the result.
For animated word-level captions instead, see [captions.animate](/docs/jobs/captions/animate).
## See also
* [Animated captions](/docs/jobs/captions/animate): word-level captions generated from the audio
* [ffprobe](/docs/jobs/ffprobe): check the subtitle streams already in a file
* [Compose](/docs/jobs/compose): assemble the video before you burn subtitles onto it
* [Error codes](/docs/support/errors): the full error catalogue
* [Plan limits](/docs/support/limits): duration and file-size caps per plan
# Audio levels, mixing and effects
Source: https://rendobar.com/docs/jobs/compose/audio
Set each clip's level, fade and duck music under a voice, pan and mix tracks, clean up a recording, and draw the sound onto the picture.
Sound comes from `audio` clips and from the sound in `video` clips. All tracks with sound play at once in one mix. Set each clip's level, then shape the sound with effects on a clip, a track or the whole mix.
```json theme={null}
{
"asset": { "type": "audio", "src": "https://example.com/music.mp3", "volume": 0.35, "fadeIn": 1.5, "fadeOut": 3 },
"length": "end"
}
```
`length: "end"` runs the music to the end of the video, however long it is.
## Levels
`volume` is linear gain on a `video` or `audio` asset. `1` keeps the source level and `0` mutes it. Under speech at `1`, set music to `0.2` to `0.4`. On its own, set it to `0.35` to `0.5`.
`fadeIn` and `fadeOut` fade an audio clip in from silence and out to silence, in seconds. Fade music in over 1 to 2 seconds and out over 3 to 5, ending on the last frame.
## Ducking music under a voice
Use one music clip and keyframe its `volume`: up before the first word, down under the speech, up again after. `fadeIn` and `fadeOut` still apply on top.
```json theme={null}
{
"asset": {
"type": "audio",
"src": "https://example.com/music.mp3",
"volume": [
{ "time": 0, "value": 0.4 },
{ "time": 2.5, "value": 0.2, "easing": "easeInOutSine" },
{ "time": 9, "value": 0.2 },
{ "time": 9.6, "value": 0.4 }
],
"fadeOut": 3
},
"length": "end"
}
```
## Panning
`pan` places a clip's sound from `-1` (full left) through `0` (centred) to `1` (full right). It works on any clip with sound.
```json theme={null}
{ "asset": { "type": "audio", "src": "https://example.com/door-knock.mp3" }, "start": 4, "pan": -0.6 }
```
## The mix
Music, a voice-over and the footage's own sound need no separate mixing step. An `effects` list works on a clip, a track or the timeline:
* On a clip, it changes that clip's sound.
* On a track (`track.effects`), it changes everything on the track, such as every line of a voice-over at once.
* On the timeline (`timeline.effects`), it changes the final mix. Put a `limiter` or a `loudness` target here.
```json theme={null}
"timeline": {
"tracks": [
{ "clips": [{ "asset": { "type": "video", "src": "https://example.com/interview.mp4" } }] },
{ "clips": [{ "asset": { "type": "audio", "src": "https://example.com/music.mp3", "volume": 0.25 }, "length": "end" }] }
],
"effects": [{ "type": "loudness" }, { "type": "limiter" }]
}
```
## Sound effects
Each effect is an entry with a `type` and only the settings you change.
| Effect | What it does |
| - | - |
| `loudness` | Sets sound to a standard loudness. Use -16 LUFS for online video and podcasts, -23 for broadcast. |
| `voiceDenoise` | Removes steady background noise from under speech: a river, a fan, a street. Not for music. |
| `gate` | Mutes the sound between phrases, so room noise drops out in the pauses. |
| `highPass` | Cuts everything below a frequency. Wind, traffic and handling noise sit below the voice. |
| `lowPass` | Cuts everything above a frequency: music from the next room, or a voice on the phone. |
| `eq` | Three-band tone control: more bass and treble on music, or less boom on a voice. |
| `compressor` | Evens out a voice so quiet and loud words play at the same level. |
| `limiter` | Stops peaks from clipping, with optional gain to make a track louder. |
| `pitch` | Raises or lowers the pitch without changing the speed. |
| `echo` | Adds a repeat behind the sound. |
| `reverb` | Makes a dry voice sound like it is in a hall. |
A typical voice chain is `highPass`, then `voiceDenoise`, then `compressor`, then `loudness`.
```json theme={null}
"effects": [{ "type": "highPass", "cutoff": 80 }, { "type": "voiceDenoise" }, { "type": "compressor" }, { "type": "loudness" }]
```
## Sound drawn on the picture
`visualizer` draws the sound over the picture as a `waveform` or a `spectrum`, for an audiogram or a podcast clip. On the timeline, its usual place, it draws the final mix. On a track or a clip, it draws only that sound.
```json theme={null}
"effects": [{ "type": "visualizer", "kind": "waveform", "color": "#34D399", "y": "80%", "width": "76%", "height": "20%" }]
```
before
visualizer, waveform
The [effect reference](/docs/jobs/compose/reference/effects) lists every sound effect and its settings. The [Compose features page](https://rendobar.com/compose/features/#sound) plays each one before and after, with sound.
# Subtitles and timers
Source: https://rendobar.com/docs/jobs/compose/captions
Add every subtitle of a video as one clip, written in the timeline or read from an .srt or .vtt file, and put a countdown or a stopwatch over a clip.
A `subtitles` clip shows every caption of a video, each at its time. A `timer` counts over its own length. Both take the same `style` as a [text clip](/docs/jobs/compose/text): font, size, colour, stroke, shadow and background box.
## Subtitles
Each cue has a `start` and an `end`, in seconds from the clip's start, and its `text`.
```json theme={null}
{
"asset": {
"type": "subtitles",
"cues": [
{ "start": 0, "end": 1.8, "text": "Subtitles live in the timeline." },
{ "start": 2, "end": 4, "text": "One clip, every line." }
],
"style": { "font": "Inter", "size": 44, "color": "#FFFFFF", "background": "#000000B0" }
},
"transform": { "position": { "x": "50%", "y": "86%" } }
}
```
subtitles, every line in one clip, timed to the words
Keep captions low in the frame and clear of the buttons phone apps draw on top. On a vertical video, keep them between 13.5% and 83% of the height. See [editing conventions](/docs/jobs/compose/craft#text-placement-and-size).
### From a file
Point `src` at an `.srt` or `.vtt` file instead of listing cues. The file sets the timing.
```json theme={null}
{ "asset": { "type": "subtitles", "src": "https://example.com/captions.srt", "style": { "size": 40 } } }
```
### How each line appears
`reveal` sets how each cue appears.
| `reveal` | Each cue |
| - | - |
| `line` | Appears whole at its start time. The default. |
| `typewriter` | Types out word by word over the cue, as in social video. |
For word-by-word captions made from the speech, with no cues to write, run [animated captions](/docs/jobs/captions/animate) on the finished video.
## Timers
`direction` sets which way a timer counts. `up`, the default, counts from zero. `down` counts from the clip's length to zero, so a 10-second clip starts at 10.
```json theme={null}
{
"asset": { "type": "timer", "direction": "down", "format": "MM:SS", "style": { "font": "Inter", "size": 96, "weight": 800, "color": "#FFFFFF" } },
"start": 0,
"length": 10
}
```
a countdown over the clip's own length
| `format` | Shows |
| - | - |
| `SS` | Seconds |
| `SS.S` | Seconds and tenths |
| `SS.SS` | Seconds and hundredths |
| `MM:SS` | Minutes and seconds |
| `MM:SS.SS` | Minutes, seconds and hundredths |
| `HH:MM:SS` | Hours, minutes and seconds |
## What they can animate
Subtitles and timers take an entrance in `style.animate`, limited to `fade` and the four slides (`slideUp`, `slideDown`, `slideLeft`, `slideRight`). They reject `blur`, `scale`, a split with `by`, and an exit with `out`. Only a text clip takes an exit.
Every field is in the [subtitles](/docs/jobs/compose/reference/subtitles) and [timer](/docs/jobs/compose/reference/timer) references.
# Edit like a professional
Source: https://rendobar.com/docs/jobs/compose/craft
Use the pacing, transition, text and colour conventions working editors follow, written here as compose fields.
These are the rules working editors follow, written as compose fields. You need no editing experience to use them. AI agents get the same rules from the MCP compose reference.
## Pacing
Clip `length` sets the pace:
* Social: 0.8 to 3 seconds, with a visual change at least every 3 seconds
* Vlog: 2 to 6 seconds
* Tutorial: 5 to 15 seconds, cut where a step ends
* Cinematic: 4 to 8 seconds, with varied lengths
Shorten clips as the video builds, then hold the final shot about twice as long. Make the first clip the hook, with no fade-in or logo, and show or promise the payoff within 3 seconds. On social, 20 to 35 second videos have the highest completion rate.
To cut to music, one beat lasts 60 divided by BPM seconds. Cut every 2 or 4 beats, and on every beat only at the climax. At 120 BPM that gives 1 or 2 second clips.
## Text placement and size
On vertical video, keep all text inside x 8 to 92% and y 13.5 to 83%, clear of the platform's interface. Put captions at y 60 to 75%.
Sizes at 1080x1920:
* Titles: 135 to 190px
* Lower thirds: 70 to 80px
* Captions: 90 to 105px
Give all text a stroke (black, width 4 to 8), a shadow or a background box. Keep titles to 6 words or fewer and 2 lines at most. Pair one display font (Oswald, Anton, Bebas Neue) with one body font (Inter, Roboto).
before
inside the safe area
## Color looks
Apply one look to every clip in the video:
| Look | `color` value |
| - | - |
| Warm sunset | `{ "temperature": 5000, "saturation": 1.2, "contrast": 1.1 }` |
| Cool corporate | `{ "temperature": 7500, "contrast": 1.15, "saturation": 0.95 }` |
| Moody cinematic | `{ "temperature": 6200, "saturation": 0.75, "contrast": 1.25, "gamma": 0.92 }` |
| Vintage faded | `{ "temperature": 5600, "contrast": 0.85, "saturation": 0.65, "brightness": 0.06 }` |
| Bright social | `{ "temperature": 6800, "saturation": 1.3, "gamma": 1.15 }` |
| Night | `{ "temperature": 11000, "saturation": 0.6, "gamma": 0.8, "brightness": -0.15 }` |
When faces are in frame, keep saturation at 0.7 to 1.3, hue within 8 degrees and temperature at 4500 to 12000K. To match two clips shot differently, fix brightness first, then temperature, then saturation.
## Photos need motion
A still photo in a video looks like a mistake. Give every image clip a slow zoom (a Ken Burns move): `"transform": { "position": { "x": "50%", "y": "50%" }, "scale": [{ "time": "0%", "value": 1, "easing": "easeInOutSine" }, { "time": "100%", "value": 1.12 }] }`.
For more on pacing and transitions, see [Transitions](/docs/jobs/compose/transitions). For levels, see [Audio](/docs/jobs/compose/audio).
# Picture effects
Source: https://rendobar.com/docs/jobs/compose/effects
Add colour grades, looks, stylised filters and layer effects to a clip or a whole track, with keyframes on any number.
Effects are a list that runs in the order you write it. Put it on a clip, a track or the whole timeline.
```json theme={null}
{
"asset": { "type": "video", "src": "https://cdn.rendobar.com/assets/examples/sea.mp4" },
"start": 0,
"length": 3,
"effects": [
{ "type": "color", "saturation": 1.2, "temperature": 6800 },
{ "type": "vignette" }
]
}
```
On a track, it applies to every clip. On the timeline, it applies to the finished video, so put a grade for the whole edit there.
```json theme={null}
"timeline": {
"effects": [{ "type": "look", "name": "muted" }],
"tracks": [
{ "effects": [{ "type": "grain" }], "clips": [{ "asset": { "type": "video", "src": "https://cdn.rendobar.com/assets/examples/sea.mp4" } }] }
]
}
```
Set an optional `start` and `length`, in seconds or as a percent of what the effect sits on, to run it for part of a clip. Keyframe any numeric parameter to change it over time.
```json theme={null}
{ "type": "blur", "radius": [{ "time": "0%", "value": 14, "easing": "easeOutCubic" }, { "time": 1, "value": 0 }] }
```
There are 34 built-in effects, 23 for the picture and 11 for sound, with parameters in real units. The [Compose features page](https://rendobar.com/compose/features/#picture) shows each one before and after. Picture effects:
| Effect | What it does |
| - | - |
| `color` | Grade by hand: brightness, contrast, saturation, gamma, hue and temperature. Every setting is optional. |
| `look` | A one-word look: greyscale, boost, muted, lighten, darken, contrast, negative, sepia or oldFilm. |
| `lut` | Grade with a `.cube` LUT, the file a colourist or a grading app exports. |
| `blur` | Soften the picture. 5 to 15 makes a backdrop that keeps text over it readable. |
| `sharpen` | Sharpen soft footage. |
| `denoise` | Remove the grain a small camera sensor adds in low light. |
| `glow` | Make the bright parts bloom. Best on lights against a dark frame. |
| `grain` | Add film grain, so digital footage looks less clinical. |
| `vignette` | Darken the corners to pull the eye to the middle. |
| `shake` | Make a steady shot look handheld. The picture zooms in a little so its edges never show. |
| `glitch` | Blocks of the picture jump sideways and the colours tear. Give it a short length. |
| `pixelate` | Large square pixels over the whole picture. |
| `posterize` | Flatten the picture into a few steps of each colour, like a screen print. |
| `rgbShift` | Pull the red and blue channels apart for an analogue look. |
| `scanLines` | The dark lines of a CRT monitor. |
| `sketch` | Turn the picture into a pencil drawing. |
| `trails` | Moving lights and people leave streaks. Needs a camera that does not move. |
| `chromaKey` | Remove a green screen or any solid colour, so the track below shows through. |
| `mask` | Show the clip only where an image says: white or opaque keeps it, black or clear cuts it. |
| `blurRegion` | Blur one part of the picture: a face, a number plate, a screen. |
| `outline` | Draw a line around a layer with transparency, such as a keyed subject or a logo. |
| `dropShadow` | Add a soft shadow under a layer with transparency, so it stands out from the background. |
| `visualizer` | Draw the sound over the picture as a waveform or a spectrum. |
The 11 sound effects are on [Audio and mixing](/docs/jobs/compose/audio#sound-effects).
Two effects read a file. `lut` takes a `.cube` grade and `mask` takes an image that sets which parts of the clip show. The file is fetched and checked like any clip source.
```json theme={null}
{ "type": "mask", "src": "https://cdn.rendobar.com/assets/brand/logo-mark.png", "channel": "alpha" }
```
A picture effect on a clip with no picture, or a sound effect on a silent clip, returns a 400. Text and shapes draw their own outline and shadow, so you cannot put `outline` or `dropShadow` on them.
## Colour
`color` holds brightness, contrast, saturation, temperature and the rest in one effect. `look` applies a ready-made look in one word. `lut` takes a `.cube` file you supply.
before
color
before
look
before
lut
## Stylise
`glitch`, `pixelate`, `posterize`, `rgbShift`, `scanLines`, `sketch`, `trails` and `shake`. Use them for a beat or a scene change, not across a whole video.
before
pixelate, size 24
before
glitch
before
trails
## Layers
`chromaKey` removes a solid background. `mask` cuts a clip to a shape. `blurRegion` hides a face or a number plate. `outline` and `dropShadow` add an edge or a shadow to a layer with transparency.
before
chromaKey
before
mask
before
blurRegion
before
dropShadow
## Anything the engine can do
If no built-in effect fits, `{ "type": "engine" }` reaches more than 300 other filters by name. A typo in a filter or parameter returns a 400 before the job starts.
```json theme={null}
{ "type": "engine", "filter": "colorize", "params": { "hue": 200, "saturation": 0.6 } }
```
FFmpeg filters use their FFmpeg name and option names, so `colorize` takes `hue`, `saturation` and `lightness`. Other filters use a camelCase name, such as `cartoon` with `triplevel` and `diffspace`. `GET /compose/effects/engine` lists every filter an engine entry can name, with its parameters. `GET /compose/effects` does the same for the built-in effects.
An engine entry that repeats a built-in effect is refused. The engine's filter list can change when the engine is upgraded. The built-in effects do not.
The [effect reference](/docs/jobs/compose/reference/effects) lists every effect and parameter. Sound effects are on [Audio and mixing](/docs/jobs/compose/audio).
# Fonts and languages
Source: https://rendobar.com/docs/jobs/compose/fonts
Use your own font files, set fallback stacks, and render scripts that need shaping such as Arabic and Devanagari.
Name any [Google Fonts](https://fonts.google.com) family in `style.font` and it
loads at render time, with no upload or setup.
```json theme={null}
"style": { "font": "Bebas Neue", "size": 96, "weight": 700 }
```
Seven families ship in the render image and need no fetch:
`Inter`, `Roboto`, `Montserrat`, `Poppins`, `Oswald`, `Anton`,
`Bebas Neue`.
a display family for the headline, Arabic and Devanagari through the bundled fallbacks
## Your own font files
List the file URLs in the job's `fonts` input, each under a family name you
choose. Then use that name in `style.font`.
```json theme={null}
{
"type": "compose",
"inputs": {
"fonts": [
{ "family": "Display", "src": "https://cdn.example.com/BrandDisplay.woff2" },
{ "family": "Body", "src": "https://cdn.example.com/BrandText.otf" }
]
},
"params": {
"schemaVersion": 1,
"timeline": {
"tracks": [
{ "clips": [{ "asset": { "type": "text", "text": "LAUNCH", "style": { "font": "Display", "size": 140 } }, "start": 0, "length": 3 }] },
{ "clips": [{ "asset": { "type": "text", "text": "in stores now", "style": { "font": "Body", "size": 54 } }, "start": 0, "length": 3 }] }
]
},
"output": { "format": "mp4", "size": "1080p" }
}
}
```
You can declare any number. TTF, OTF, TTC, WOFF and WOFF2 all work, and `src`
takes an [uploaded asset's](/docs/sdk#uploads) content URL like any other URL.
Choosing a name means you never need the family name stored inside the file,
which often differs from the file name and takes a font inspector to find. Omit
`family` and the engine reads the stored name, so `{ "src": "..." }` alone is
valid.
A family you declare overrides a bundled one with the same name, as an
`@font-face` rule overrides a system font in CSS.
For a single file, use the `inputs.font` shorthand and refer to it as `custom`:
```json theme={null}
"inputs": { "font": "https://cdn.example.com/BrandDisplay.ttf" },
"style": { "font": "custom", "size": 96 }
```
## Fallback stacks
`style.font` takes a CSS-style list and tries each entry in order:
```json theme={null}
"style": { "font": "Display, Bebas Neue, sans-serif" }
```
If your CDN is down or a Google family cannot be fetched, the render uses the
next entry. The job does not fail or fall back to a random system font, and it
reports every substitution:
```json theme={null}
"steps": [
{
"id": "execute-engine",
"meta": {
"fontFallbacks": [
"font \"Display\" is not available; trying the next entry in \"Display, Bebas Neue\""
]
}
}
]
```
If `style.font` names no font that can be found, the API rejects the job at
submit. This catches a font URL pasted into `style.font` instead of `fonts`.
## Weights and languages
`weight` runs from 100 to 1000. A variable font uses the exact value. A static
family uses its nearest available weight, rounding up on a tie.
Latin, Cyrillic, Greek, Vietnamese, Turkish, Arabic, Hebrew, Thai, Devanagari,
Bengali, Tamil, Amharic, Khmer, Chinese, Japanese and Korean all render. The
engine handles right-to-left joining and conjunct shaping. Colour emoji does not
render in text assets.
# Placing and framing a clip
Source: https://rendobar.com/docs/jobs/compose/framing
Set where a clip sits in the frame: position, anchor, scale, box, fit, rotation, flip, crop and corner pin, each shown before and after with its JSON.
Every clip takes these fields, whatever it holds. Most live in `transform`. Each example changes one thing on the same shot and backdrop. Position, scale, rotation, size and the corner pin all take keyframes. See [Keyframes and easing](/docs/jobs/compose/motion).
## Where it sits
before
position x 76%, y 26%
```json theme={null}
"transform": { "position": { "x": "76%", "y": "26%" } }
```
`position` places the clip's centre by default, as a percent of the frame or in pixels. `anchor` picks a different point of the clip to place.
before
anchor topLeft, same coordinates
```json theme={null}
"transform": { "position": { "x": "30%", "y": "30%" }, "anchor": "topLeft" }
```
## How big it is
before
scale 0.34
```json theme={null}
"transform": { "scale": 0.34 }
```
`scale` multiplies the clip's natural size. `size` gives the clip its own box, and [fit](#how-a-picture-fills-its-box) sets how the picture fills it. A box with `fit` set to `cover` turns a wide shot into a tall panel.
before
size 30% by 88%, fit cover
```json theme={null}
"transform": { "size": { "width": "30%", "height": "88%" }, "fit": "cover" }
```
## Turning and mirroring
before
rotate -7 degrees
```json theme={null}
"transform": { "rotate": -7 }
```
before
flip horizontal
```json theme={null}
"flip": { "horizontal": true }
```
## Trimming the edges
before
crop 18% top and bottom, 12% each side
```json theme={null}
"crop": { "top": "18%", "bottom": "18%", "left": "12%", "right": "12%" }
```
before
crop radius 0.14
```json theme={null}
"transform": { "scale": 0.5 },
"crop": { "radius": 0.14 }
```
## Pinning to a surface
`corners` places a clip by four points in place of a position, to put footage on a screen or a sign in the shot. It does not combine with position, scale, rotate or fit. Keyframe the points to follow a moving surface.
before
corners pinned to the laptop screen
```json theme={null}
"transform": {
"corners": {
"topLeft": { "x": "45.0%", "y": "33.6%" },
"topRight": { "x": "62.6%", "y": "32.4%" },
"bottomRight": { "x": "61.0%", "y": "54.6%" },
"bottomLeft": { "x": "43.4%", "y": "54.0%" }
}
}
```
## How a picture fills its box
`fit` sets what happens when a clip's box has a different shape from its picture, such as a wide photo in a phone-shaped box.
| `fit` | The picture |
| - | - |
| `contain` | Shows all of it, with bars where it does not reach. The default. |
| `cover` | Fills the box and cuts off what overflows. |
| `fill` | Stretches to the box and distorts. |
| `blur` | Shows all of it over a blurred copy of itself, with no bars. |
before
fit cover
```json theme={null}
"transform": { "size": { "width": 304, "height": 540 }, "fit": "cover" }
```
`blur` fills the whole frame around a clip that fills it, so it does not combine with position, size, scale or rotation.
For opacity, speed and blend modes, see [Media clips](/docs/jobs/compose/media).
Every field is in the [clip reference](/docs/jobs/compose/reference/timeline#clip).
# Compose: render from a timeline
Source: https://rendobar.com/docs/jobs/compose/index
Render a video from a declarative JSON timeline: tracks, clips, transitions, text, shapes, keyframes and effects.
An illustrated story rendered by Compose from the request below: each drawing sketches itself in, then fills with colour, under its caption.
```json The request that made it expandable theme={null}
{
"schemaVersion": 1,
"output": {
"format": "mp4",
"resolution": { "width": 1920, "height": 1080 },
"fps": 30
},
"timeline": {
"tracks": [
{
"clips": [
{
"asset": {
"type": "shape",
"shape": "rect",
"color": "#F3EAD7"
},
"length": 1.8,
"start": 0
},
{
"type": "transition",
"transition": "wipe",
"map": "https://cdn.rendobar.com/compose/player/media/sk1-draw.jpg",
"duration": 1.6
},
{
"asset": {
"type": "image",
"src": "https://cdn.rendobar.com/compose/player/media/sk1.png"
},
"transform": {
"fit": "cover",
"scale": [
{ "time": 0, "value": 1, "easing": "linear" },
{ "time": 3.2, "value": 1.05 }
]
},
"length": 3.2
},
{
"type": "transition",
"transition": "crossfade",
"duration": 0.4
},
{
"asset": {
"type": "shape",
"shape": "rect",
"color": "#F3EAD7"
},
"length": 1.9
},
{
"type": "transition",
"transition": "wipe",
"map": "https://cdn.rendobar.com/compose/player/media/sk2-draw.jpg",
"duration": 1.4
},
{
"asset": {
"type": "image",
"src": "https://cdn.rendobar.com/compose/player/media/sk2.png"
},
"transform": {
"fit": "cover",
"scale": [
{ "time": 0, "value": 1, "easing": "linear" },
{ "time": 3.2, "value": 1.05 }
]
},
"length": 3.2
},
{
"type": "transition",
"transition": "crossfade",
"duration": 0.4
},
{
"asset": {
"type": "shape",
"shape": "rect",
"color": "#F3EAD7"
},
"length": 1.9
},
{
"type": "transition",
"transition": "wipe",
"map": "https://cdn.rendobar.com/compose/player/media/sk3-draw.jpg",
"duration": 1.4
},
{
"asset": {
"type": "image",
"src": "https://cdn.rendobar.com/compose/player/media/sk3.png"
},
"transform": {
"fit": "cover",
"scale": [
{ "time": 0, "value": 1, "easing": "linear" },
{ "time": 3.2, "value": 1.05 }
]
},
"length": 3.2
},
{
"type": "transition",
"transition": "crossfade",
"duration": 0.4
},
{
"asset": {
"type": "shape",
"shape": "rect",
"color": "#F3EAD7"
},
"length": 0.4
}
]
},
{
"clips": [
{
"asset": {
"type": "shape",
"shape": "rect",
"color": "#FBF6EA",
"radius": 0.5
},
"transform": {
"size": { "width": 720, "height": 96 },
"position": { "x": 960, "y": 112 }
},
"start": 0.2,
"length": 9.8,
"opacity": [
{ "time": 0, "value": 0, "easing": "easeOutQuad" },
{ "time": 0.4, "value": 1 },
{ "time": 9.4, "value": 1, "easing": "easeInQuad" },
{ "time": 9.8, "value": 0 }
]
}
]
},
{
"clips": [
{
"asset": {
"type": "text",
"text": "The Last Keeper · Part 1",
"style": {
"font": "Lora",
"size": 48,
"weight": 600,
"italic": true,
"color": "#2B2118",
"animate": { "type": "fade", "duration": 0.5 }
}
},
"transform": { "position": { "x": 960, "y": 112 } },
"start": 0.3,
"length": 9.7,
"opacity": [
{ "time": 0, "value": 1 },
{ "time": 9.35, "value": 1, "easing": "easeInQuad" },
{ "time": 9.7, "value": 0 }
]
}
]
},
{
"clips": [
{
"asset": {
"type": "shape",
"shape": "rect",
"color": "#FBF6EA",
"radius": 0.12,
"shadow": {
"color": "#00000033",
"blur": 24,
"x": 0,
"y": 8
}
},
"transform": {
"size": { "width": 1440, "height": 170 },
"position": { "x": 960, "y": 925 }
},
"start": 1,
"length": 2.3,
"opacity": [
{ "time": 0, "value": 0, "easing": "easeOutQuad" },
{ "time": 0.4, "value": 1 },
{ "time": 1.9, "value": 1, "easing": "easeInQuad" },
{ "time": 2.3, "value": 0 }
]
}
]
},
{
"clips": [
{
"asset": {
"type": "text",
"text": "He kept the light for forty years.",
"style": {
"font": "Lora",
"size": 84,
"weight": 500,
"italic": true,
"color": "#2B2118",
"animate": {
"type": "fade",
"by": "word",
"duration": 0.9,
"out": "fade"
}
}
},
"transform": { "position": { "x": 960, "y": 925 } },
"start": 1.15,
"length": 2.15
}
]
},
{
"clips": [
{
"asset": {
"type": "shape",
"shape": "rect",
"color": "#FBF6EA",
"radius": 0.12,
"shadow": {
"color": "#00000033",
"blur": 24,
"x": 0,
"y": 8
}
},
"transform": {
"size": { "width": 1440, "height": 170 },
"position": { "x": 960, "y": 925 }
},
"start": 4.4,
"length": 2.3,
"opacity": [
{ "time": 0, "value": 0, "easing": "easeOutQuad" },
{ "time": 0.4, "value": 1 },
{ "time": 1.9, "value": 1, "easing": "easeInQuad" },
{ "time": 2.3, "value": 0 }
]
}
]
},
{
"clips": [
{
"asset": {
"type": "text",
"text": "Every night he climbed the stairs.",
"style": {
"font": "Lora",
"size": 84,
"weight": 500,
"italic": true,
"color": "#2B2118",
"animate": {
"type": "fade",
"by": "word",
"duration": 0.9,
"out": "fade"
}
}
},
"transform": { "position": { "x": 960, "y": 925 } },
"start": 4.55,
"length": 2.15
}
]
},
{
"clips": [
{
"asset": {
"type": "shape",
"shape": "rect",
"color": "#FBF6EA",
"radius": 0.12,
"shadow": {
"color": "#00000033",
"blur": 24,
"x": 0,
"y": 8
}
},
"transform": {
"size": { "width": 1440, "height": 170 },
"position": { "x": 960, "y": 925 }
},
"start": 7.7,
"length": 2,
"opacity": [
{ "time": 0, "value": 0, "easing": "easeOutQuad" },
{ "time": 0.4, "value": 1 },
{ "time": 1.6, "value": 1, "easing": "easeInQuad" },
{ "time": 2, "value": 0 }
]
}
]
},
{
"clips": [
{
"asset": {
"type": "text",
"text": "Then, one night, a ship came home.",
"style": {
"font": "Lora",
"size": 84,
"weight": 500,
"italic": true,
"color": "#2B2118",
"animate": {
"type": "fade",
"by": "word",
"duration": 0.9,
"out": "fade"
}
}
},
"transform": { "position": { "x": 960, "y": 925 } },
"start": 7.85,
"length": 1.85
}
]
}
]
}
}
```
The same request, built up step by step, is the [illustrated story recipe](https://rendobar.com/compose/recipes/illustrated-story/).
`compose` renders a video from a JSON timeline. You start with one clip and add more clips, transitions, overlays and effects as you need them.
## Your simplest render
The smallest timeline is one track with one clip. This call renders the first three seconds of a video to MP4.
```ts SDK theme={null}
import { createClient, outputUrl } from "@rendobar/sdk";
const client = createClient({ apiKey: "rb_YOUR_KEY" });
// run() creates the job and waits for it to finish.
const job = await client.jobs.run({
type: "compose",
params: {
schemaVersion: 1,
output: {
format: "mp4",
resolution: { width: 1080, height: 1920 },
fps: 30,
},
timeline: {
tracks: [
{
clips: [
{
asset: {
type: "video",
src: "https://cdn.rendobar.com/assets/examples/sea.mp4",
},
start: 0,
length: 3,
},
],
},
],
},
},
});
console.log(outputUrl(job));
```
```python Python theme={null}
import requests
res = requests.post(
"https://api.rendobar.com/jobs",
headers={"Authorization": "Bearer rb_YOUR_KEY"},
json={
"type": "compose",
"params": {
"schemaVersion": 1,
"output": {
"format": "mp4",
"resolution": {"width": 1080, "height": 1920},
"fps": 30,
},
"timeline": {
"tracks": [
{
"clips": [
{
"asset": {
"type": "video",
"src": "https://cdn.rendobar.com/assets/examples/sea.mp4",
},
"start": 0,
"length": 3,
}
]
}
]
},
},
},
)
```
```bash cURL theme={null}
curl -X POST https://api.rendobar.com/jobs \
-H "Authorization: Bearer rb_YOUR_KEY" \
-H "Content-Type: application/json" \
-d '{
"type": "compose",
"params": {
"schemaVersion": 1,
"output": {
"format": "mp4",
"resolution": { "width": 1080, "height": 1920 },
"fps": 30
},
"timeline": {
"tracks": [
{
"clips": [
{
"asset": {
"type": "video",
"src": "https://cdn.rendobar.com/assets/examples/sea.mp4"
},
"start": 0,
"length": 3
}
]
}
]
}
}
}'
```
> [!NOTE]
>
> **Assets:** video, image, audio, text, timer, subtitles, shape, animation (Lottie), composition · **Output:** mp4 / webm / gif / mp3 (audio only) / jpg / png (still frame)
Without `trim`, a clip plays its source from the start for `length` seconds. Leave `length` off and it plays the whole source. To play one segment, add `trim: { from, to }` to the asset, in source seconds. `length` sets how long the clip lasts on the timeline, and `trim` picks which part of the source fills that time.
## Join two clips
Put a second clip on the same track and a transition between them.
```json theme={null}
"clips": [
{ "asset": { "type": "video", "src": "https://cdn.rendobar.com/assets/examples/river.mp4" } },
{ "type": "transition", "transition": "crossfade", "duration": 1 },
{ "asset": { "type": "video", "src": "https://cdn.rendobar.com/assets/examples/forest.mp4" } }
]
```
You set no timing here. Each clip plays its whole source, the second starts after the first, and the transition overlaps them by its `duration`. You do not need to know how long either file is.
You can also write the timing out. This gives the same render, with the second clip starting `duration` seconds before the first ends.
```json theme={null}
"clips": [
{ "asset": { "type": "video", "src": "https://cdn.rendobar.com/assets/examples/river.mp4" }, "start": 0, "length": 3 },
{ "type": "transition", "transition": "crossfade", "duration": 1 },
{ "asset": { "type": "video", "src": "https://cdn.rendobar.com/assets/examples/forest.mp4" }, "start": 2, "length": 3 }
]
```
See [Transitions](/docs/jobs/compose/transitions) for the seven transition kinds, wipe shapes, directions and your own wipe patterns.
## Everything else
> **[How the timeline works](/docs/jobs/compose/timeline)**
>
> Tracks, clips, scenes, and when you can leave timing out.
> **[Media clips](/docs/jobs/compose/media)**
>
> Video, images, audio and Lottie, with trim, speed, opacity and blend modes.
> **[Placing and framing a clip](/docs/jobs/compose/framing)**
>
> Position, scale, rotate, crop, fit and pin a clip, each shown before and after.
> **[Text and titles](/docs/jobs/compose/text)**
>
> Readable titles, entrances and exits, and kinetic titles a word at a time.
> **[Subtitles and timers](/docs/jobs/compose/captions)**
>
> Every caption in one clip, from cues or an .srt file, and countdowns.
> **[Fonts and languages](/docs/jobs/compose/fonts)**
>
> Google fonts by name, bundled families, your own files, and other scripts.
> **[Shapes](/docs/jobs/compose/shapes)**
>
> Bars, cards, circles and SVG paths, with gradients, outlines and shadows.
> **[Keyframes and easing](/docs/jobs/compose/motion)**
>
> Animate anything numeric with 33 easings, and turn clips in 3D.
> **[Transitions](/docs/jobs/compose/transitions)**
>
> Crossfade, fade, slide, push, wipe and zoom, and your own wipe patterns.
> **[Effects](/docs/jobs/compose/effects)**
>
> Colour, looks, stylised filters, keying and every other filter by name.
> **[Audio and mixing](/docs/jobs/compose/audio)**
>
> Levels, ducking, panning, the mix, voice clean-up and audiograms.
> **[Output](/docs/jobs/compose/output)**
>
> Formats, size presets, frame rate, quality and transparent video.
> **[Pricing and validation](/docs/jobs/compose/pricing)**
>
> One price per minute of output, and a free check before you render.
> **[Edit like a professional](/docs/jobs/compose/craft)**
>
> The pacing, transition and text conventions working editors follow.
> **[Reference](/docs/jobs/compose/reference/timeline)**
>
> Every field, generated from the schema the API validates with.
## See also
* [Compose features](https://rendobar.com/compose/features/): every engine feature, searchable, most shown before and after
* [Job output](/docs/concepts/job#the-output): the output shape every job returns
* [Animated captions](/docs/jobs/captions/animate): word-level captions over a rendered video
* [Compress](/docs/jobs/compress): shrink the render to a size or quality budget
* [FFmpeg](/docs/jobs/ffmpeg): drop to a raw command when the timeline cannot express it
* [Webhooks](/docs/guides/webhooks): receive `job.completed` instead of polling
* [Plan limits](/docs/support/limits): render duration and file-size caps per plan
# Video, image, audio and Lottie clips
Source: https://rendobar.com/docs/jobs/compose/media
Add footage, stills, sound and Lottie animation to a timeline, use part of a source, change its speed and opacity, and blend it into the layer below.
A clip's `asset` sets what it plays. Four asset types read a file from a URL. Timing, placement and effects work the same for all four.
| `asset.type` | Plays | Takes |
| - | - | - |
| `video` | Footage, with its own sound | `src`, `trim`, `volume` |
| `image` | A png or jpg still | `src` |
| `audio` | Music, a voice-over or a sound effect | `src`, `trim`, `volume`, `fadeIn`, `fadeOut` |
| `animation` | A Lottie `.json` file, with its transparency | `src`, `trim` |
`src` is an https URL, or the URL of a file you uploaded to Rendobar. Text, timers, subtitles, shapes and nested timelines are clips without a file, each on its own page.
## Video
```json theme={null}
{
"asset": {
"type": "video",
"src": "https://cdn.rendobar.com/assets/examples/sea.mp4",
"trim": { "from": 4, "to": 9 },
"volume": 0.6
},
"start": 0
}
```
`volume` is linear gain: `1` keeps the source level and `0` mutes it. Keyframe it to duck music under a voice. See [Audio and mixing](/docs/jobs/compose/audio).
## Images
An `image` shows one frame for the clip's `length`. A still with no motion looks like a mistake, so add a slow push-in: keyframe `transform.scale` from `1` to about `1.15` across the clip. See [Keyframes and easing](/docs/jobs/compose/motion).
```json theme={null}
{
"asset": { "type": "image", "src": "https://example.com/listing.jpg" },
"transform": { "scale": [{ "time": "0%", "value": 1, "easing": "easeInOutSine" }, { "time": "100%", "value": 1.15 }] },
"length": 4
}
```
## Audio
An `audio` clip has no picture. Put music on its own track under the footage and set its level with `volume`. `fadeIn` and `fadeOut` fade it in from silence and out to silence, in seconds. See [Audio and mixing](/docs/jobs/compose/audio) for levels, ducking and sound effects.
## Lottie animations
An `animation` plays a Lottie `.json` file, as exported by After Effects, Figma or LottieFiles, with a transparent background. It plays once, for its own length. Place and size it with `transform`, like an image.
```json theme={null}
{ "asset": { "type": "animation", "src": "https://example.com/logo-reveal.json" }, "transform": { "scale": 0.4, "position": { "x": "50%", "y": "50%" } } }
```
Export the file self-contained. The API refuses a file that loads images or fonts from elsewhere, because the render only gets files through a checked download.
a Lottie lower third sweeping in, its words a compose text clip
## Using part of a source
`trim` picks which seconds of the source fill the clip. `{ "from": 4, "to": 9 }` plays seconds 4 to 9 of the file. `length` sets how long the clip lasts on the timeline. Without `trim`, the clip plays from the start of the source.
## Speed
`speed` plays a clip faster or slower. `2` is double speed and `0.5` is slow motion. At double speed a clip lasts half as long, and its sound changes pitch.
```json theme={null}
{ "asset": { "type": "video", "src": "https://example.com/run.mp4" }, "speed": 0.5 }
```
before
speed 2
Shapes, nested timelines and Lottie animations do not accept `speed`. The first two have no file to speed up, and a Lottie plays at its own frame rate. Avoid slow motion on the outgoing clip of a transition, as it can run out of frames before the transition ends.
## Opacity
`opacity` runs from `0` (invisible) to `1` (solid). Keyframe it to fade a clip in or out.
```json theme={null}
{ "asset": { "type": "video", "src": "https://example.com/b-roll.mp4" }, "opacity": [{ "time": 0, "value": 0 }, { "time": 0.5, "value": 1 }] }
```
before
opacity 0.45
## Blend modes
`blendMode` sets how a clip mixes with the layers below, for example a light leak or texture over footage. It only works on a clip above another track.
| `blendMode` | Use it for |
| - | - |
| `normal` | The clip sits over what is below. The default. |
| `screen` | Light leaks, flares and glows: black disappears and light adds. |
| `multiply` | Darkening textures and paper: white disappears and dark adds. |
| `overlay` | More contrast from a texture without changing the overall brightness. |
| `add` | Brighter than screen, for strong light. |
| `lighten` | Keeps whichever of the two is lighter. |
| `darken` | Keeps whichever of the two is darker. |
| `difference` | A stylised inverted look. |
```json theme={null}
{ "asset": { "type": "video", "src": "https://example.com/light-leak.mp4" }, "blendMode": "screen", "opacity": 0.8 }
```
The [video](/docs/jobs/compose/reference/video), [image](/docs/jobs/compose/reference/image), [audio](/docs/jobs/compose/reference/audio) and [animation](/docs/jobs/compose/reference/animation) references list every asset field. Clip fields are in the [timeline reference](/docs/jobs/compose/reference/timeline#clip).
# Keyframes and easing
Source: https://rendobar.com/docs/jobs/compose/motion
Add keyframes to position, scale, rotation, 3D turns, opacity, volume and any numeric effect parameter, with 33 easings.
To animate a numeric field, give it a list of keyframes instead of a value. [Where keyframes are accepted](#where-keyframes-are-accepted) lists every field that takes one.
```json theme={null}
"transform": {
"scale": [
{ "time": "0%", "value": 1, "easing": "easeInOutSine" },
{ "time": "100%", "value": 1.12 }
]
}
```
* `time` is seconds from the clip's start or a percent of its length. `"100%"` is the last frame, whatever the clip's length.
* `easing` sets the curve from that keyframe to the next, so put it on the first of a pair. The last keyframe's easing is never used. There are 33 easings, listed below.
The example above is a Ken Burns push-in. Use the same keyframes on `opacity` for a fade, on a shape's `color` for a colour change, or on `volume` to duck music under a voice.
before
scale 1 to 1.15, easeInOutSine, over 5 seconds
The scale keyframes are the only difference between the two videos.
## Where keyframes are accepted
`transform.position`, `transform.scale`, `transform.rotate`, `transform.rotateX`, `transform.rotateY`, `transform.size` (a box's size), `transform.corners` (the four corners of a pin), clip `opacity`, `asset.volume` on video and audio, a shape's `color` and `radius`, and every effect parameter marked animatable in the [effect reference](/docs/jobs/compose/reference/effects).
## Turning in 3D
`rotateY` turns a clip around its vertical axis and `rotateX` tips it around its horizontal axis. Both are in degrees and take keyframes. `perspective` is the viewer's distance from the frame in pixels. 600 looks dramatic, 2000 looks subtle, and the default is 1200. The clip turns about its `anchor`.
```json theme={null}
"transform": {
"scale": 0.62,
"rotateY": [
{ "time": 0, "value": -80, "easing": "easeOutCubic" },
{ "time": 1.4, "value": -18 }
],
"perspective": 900
}
```
before
rotateY from -80 to -18, perspective 900
Use a turn on a card, a picture-in-picture or a product reveal. On full-frame footage, it shows the frame's edges.
> [!NOTE]
>
> A 3D turn makes the clip an animated graphic. It costs the same per second, and renders up to 1080p at 30 fps on every self-serve plan. It works only on a top-level track or in `overlays`, not inside a scene or a composition. See [what each plan renders](/docs/jobs/compose/pricing#what-each-plan-renders).
## The 33 easings
`step` holds the value until the next keyframe. `linear` moves at a constant rate. `smooth` curves through every keyframe, so a move across several keyframes has no sharp corners. The other 30 are the `easeIn`, `easeOut` and `easeInOut` families over Sine, Quad, Cubic, Quart, Quint, Expo, Circ, Back, Elastic and Bounce.
Back, Elastic and Bounce overshoot the value you set, by design. When you use one on `position`, leave room at the edges of the frame.
# Output format, size and quality
Source: https://rendobar.com/docs/jobs/compose/output
Set what a compose render returns: mp4, webm, gif, mp3, jpg or png, a platform size preset or any resolution, the frame rate, and the encoder quality.
`output` sets the file you get back. Without it, you get a 1080p mp4 at 30 fps.
```json theme={null}
"output": { "format": "mp4", "size": "reels", "fps": 30, "quality": "high" }
```
A compose job renders one file. For two sizes of the same edit, submit two jobs. They render at the same time.
## Formats
| `format` | You get |
| - | - |
| `mp4` | Video with sound, H.264 and AAC. The default. |
| `webm` | Video with sound, VP9 and Opus. Keeps a transparent background. |
| `gif` | An animated image, with no sound. |
| `mp3` | Sound alone. Needs no frame size. |
| `jpg` | One frame, as a still. |
| `png` | One frame, as a still. Keeps a transparent background. |
## Size
Set a `size` preset or an exact `resolution`. If you set both, `resolution` wins. Every format except `mp3` needs one of them.
```json theme={null}
"output": { "format": "mp4", "resolution": { "width": 1080, "height": 1350 } }
```
| `size` | Pixels |
| - | - |
| `360p` | 640 x 360 |
| `720p` | 1280 x 720 |
| `1080p` | 1920 x 1080 |
| `1440p` | 2560 x 1440 |
| `4k` | 3840 x 2160 |
| `tiktok`, `reels`, `shorts`, `instagram-story` | 1080 x 1920 |
| `instagram-feed` | 1080 x 1350 |
| `square` | 1080 x 1080 |
| `youtube-hd`, `x-landscape`, `linkedin` | 1920 x 1080 |
| `youtube-4k` | 3840 x 2160 |
For a vertical Reel from landscape footage, set `"fit": "cover"` to fill the frame, or `"fit": "blur"` to show the whole picture over a blurred copy of itself. See [how a picture fills its box](/docs/jobs/compose/framing#how-a-picture-fills-its-box).
## Frame rate
`fps` sets the frame rate, 30 by default. Each plan caps frame size and frame rate together: 1080p at 30 fps on Free, 1440p at 30 fps on Pro, and 4K at 60 fps on Studio. Animated graphics render up to 1080p at 30 fps on every self-serve plan. A video above your plan returns `403 PLAN_LIMIT` at submit, and [validation](/docs/jobs/compose/pricing#check-a-timeline-before-you-render) catches it first. See [what each plan renders](/docs/jobs/compose/pricing#what-each-plan-renders).
## Quality
`quality` trades picture quality against file size and render time.
| `quality` | For |
| - | - |
| `draft` | A fast preview |
| `standard` | Web delivery. The default. |
| `high` | A sharper master, slower to encode |
| `max` | The highest fidelity, slowest to encode |
To set the encoder yourself, these override `quality`:
| Field | Takes |
| - | - |
| `videoCodec` | `h264` (the mp4 default) or `vp9`. webm is always vp9. |
| `audioCodec` | `aac` (the mp4 default), `opus` or `mp3`. webm is always opus. |
| `crf` | Constant rate factor. Lower means better quality and a larger file: 0 to 51 for h264, 0 to 63 for vp9. Not for gif, mp3 or stills. |
| `encoderPreset` | `ultrafast` through `veryslow`, h264 only. Slower gives a smaller file at the same quality. |
## Transparent video
`timeline.background` fills any area the clips do not cover, with a hex colour (black by default) or `"transparent"`. png and webm keep transparency as an alpha channel, so you can render a lower third or a logo animation to lay over other video. mp4, gif and jpg have no transparency and refuse a transparent background instead of rendering it black.
```json theme={null}
{
"schemaVersion": 1,
"output": { "format": "webm", "size": "1080p" },
"timeline": {
"background": "transparent",
"tracks": [{ "clips": [{ "asset": { "type": "image", "src": "https://cdn.rendobar.com/assets/brand/logo-mark.png" }, "length": 3 }] }]
}
}
```
## Part of a timeline, or one frame
`range` renders part of the timeline, from the second in `start` for `length` seconds. Leave out `length` to render to the end. On `jpg` and `png`, `start` is the moment captured, for a poster frame.
```json theme={null}
"output": { "format": "png", "size": "1080p", "range": { "start": 4.5 } }
```
The [output reference](/docs/jobs/compose/reference/output) lists every output field.
# Compose pricing and validation
Source: https://rendobar.com/docs/jobs/compose/pricing
See what a compose render costs, one price per minute of output video on every plan with a 15-second minimum, and check a timeline for free before you render.
Compose bills per second of the video you get back, not per second of compute. The rate is \$0.04 per minute of output video, on every plan and for every video your plan can render. You can check the price before you render.
Each render bills at least 15 seconds, which is 1 cent. You pay from your [credit balance](/docs/concepts/credits). The \$5 signup credit covers 125 minutes of compose output.
| Render | Price |
| - | - |
| 10 s (bills the 15 s minimum) | \$0.01 |
| 30 s | \$0.02 |
| 2 min | \$0.08 |
| 10 min | \$0.40 |
Frame size and animated graphics do not change the price. A 2-minute render costs the same at 720p or 4K. Animated text and 3D turns render up to 1080p at 30 fps, and adding them does not change the price.
## What each plan renders
Plans differ in what they can render. The per-minute price is the same.
| Plan | Renders up to |
| - | - |
| Free (pay-as-you-go) | 1080p at 30 fps, animated graphics included |
| Pro | 1440p at 30 fps. Animated graphics up to 1080p at 30 fps |
| Studio | 4K at 60 fps. Animated graphics up to 1080p at 30 fps |
| Enterprise | Animated graphics above 1080p or 30 fps, at a contract rate. Email `hello@rendobar.com` |
Animated graphics are:
* text that enters or leaves a letter, word or line at a time
* text with a `blur` or `scale` entrance, or any exit
* clips turned in 3D with `rotateX` or `rotateY`
A `fade` or a slide of a whole title, a Lottie animation and a 2D transform do not count. Frame size counts by pixels, so a portrait 1080x1920 video counts as 1080p.
Pro costs \$9 a month and includes \$5 of monthly credit. Studio costs \$29 a month and includes \$20 of monthly credit. Their compose discount is a 25% bonus on every credit purchase, so \$25 buys \$31.25 of credit. See [credits and billing](/docs/concepts/credits#plans).
A video above your plan returns `403 PLAN_LIMIT` at submit, before anything renders or is charged. `upgradeTo` in `error.details` names the plan that can render it, or is `null` when only an enterprise plan can. Only video outputs (`mp4`, `webm`, `gif`) are checked. A `jpg`, `png` or `mp3` output renders on every plan.
`GET /account/capabilities` returns your plan's limits: `composeMaxPixels` and `composeMaxFps` for a plain edit, and `composeAnimatedMaxPixels` and `composeAnimatedMaxFps` for one with animated graphics.
## Failed renders
You pay nothing for a render that fails on Rendobar's side, or for a job that never started.
If the failure may come from your input, such as the render tool exiting on a bad file, you pay for the compute the job used at 2x. `GET /jobs/{id}` returns the job's `cost` once it is billed, so you can see what a failed render was charged.
## Check a timeline before you render
`POST /compose/validate` parses a timeline the same way a render does, for free. Call it from your code before you submit. Agents can use the MCP tool `validate_compose`.
```ts SDK theme={null}
const check = await client.compose.validate(params);
if (!check.valid) console.error(check.problems);
else console.log(check.price); // { perMinuteUsd: 0.04, minSeconds: 15 }
```
```bash cURL theme={null}
curl -X POST https://api.rendobar.com/compose/validate \
-H "Authorization: Bearer rb_YOUR_KEY" \
-H "Content-Type: application/json" \
-d '{ "params": { "schemaVersion": 1, "output": { "format": "mp4", "size": "1080p" }, "timeline": { "tracks": [{ "clips": [{ "asset": { "type": "video", "src": "https://example.com/a.mp4" } }] }] } } }'
```
The response contains:
| Field | Holds |
| - | - |
| `valid` | Whether the timeline would be accepted |
| `problems` | What is wrong, each with the path of its field. A plan limit appears at `["output"]`, with `upgradeTo` set to `"pro"` or `"studio"`, or `null` when only an enterprise plan renders it. |
| `params` | The timeline as the engine reads it, with every default filled in |
| `upgraded` | Anything written for an older API version and upgraded to the current shape. Old timelines keep rendering. |
| `warnings` | Settings the render will ignore or adjust, such as a transition longer than a clip, or a font that falls back |
| `price` | `{ "perMinuteUsd": 0.04, "minSeconds": 15 }` |
The charge is the video's length in minutes times `perMinuteUsd`, counted by the second, and never less than `minSeconds`.
`GET /compose/effects` lists every built-in effect with its settings. `GET /compose/effects/engine` lists every filter an `engine` entry can name. Build from these live lists instead of a copy. In the SDK, use `client.compose.effects()` and `client.compose.engineEffects()`.
All other job types, [FFmpeg](/docs/jobs/ffmpeg) included, bill per second of compute. See [how a job is priced](/docs/concepts/credits#how-is-a-job-priced).
## See also
* [Output](/docs/jobs/compose/output): formats, size presets, frame rate and quality
* [Credits and billing](/docs/concepts/credits): balance, credit packs, and when the debit lands
* [Plan limits](/docs/support/limits): render time, file-size and compose frame caps per plan
# Animation asset reference
Source: https://rendobar.com/docs/jobs/compose/reference/animation
Add a Lottie animation exported by a designer with its transparency kept, and every field the asset accepts.
Set `asset.type` to `"animation"`. These are its own fields, on top of the [clip fields](/docs/jobs/compose/reference/timeline#clip) every clip takes.
| Field | Type | What it does |
| - | - | - |
| `src` \* | string | Lottie animation URL: the .json file LottieFiles, After Effects (Bodymovin) and Figma plugins export. It plays once, for its own length, with a transparent background, and fits the frame like an image: place and size it with the transform. |
| `trim` | object | Which part of the source file to use, in source seconds. Omit to play from the start. |
| `trim.from` \* | number | Start second in the SOURCE file. min 0. |
| `trim.to` \* | number | End second in the SOURCE file (exclusive). over 0. |
Fields marked `*` are required. Every table on this page is generated from the schema the API validates with, so it cannot drift from what a render accepts.
# Audio asset reference
Source: https://rendobar.com/docs/jobs/compose/reference/audio
Add an audio clip and set its volume, fades, trim and speed, with every field it accepts listed in full.
Set `asset.type` to `"audio"`. These are its own fields, on top of the [clip fields](/docs/jobs/compose/reference/timeline#clip) every clip takes.
| Field | Type | What it does |
| - | - | - |
| `src` \* | string | Audio URL (mp3/wav/aac). Put music on its own track under the video tracks. |
| `trim` | object | Which part of the source file to use, in source seconds. Omit to play from the start. |
| `trim.from` \* | number | Start second in the SOURCE file. min 0. |
| `trim.to` \* | number | End second in the SOURCE file (exclusive). over 0. |
| `volume` | number \| object\[] | Gain: 1 = source level. 0.2-0.4 sits music under speech. Keyframes duck it: drop to 0.2 while someone speaks and back to 1 after. default `1`. |
| `fadeIn` | number | Seconds to ramp in from silence. Works with `volume` keyframes: the fade shapes whatever level they set. default `0`, min 0. |
| `fadeOut` | number | Seconds to ramp out to silence at the clip's end. Works with `volume` keyframes, like `fadeIn`. default `0`, min 0. |
Fields marked `*` are required. Every table on this page is generated from the schema the API validates with, so it cannot drift from what a render accepts.
# Composition asset reference
Source: https://rendobar.com/docs/jobs/compose/reference/composition
Use a nested timeline as one clip so a group of clips moves, scales and fades together, with every field listed.
Set `asset.type` to `"composition"`. These are its own fields, on top of the [clip fields](/docs/jobs/compose/reference/timeline#clip) every clip takes.
| Field | Type | What it does |
| - | - | - |
| `timeline` \* | object | |
Fields marked `*` are required. Every table on this page is generated from the schema the API validates with, so it cannot drift from what a render accepts.
# Effect reference
Source: https://rendobar.com/docs/jobs/compose/reference/effects
Read every compose effect and each one of its parameters, grouped by colour, stylise, layers and sound.
Every entry of an `effects` list. An effect goes on a clip, on a track, or on the timeline itself, and the list runs in the order you write it. Any entry takes `start` and `length` to run for part of its clip, and a parameter marked animatable takes [keyframes](/docs/jobs/compose/motion).
## Color
### `color`
Grade the picture by hand. Every parameter is optional, and one left out leaves that quality unchanged.
| Parameter | Type | What it does |
| - | - | - |
| `brightness` | number | -1 to 1, 0 = unchanged. Small moves (0.05 to 0.15) read as exposure lifts. min -1, max 1, animatable. |
| `contrast` | number | 0 to 4, 1 = unchanged. 1.1 to 1.4 adds punch, above 2 crushes. min 0, max 4, animatable. |
| `saturation` | number | 0 to 3, 1 = unchanged. 0 is black and white, 1.2 to 1.4 is a vivid social look. min 0, max 3, animatable. |
| `gamma` | number | 0.1 to 10, 1 = unchanged. Above 1 lifts midtones and shadows. min 0.1, max 10, animatable. |
| `hue` | number | Hue rotation in degrees, 0 = unchanged. min -180, max 180, in deg. |
| `temperature` | number | Colour temperature in kelvin, about 6500 is neutral. Lower is warm and orange, higher is cool and blue. min 1000, max 40000, in K. |
### `look`
A one-word look: greyscale, boost (vivid social pop), muted (desaturated, cinematic), lighten and darken (exposure), contrast, negative, sepia (brown archive tone), oldFilm (sepia with grain, dust, scratches, projector flicker and a vignette).
| Parameter | Type | What it does |
| - | - | - |
| `name` | `"greyscale"` \| `"negative"` \| `"boost"` \| `"muted"` \| `"lighten"` \| `"darken"` \| `"contrast"` \| `"sepia"` \| `"oldFilm"` | Which look. |
### `blur`
Soften the picture. 5 to 15 makes a backdrop that keeps text over it readable.
| Parameter | Type | What it does |
| - | - | - |
| `radius` | number | How far the blur spreads, in pixels. 0 is no blur. min 0, in px, animatable. |
### `sharpen`
Crisp up soft footage.
| Parameter | Type | What it does |
| - | - | - |
| `amount` | number | 0 to 1. 0.2 to 0.6 is subtle, 1 is as sharp as it goes. default `0.4`, min 0, max 1, animatable. |
### `denoise`
Clean the grain a small sensor adds in low light. Works across neighbouring frames as well as inside each one.
| Parameter | Type | What it does |
| - | - | - |
| `amount` | number | 0 to 1. 0.3 to 0.6 cleans a dark phone clip, higher starts to smear fine detail. default `0.55`, min 0, max 1, animatable. |
### `glow`
Make the bright parts of the picture bloom. Best on lights against a dark frame: a city at night, a stage, a candle.
| Parameter | Type | What it does |
| - | - | - |
| `amount` | number | 0 to 1, how far the bloom spreads. default `0.45`, min 0, max 1, animatable. |
### `grain`
A layer of film grain, so digital footage feels less clinical.
| Parameter | Type | What it does |
| - | - | - |
| `amount` | number | 0 to 1. 0.2 to 0.35 is a light film stock, above 0.6 is heavy and deliberate. default `0.28`, min 0, max 1, animatable. |
### `lut`
Grade the picture with a 3D LUT, the .cube file a colourist or a grading app exports.
| Parameter | Type | What it does |
| - | - | - |
| `src` | file | URL of the LUT: a 3D .cube file, the kind DaVinci Resolve, Premiere and most LUT packs export. |
### `vignette`
Darken the corners to pull the eye to the middle of the frame.
| Parameter | Type | What it does |
| - | - | - |
| `amount` | number | 0 to 1, how dark the corners get. 1 is black. default `0.6`, min 0, max 1, animatable. |
| `radius` | number | 0 to 1, how much of the frame stays clear. Smaller closes in on the centre. default `0.5`, min 0, max 1, animatable. |
## Layers
### `chromaKey`
Remove a solid background colour (green screen). Put the keyed clip on an UPPER track, and the removed area shows the track below.
| Parameter | Type | What it does |
| - | - | - |
| `color` | color | The background colour to remove, hex like "#00FF00" for green screen. |
| `similarity` | number | How close a pixel must be to the key colour to become transparent. Raise toward 0.3 to 0.4 for uneven lighting. default `0.2`, min 0, max 1. |
### `blurRegion`
Blur one part of the picture and leave the rest sharp: a face, a number plate, a logo, a screen.
| Parameter | Type | What it does |
| - | - | - |
| `x` | length | Centre of the region, measured from the left edge. |
| `y` | length | Centre of the region, measured from the top edge. |
| `width` | length | Width of the region. |
| `height` | length | Height of the region. |
| `shape` | `"ellipse"` \| `"rect"` | ellipse suits a face, rect a plate or a screen. default `"ellipse"`. |
| `radius` | number | How far the blur spreads inside the region, in pixels. 40 makes a face unrecognisable at 1080p. default `40`, min 0, in px, animatable. |
### `mask`
Show the clip only where an image says: white or opaque keeps it, black or clear cuts it away, grey fades it. A picture seen through a logo, or any shape you can draw.
| Parameter | Type | What it does |
| - | - | - |
| `src` | file | URL of the mask image, png or jpg. It is stretched over the clip's picture, so draw it at the same shape. |
| `channel` | `"luma"` \| `"alpha"` | What of the image decides: luma reads its brightness, for a black and white matte; alpha reads its transparency, for a png cut-out like a logo. default `"luma"`. |
### `outline`
A stroke round the edge of a layer that has transparency: a keyed subject, a picture in picture, a logo. With dropShadow it is the sticker look. Does nothing on a clip that fills the frame. Text and shapes have their own stroke.
| Parameter | Type | What it does |
| - | - | - |
| `color` | color | Stroke colour, hex like "#FFFFFF". default `"#FFFFFF"`. |
| `width` | number | Stroke width in pixels. The engine draws up to 20. default `8`, min 0, max 20, in px, animatable. |
### `dropShadow`
A soft shadow under a layer that has transparency, so a logo, a cut-out or a picture in picture lifts off what is behind it. Does nothing on a clip that fills the frame.
| Parameter | Type | What it does |
| - | - | - |
| `color` | color | Shadow colour, hex. default `"#000000"`. |
| `opacity` | number | 0 to 1, how dark the shadow is. default `0.6`, min 0, max 1. |
| `blur` | number | How soft the shadow's edge is, in pixels. default `16`, min 0, max 100, in px, animatable. |
| `offsetX` | number | How far right the shadow falls, in pixels. Negative is left. default `0`, min -100, max 100, in px, animatable. |
| `offsetY` | number | How far down the shadow falls, in pixels. Negative is up. default `8`, min -100, max 100, in px, animatable. |
## Sound
### `visualizer`
Draw the sound over the picture: the audiogram look. In the TIMELINE's effects it draws the final mix, which is the usual place. On a track or a clip it draws that track's or that clip's own sound.
| Parameter | Type | What it does |
| - | - | - |
| `kind` | `"waveform"` \| `"spectrum"` | waveform is a moving line, spectrum is frequency bars that jump with the sound. default `"waveform"`. |
| `color` | color | Colour of the drawing, hex. default `"#FFFFFF"`. |
| `x` | length | Centre of the drawing, measured from the left edge. default `"50%"`. |
| `y` | length | Centre of the drawing, measured from the top edge. The default sits it in the lower third. default `"77%"`. |
| `width` | length | Width of the drawing. default `"88%"`. |
| `height` | length | Height of the drawing. default `"38%"`. |
### `eq`
Three-band tone control. More bass and treble on a music bed, or less boom on a voice.
| Parameter | Type | What it does |
| - | - | - |
| `bass` | number | Low end, a shelf from about 150 Hz down, in decibels. 0 is unchanged, 3 to 6 warms a music bed, negative thins a boomy voice. min -70, max 6, in dB. |
| `mid` | number | Middle, two octaves around 1 kHz, in decibels. 0 is unchanged. A few decibels down softens a harsh voice. min -70, max 6, in dB. |
| `treble` | number | Top end, a shelf from about 6 kHz up, in decibels. 0 is unchanged, 3 to 5 adds sparkle and presence. min -70, max 6, in dB. |
### `compressor`
Even out a voice, so quiet words and loud words sit at one level. The defaults suit speech.
| Parameter | Type | What it does |
| - | - | - |
| `threshold` | number | The level above which it starts to turn the sound down, in decibels. default `-22`, min -30, max 0, in dB. |
| `ratio` | number | How hard it turns down what is over the threshold. 2 to 4 is natural on speech, above 10 is a limiter. default `4`, min 1, max 20. |
| `makeup` | number | Gain added back afterwards, in decibels, so the evened-out sound is as loud as before. default `9`, min 0, max 24, in dB. |
### `limiter`
Stop peaks from clipping. Add gain to make a track louder with no distortion, or leave gain at 0 as a safety net on the final mix.
| Parameter | Type | What it does |
| - | - | - |
| `gain` | number | Gain going in, in decibels. 6 to 9 makes music clearly louder. default `0`, min -20, max 20, in dB. |
| `ceiling` | number | The level nothing is allowed over, in decibels. default `-1`, min -20, max 0, in dB. |
### `gate`
Close the microphone between phrases, so room noise drops away in the pauses.
| Parameter | Type | What it does |
| - | - | - |
| `threshold` | number | Sound quieter than this is turned down, in decibels. Set it just above the noise. default `-30`, min -70, max 20, in dB. |
### `highPass`
Cut everything below a frequency. Wind, traffic and handling noise live under the voice.
| Parameter | Type | What it does |
| - | - | - |
| `cutoff` | number | Frequencies below this are removed, in hertz. 80 to 120 cleans speech, 200 and up is drastic. default `100`, min 5, max 21600, in Hz. |
### `lowPass`
Cut everything above a frequency. Music from the next room, or a voice on the phone.
| Parameter | Type | What it does |
| - | - | - |
| `cutoff` | number | Frequencies above this are removed, in hertz. default `700`, min 5, max 21600, in Hz. |
### `loudness`
Bring sound to a standard loudness, riding the level as it goes. -16 suits online video and podcasts, -23 is broadcast.
| Parameter | Type | What it does |
| - | - | - |
| `target` | number | The loudness to aim for, in LUFS. default `-16`, min -50, max -10, in LUFS. |
### `pitch`
Raise or lower the pitch without changing the speed.
| Parameter | Type | What it does |
| - | - | - |
| `semitones` | number | How far to shift. 12 is an octave up, -3 deepens a voice. min -36, max 36, in semitones. |
### `echo`
A repeat behind the sound.
| Parameter | Type | What it does |
| - | - | - |
| `delay` | number | Time before the repeat, in seconds. The engine starts at 0.1. default `0.28`, min 0.1, max 10, in s. |
| `amount` | number | 0 to 1, how loud the repeat is against the original. default `0.4`, min 0, max 1. |
### `reverb`
Place a dry voice in a hall.
| Parameter | Type | What it does |
| - | - | - |
| `amount` | number | 0 to 1, how much room you hear. 0.3 is a touch of air, 0.8 is a cathedral. default `0.5`, min 0, max 1. |
### `voiceDenoise`
Remove steady background noise from under speech: a river, a fan, a street. Trained on voices, so keep it off music.
| Parameter | Type | What it does |
| - | - | - |
| `amount` | number | 0 to 1, how much of the noise is removed. default `1`, min 0, max 1. |
## Stylize
### `shake`
Handheld camera energy on a steady shot. The picture is zoomed in slightly so its edges never show.
| Parameter | Type | What it does |
| - | - | - |
| `amount` | number | 0 to 1, how far the frame moves. 0.2 to 0.4 is handheld, 1 is an earthquake. default `0.3`, min 0, max 1, animatable. |
| `speed` | number | 0 to 1, how fast it moves. default `0.3`, min 0, max 1, animatable. |
### `glitch`
Digital break-up: blocks of the picture jump sideways and the colours tear. For a beat or a scene change, so give it a short length.
| Parameter | Type | What it does |
| - | - | - |
| `amount` | number | 0 to 1, how often the picture breaks. default `0.55`, min 0, max 1, animatable. |
### `pixelate`
Large square pixels over the whole picture.
| Parameter | Type | What it does |
| - | - | - |
| `size` | number | The side of one block, in pixels. default `24`, min 1, in px, animatable. |
### `posterize`
Flatten the picture into a few steps of each colour, like a screen print.
| Parameter | Type | What it does |
| - | - | - |
| `levels` | number | How many steps each colour channel keeps. 2 to 6 is a poster, above 16 is barely visible. default `4`, min 2, max 48, animatable. |
### `rgbShift`
Pull the red and blue channels apart sideways, for a chromatic, analogue-video edge.
| Parameter | Type | What it does |
| - | - | - |
| `distance` | number | How far each channel moves, in pixels. The engine stops at a sixteenth of the frame's width. default `10`, min 0, in px, animatable. |
### `scanLines`
The dark horizontal lines of a CRT monitor.
*No parameters.*
### `sketch`
Turn the picture into a pencil drawing.
| Parameter | Type | What it does |
| - | - | - |
| `amount` | number | 0 to 1. 1 is a pure pencil drawing on white, lower lets the original colours wash back in behind the lines. default `1`, min 0, max 1, animatable. |
### `trails`
Blend the last moments of the clip together, so moving lights and people leave streaks.
| Parameter | Type | What it does |
| - | - | - |
| `duration` | number | How long a streak lasts, in seconds. default `0.9`, min 0, in s. |
## Easings
Any keyframe takes one of 33: `step`, `linear`, `smooth`, `easeInSine`, `easeOutSine`, `easeInOutSine`, `easeInQuad`, `easeOutQuad`, `easeInOutQuad`, `easeInCubic`, `easeOutCubic`, `easeInOutCubic`, `easeInQuart`, `easeOutQuart`, `easeInOutQuart`, `easeInQuint`, `easeOutQuint`, `easeInOutQuint`, `easeInExpo`, `easeOutExpo`, `easeInOutExpo`, `easeInCirc`, `easeOutCirc`, `easeInOutCirc`, `easeInBack`, `easeOutBack`, `easeInOutBack`, `easeInElastic`, `easeOutElastic`, `easeInOutElastic`, `easeInBounce`, `easeOutBounce`, `easeInOutBounce`.
Fields marked `*` are required. Every table on this page is generated from the schema the API validates with, so it cannot drift from what a render accepts.
# Image asset reference
Source: https://rendobar.com/docs/jobs/compose/reference/image
Add a still image clip and control how long it lasts and how it fills its box, with every field listed in full.
Set `asset.type` to `"image"`. These are its own fields, on top of the [clip fields](/docs/jobs/compose/reference/timeline#clip) every clip takes.
| Field | Type | What it does |
| - | - | - |
| `src` \* | string | Image URL (png/jpg). Give a photo life with scale keyframes from 1 to about 1.15, a Ken Burns move. |
Fields marked `*` are required. Every table on this page is generated from the schema the API validates with, so it cannot drift from what a render accepts.
# Output reference
Source: https://rendobar.com/docs/jobs/compose/reference/output
Set the format, frame size, frame rate, codecs, quality and range of the single file a compose job renders.
What the render produces. One compose job renders exactly one file.
| Field | Type | What it does |
| - | - | - |
| `format` | `"mp4"` \| `"webm"` \| `"gif"` \| `"mp3"` \| `"jpg"` \| `"png"` | Output container/format. mp4=H.264+AAC, webm=VP9+Opus, gif=animated (no audio), mp3=audio only and needs no size, jpg/png=single frame. default `"mp4"`. |
| `size` | `"360p"` \| `"720p"` \| `"1080p"` \| `"1440p"` \| `"4k"` \| `"tiktok"` \| `"reels"` \| `"shorts"` \| `"instagram-story"` \| `"instagram-feed"` \| `"square"` \| `"youtube-hd"` \| `"youtube-4k"` \| `"x-landscape"` \| `"linkedin"` | Named resolution preset (dimensions only): a generic ladder ("1080p", "4k") or a platform alias ("tiktok", "reels", "youtube-4k"). An explicit `resolution` overrides this. Not used by mp3. Free renders up to 1080p at 30 fps, Pro 1440p at 30 fps, Studio 4K at 60 fps. |
| `resolution` | object | Explicit output dimensions. Wins over `size`. Every format but mp3 needs this or `size`. |
| `resolution.width` \* | integer | Output width in pixels. over 0, max 9007199254740991. |
| `resolution.height` \* | integer | Output height in pixels. over 0, max 9007199254740991. |
| `fps` | number | Output frame rate. Defaults to 30. Free renders up to 1080p at 30 fps, Pro 1440p at 30 fps, Studio 4K at 60 fps. default `30`, over 0. |
| `quality` | `"draft"` \| `"standard"` \| `"high"` \| `"max"` | Encoder quality ladder (crf + speed + audio bitrate). draft=fast preview, standard=web delivery (default), high/max=higher fidelity, slower. Explicit `crf`/`encoderPreset` override the ladder. default `"standard"`. |
| `videoCodec` | `"h264"` \| `"vp9"` | The video codec. mp4 takes h264 (default) or vp9. webm is always vp9. gif is always GIF, so it takes none. |
| `audioCodec` | `"aac"` \| `"opus"` \| `"mp3"` | The audio codec. mp4 takes aac (default), opus or mp3. webm is always opus and mp3 always mp3. |
| `crf` | integer | Advanced: constant rate factor (lower = higher quality/larger file). Overrides `quality`. h264 accepts 0-51, vp9 0-63. Does not apply to gif/mp3/jpg/png. min 0, max 63. |
| `encoderPreset` | `"ultrafast"` \| `"superfast"` \| `"veryfast"` \| `"faster"` \| `"fast"` \| `"medium"` \| `"slow"` \| `"slower"` \| `"veryslow"` | Advanced: x264 speed/compression preset (slower = smaller file, same quality). Overrides `quality`. h264 only. |
| `range` | object | Which part of the timeline to render: a preview, or one section checked without paying for the whole render. A jpg or png is the single frame at `start`, the first frame when there is no range. |
| `range.start` | number | Second of the timeline to start from. For a jpg or png, the moment captured. default `0`, min 0. |
| `range.length` | number | Seconds to render. Leave it out to run to the end. A range past the end stops at the end. A jpg or png is one frame and ignores it. over 0. |
Fields marked `*` are required. Every table on this page is generated from the schema the API validates with, so it cannot drift from what a render accepts.
# Shape asset reference
Source: https://rendobar.com/docs/jobs/compose/reference/shape
Render a rectangle, ellipse, polygon or path as a clip, with every field a shape asset accepts listed in full.
Set `asset.type` to `"shape"`. These are its own fields, on top of the [clip fields](/docs/jobs/compose/reference/timeline#clip) every clip takes.
| Field | Type | What it does | |
| - | - | - | - |
| `shape` | `"rect"` \| `"ellipse"` \| `"circle"` \| `"triangle"` \| `"diamond"` \| `"path"` | What to draw, in the box the clip's `transform.size` gives it. Size, place and turn the shape with the transform like any clip, and with no size it fills the frame. rect is the default and the only kind that takes a `radius` or a two-colour fill plus stroke. circle takes one side of the box, its diameter, so it stays round on any frame. triangle points down until you `rotate` it. path draws whatever SVG path data you paste into `path`. A LINE is a rect with a small height, turned with `rotate` when it needs to be diagonal. default `"rect"`. | |
| `color` | string \| any\[] \| object\[] | Fill colour, "#RRGGBB", or "#RRGGBBAA" to make the fill itself translucent. "#00000080" is a 50% scrim to sit text on. Give TWO colours as an array and it is a gradient, \["#E11D48","#3B82F6"], running in the direction `gradient` names. Keyframes change it over time, and a solid can become a gradient. Leave it out and only the `stroke` draws, which is an outline with a real hole in it. The clip opacity makes the whole shape translucent the same way, outline and shadow included, and can be keyframed. | |
| `gradient` | `"vertical"` \| `"horizontal"` \| `"diagonal"` \| `"radial"` | Which way a two-colour `color` runs: vertical (top to bottom, the default), horizontal, diagonal, or radial from the centre out. The gradient is mapped to the SHAPE, not the frame, so a small badge still shows the whole ramp. | |
| `stroke` | object | An outline drawn just inside the edge of the shape. With no `color` it is an outline only, and what it surrounds is genuinely transparent. | |
| `stroke.color` \* | string | Outline colour, hex like "#FFFFFF". pattern `^#[0-9A-Fa-f]{6}$`. | |
| `stroke.width` \* | number | Outline width in pixels of the output frame, drawn INSIDE the edge of the shape. 2-8 reads well at 1080p. over 0. | |
| `path` | string | SVG path data, the `d` attribute straight out of a design tool, for `shape: "path"`. Supports M L H V C S Q T Z, absolute and relative. Elliptical arcs (A) are refused rather than approximated, so re-export with arcs converted to curves. The path is scaled into the clip's box, so the same data works at any size on any frame. | |
| `viewBox` | string | The coordinate space `path` is written in, like "0 0 24 24" for a pasted icon. Defaults to "0 0 100 100", so a path written in percentages needs no viewBox at all. | |
| `radius` | number \| object\[] | Corner rounding on a rect. 0 is square, 1 is fully round, which gives a pill on a wide box and a circle on a square one. Keyframes round it off or square it up. Rectangles only, and not combinable with a turn or `softness`. default `0`. | |
| `softness` | number | Feathers the edge; 0 is a hard edge. 0.1 to 0.3 makes a soft spotlight or vignette instead of a hard-edged shape. Not available on a rect that has a `radius`. default `0`, min 0, max 1. | |
| `shadow` | object | A drop shadow behind the shape. Every field has a default, so "shadow": \{} is a sensible one. It follows the shape, including its outline, its turn and its animation. | |
| `shadow.color` | string | Shadow colour, usually black with alpha like "#00000080". default `"#00000080"`, pattern \`^#(\[0-9A-Fa-f]6 | \[0-9A-Fa-f]8)\$\`. |
| `shadow.blur` | number | Blur radius in pixels. 8-20 reads as a soft drop shadow; 0 is a hard offset copy. default `12`, min 0. | |
| `shadow.x` | number | Horizontal offset in pixels, positive to the right. default `6`. | |
| `shadow.y` | number | Vertical offset in pixels, positive downward. default `6`. | |
Fields marked `*` are required. Every table on this page is generated from the schema the API validates with, so it cannot drift from what a render accepts.
# Subtitles asset reference
Source: https://rendobar.com/docs/jobs/compose/reference/subtitles
Burn subtitles written inline or read from an SRT or VTT file, with every field the asset accepts listed.
Set `asset.type` to `"subtitles"`. These are its own fields, on top of the [clip fields](/docs/jobs/compose/reference/timeline#clip) every clip takes.
| Field | Type | What it does | | |
| - | - | - | - | - |
| `cues` | object\[] | The lines, in order. Times count from the start of the clip, so moving the clip moves its subtitles. Or give `src` instead. | | |
| `cues.start` \* | number | When the line appears, in seconds from the start of THIS clip. min 0. | | |
| `cues.end` \* | number | When the line goes, in seconds from the start of this clip. over 0. | | |
| `cues.text` \* | string | The line. Keep it to two short rows. | | |
| `src` | string | An .srt or .vtt file with the lines, instead of `cues`: what a transcription service gives you. Its times count from the start of the clip. | | |
| `reveal` | `"line"` \| `"typewriter"` | line shows each cue at once, typewriter types it out word by word, the social-video style. default `"line"`. | | |
| `style` | object | default `{}`. | | |
| `style.font` | string | Font family, or a CSS fallback stack. Any Google Fonts family works by name. Bundled and instant: Inter, Bebas Neue, Anton, Montserrat, Poppins, Roboto, Oswald. Families declared in the `fonts` job input win over both. A stack falls through in CSS order, so "Display, Inter, sans-serif" tries each in turn. default `"Inter"`. | | |
| `style.size` | number | Font size in pixels of the output frame. \~64-96 for titles at 1080p, \~36-48 for lower thirds. Defaults to 64. default `64`, over 0. | | |
| `style.weight` | integer | Font weight 100..1000 (400 regular, 700 bold, 800+ display). Honoured exactly on variable fonts; snapped to the nearest available weight otherwise. default `400`, min 100, max 1000. | | |
| `style.italic` | boolean | Render the italic cut of the family, when it has one. default `false`. | | |
| `style.color` | string | Text fill color, hex like "#FFFFFF". default `"#FFFFFF"`, pattern \`^#(\[0-9A-Fa-f]3 | \[0-9A-Fa-f]6 | \[0-9A-Fa-f]8)\$\`. |
| `style.stroke` | object | Outline around the glyphs. A 2-4px black stroke keeps white text readable on bright footage. | | |
| `style.stroke.color` \* | string | Outline color, hex like "#000000". pattern \`^#(\[0-9A-Fa-f]3 | \[0-9A-Fa-f]6 | \[0-9A-Fa-f]8)\$\`. |
| `style.stroke.width` \* | number | Outline width in pixels. 2 to 4 keeps text readable over busy footage. min 0. | | |
| `style.background` | string | Solid box color behind the text, hex. Omit for no box. pattern \`^#(\[0-9A-Fa-f]3 | \[0-9A-Fa-f]6 | \[0-9A-Fa-f]8)\$\`. |
| `style.align` | `"left"` \| `"center"` \| `"right"` | How the lines line up, and which side of the text sits on the clip's transform.position x: left starts there, center is centred on it, right ends there. Place the text with the clip's transform, not here. default `"center"`. | | |
| `style.animate` | object | How the text enters: \{"type":"fade"} or one of the slides. A split (`by`), a blur or scale entrance and an exit (`out`) are not available here, because the text changes as it plays. | | |
| `style.animate.type` \* | `"fade"` \| `"slideUp"` \| `"slideDown"` \| `"slideLeft"` \| `"slideRight"` \| `"blur"` \| `"scale"` | How the text arrives: fade in place, slide in from the named direction while fading, blur comes into focus, scale grows from small. | | |
| `style.animate.duration` | number | Seconds the whole entrance takes. With `by`, the last unit lands at this time. 0.4 to 0.8 reads polished for one piece of text, 0.8 to 1.5 for a split title. default `0.5`, over 0. | | |
| `style.animate.by` | `"letter"` \| `"word"` \| `"line"` | Animate the text one letter, word or line at a time: kinetic titles and lower thirds. Omit it and the text moves as one piece. | | |
| `style.animate.stagger` | number | Seconds between one unit starting and the next. Omit it and the units spread evenly over the first 40% of `duration`. min 0. | | |
| `style.animate.order` | `"start"` \| `"end"` \| `"center"` \| `"edges"` \| `"random"` | Which unit starts first. center and edges start units at the same distance together. random is seeded by the clip, so a re-render is identical. default `"start"`. | | |
| `style.animate.out` | `"fade"` \| `"slideUp"` \| `"slideDown"` \| `"slideLeft"` \| `"slideRight"` \| `"blur"` \| `"scale"` | How the text leaves over the clip's last `duration` seconds, with the same split and order. Omit it to hold until the clip ends. | | |
| `style.shadow` | object | Drop shadow behind the text, adds depth and readability. | | |
| `style.shadow.color` | string | Shadow color, hex. default `"#000000"`, pattern \`^#(\[0-9A-Fa-f]3 | \[0-9A-Fa-f]6 | \[0-9A-Fa-f]8)\$\`. |
| `style.shadow.opacity` | number | Shadow opacity 0..1. default `0.6`, min 0, max 1. | | |
| `style.shadow.offsetX` | number | Horizontal shadow offset in pixels. default `4`. | | |
| `style.shadow.offsetY` | number | Vertical shadow offset in pixels. default `4`. | | |
Fields marked `*` are required. Every table on this page is generated from the schema the API validates with, so it cannot drift from what a render accepts.
# Text asset reference
Source: https://rendobar.com/docs/jobs/compose/reference/text
Add a text clip and set its font, fill, stroke, shadow and alignment, with every field it accepts listed.
Set `asset.type` to `"text"`. These are its own fields, on top of the [clip fields](/docs/jobs/compose/reference/timeline#clip) every clip takes.
| Field | Type | What it does | | |
| - | - | - | - | - |
| `text` \* | string | The text to render. Keep titles short, 2-6 words reads best. | | |
| `style` | object | default `{}`. | | |
| `style.font` | string | Font family, or a CSS fallback stack. Any Google Fonts family works by name. Bundled and instant: Inter, Bebas Neue, Anton, Montserrat, Poppins, Roboto, Oswald. Families declared in the `fonts` job input win over both. A stack falls through in CSS order, so "Display, Inter, sans-serif" tries each in turn. default `"Inter"`. | | |
| `style.size` | number | Font size in pixels of the output frame. \~64-96 for titles at 1080p, \~36-48 for lower thirds. Defaults to 64. default `64`, over 0. | | |
| `style.weight` | integer | Font weight 100..1000 (400 regular, 700 bold, 800+ display). Honoured exactly on variable fonts; snapped to the nearest available weight otherwise. default `400`, min 100, max 1000. | | |
| `style.italic` | boolean | Render the italic cut of the family, when it has one. default `false`. | | |
| `style.color` | string | Text fill color, hex like "#FFFFFF". default `"#FFFFFF"`, pattern \`^#(\[0-9A-Fa-f]3 | \[0-9A-Fa-f]6 | \[0-9A-Fa-f]8)\$\`. |
| `style.stroke` | object | Outline around the glyphs. A 2-4px black stroke keeps white text readable on bright footage. | | |
| `style.stroke.color` \* | string | Outline color, hex like "#000000". pattern \`^#(\[0-9A-Fa-f]3 | \[0-9A-Fa-f]6 | \[0-9A-Fa-f]8)\$\`. |
| `style.stroke.width` \* | number | Outline width in pixels. 2 to 4 keeps text readable over busy footage. min 0. | | |
| `style.background` | string | Solid box color behind the text, hex. Omit for no box. pattern \`^#(\[0-9A-Fa-f]3 | \[0-9A-Fa-f]6 | \[0-9A-Fa-f]8)\$\`. |
| `style.align` | `"left"` \| `"center"` \| `"right"` | How the lines line up, and which side of the text sits on the clip's transform.position x: left starts there, center is centred on it, right ends there. Place the text with the clip's transform, not here. default `"center"`. | | |
| `style.animate` | object | How the text enters, and optionally leaves: \{"type":"slideUp","by":"word"} brings a title in word by word. A split (`by`), a blur or scale entrance and an exit (`out`) render up to 1080p at 30 fps on self-serve plans. Omit for text that is present from its first frame to its last. | | |
| `style.animate.type` \* | `"fade"` \| `"slideUp"` \| `"slideDown"` \| `"slideLeft"` \| `"slideRight"` \| `"blur"` \| `"scale"` | How the text arrives: fade in place, slide in from the named direction while fading, blur comes into focus, scale grows from small. | | |
| `style.animate.duration` | number | Seconds the whole entrance takes. With `by`, the last unit lands at this time. 0.4 to 0.8 reads polished for one piece of text, 0.8 to 1.5 for a split title. default `0.5`, over 0. | | |
| `style.animate.by` | `"letter"` \| `"word"` \| `"line"` | Animate the text one letter, word or line at a time: kinetic titles and lower thirds. Omit it and the text moves as one piece. | | |
| `style.animate.stagger` | number | Seconds between one unit starting and the next. Omit it and the units spread evenly over the first 40% of `duration`. min 0. | | |
| `style.animate.order` | `"start"` \| `"end"` \| `"center"` \| `"edges"` \| `"random"` | Which unit starts first. center and edges start units at the same distance together. random is seeded by the clip, so a re-render is identical. default `"start"`. | | |
| `style.animate.out` | `"fade"` \| `"slideUp"` \| `"slideDown"` \| `"slideLeft"` \| `"slideRight"` \| `"blur"` \| `"scale"` | How the text leaves over the clip's last `duration` seconds, with the same split and order. Omit it to hold until the clip ends. | | |
| `style.shadow` | object | Drop shadow behind the text, adds depth and readability. | | |
| `style.shadow.color` | string | Shadow color, hex. default `"#000000"`, pattern \`^#(\[0-9A-Fa-f]3 | \[0-9A-Fa-f]6 | \[0-9A-Fa-f]8)\$\`. |
| `style.shadow.opacity` | number | Shadow opacity 0..1. default `0.6`, min 0, max 1. | | |
| `style.shadow.offsetX` | number | Horizontal shadow offset in pixels. default `4`. | | |
| `style.shadow.offsetY` | number | Vertical shadow offset in pixels. default `4`. | | |
Fields marked `*` are required. Every table on this page is generated from the schema the API validates with, so it cannot drift from what a render accepts.
# Timeline, tracks and clips
Source: https://rendobar.com/docs/jobs/compose/reference/timeline
Read the shape of a compose request from the outside in: the params, the timeline, a track, and every clip field.
The shape of a compose request, from the outside in. Each asset kind adds its own fields on top of the clip fields here, and those are one page each under this group.
## Top level
| Field | Type | What it does |
| - | - | - |
| `schemaVersion` | `1` | Timeline schema version. Always 1, and assumed when omitted. default `1`. |
| `output` | object | Output file. Omit for a 1080p mp4 at 30 fps. default `{"size":"1080p"}`. |
| `output.format` | `"mp4"` \| `"webm"` \| `"gif"` \| `"mp3"` \| `"jpg"` \| `"png"` | Output container/format. mp4=H.264+AAC, webm=VP9+Opus, gif=animated (no audio), mp3=audio only and needs no size, jpg/png=single frame. default `"mp4"`. |
| `output.size` | `"360p"` \| `"720p"` \| `"1080p"` \| `"1440p"` \| `"4k"` \| `"tiktok"` \| `"reels"` \| `"shorts"` \| `"instagram-story"` \| `"instagram-feed"` \| `"square"` \| `"youtube-hd"` \| `"youtube-4k"` \| `"x-landscape"` \| `"linkedin"` | Named resolution preset (dimensions only): a generic ladder ("1080p", "4k") or a platform alias ("tiktok", "reels", "youtube-4k"). An explicit `resolution` overrides this. Not used by mp3. Free renders up to 1080p at 30 fps, Pro 1440p at 30 fps, Studio 4K at 60 fps. |
| `output.resolution` | object | Explicit output dimensions. Wins over `size`. Every format but mp3 needs this or `size`. |
| `output.resolution.width` \* | integer | Output width in pixels. over 0, max 9007199254740991. |
| `output.resolution.height` \* | integer | Output height in pixels. over 0, max 9007199254740991. |
| `output.fps` | number | Output frame rate. Defaults to 30. Free renders up to 1080p at 30 fps, Pro 1440p at 30 fps, Studio 4K at 60 fps. default `30`, over 0. |
| `output.quality` | `"draft"` \| `"standard"` \| `"high"` \| `"max"` | Encoder quality ladder (crf + speed + audio bitrate). draft=fast preview, standard=web delivery (default), high/max=higher fidelity, slower. Explicit `crf`/`encoderPreset` override the ladder. default `"standard"`. |
| `output.videoCodec` | `"h264"` \| `"vp9"` | The video codec. mp4 takes h264 (default) or vp9. webm is always vp9. gif is always GIF, so it takes none. |
| `output.audioCodec` | `"aac"` \| `"opus"` \| `"mp3"` | The audio codec. mp4 takes aac (default), opus or mp3. webm is always opus and mp3 always mp3. |
| `output.crf` | integer | Advanced: constant rate factor (lower = higher quality/larger file). Overrides `quality`. h264 accepts 0-51, vp9 0-63. Does not apply to gif/mp3/jpg/png. min 0, max 63. |
| `output.encoderPreset` | `"ultrafast"` \| `"superfast"` \| `"veryfast"` \| `"faster"` \| `"fast"` \| `"medium"` \| `"slow"` \| `"slower"` \| `"veryslow"` | Advanced: x264 speed/compression preset (slower = smaller file, same quality). Overrides `quality`. h264 only. |
| `output.range` | object | Which part of the timeline to render: a preview, or one section checked without paying for the whole render. A jpg or png is the single frame at `start`, the first frame when there is no range. |
| `output.range.start` | number | Second of the timeline to start from. For a jpg or png, the moment captured. default `0`, min 0. |
| `output.range.length` | number | Seconds to render. Leave it out to run to the end. A range past the end stops at the end. A jpg or png is one frame and ignores it. over 0. |
| `timeline` \* | object | The edit itself, in ONE of two shapes: \{ tracks } for precise multi-track control (layers, exact timing), or \{ scenes, overlays } for sequential scene-by-scene authoring. Not both. |
| `prompt` | string | The natural-language request this timeline was generated from, when AI assist was used. |
| `assets` | string\[] | The asset URLs supplied to AI assist, when it was used. |
## Timeline
| Field | Type | What it does |
| - | - | - |
| `background` | string \| `"transparent"` | The colour behind every clip, wherever nothing else is drawn, like "#FFFFFF". Defaults to black. "transparent" leaves those parts see-through, for png and webm output: a title or a lower third to lay over other video. |
| `effects` | object\[] | Effects on the finished picture and the final mix, after every track is composited: one grade over the whole video, or a limiter on the master. |
| `tracks` | object\[] | Layer stack: the FIRST track is the background, each later track composites on top (overlays, picture-in-picture, titles). Within a track, clips play in time; between two clips a transition item blends them. |
| `tracks.name` | string | Optional label for your own reference, not rendered. |
| `tracks.effects` | object\[] | Effects on the whole track, after its clips are laid out: grade every clip on it at once, or put a limiter on a music track. |
| `tracks.clips` \* | object\[] | Clips in time order, with optional transition items between adjacent clips. Omit start and length and they lay themselves out end to end, each as long as its source, overlapping by any transition between them. Two clips that overlap with no transition between them crossfade over the overlap, and the job says which in the render step's `clipOverlaps`. Text and image clips have no source, so they run to the end of the video and must come last on their track. |
| `scenes` | object\[] | Sequential segments played one after another, each with its own clips and an optional transition into it. |
| `scenes.duration` | number | Scene length in seconds. Omit to take it from the longest thing inside: a clip's own length, or the source in it. over 0. |
| `scenes.transition` | object | The transition INTO this scene from the previous one. Omit on the first scene and for hard cuts. |
| `scenes.transition.transition` \* | `"crossfade"` \| `"fade"` \| `"slide"` \| `"push"` \| `"wipe"` \| `"zoom"` \| `"none"` | crossfade dissolves A into B, fade dips through black, slide moves B in over A, push moves B in and A out together, wipe reveals B in place along an edge or a shape, zoom grows B from the center, none is a hard cut. |
| `scenes.transition.direction` | `"left"` \| `"right"` \| `"up"` \| `"down"` | slide, push and an edge wipe: which way the picture travels. Default left. |
| `scenes.transition.shape` | `"edge"` \| `"circle"` \| `"box"` \| `"barnDoorHorizontal"` \| `"barnDoorVertical"` | wipe only. edge (default) sweeps a straight line across in `direction`, circle opens an iris from the centre, box opens a rectangle from the centre, barnDoorVertical opens a vertical gap from the middle out to the sides, barnDoorHorizontal opens a horizontal gap up and down. |
| `scenes.transition.map` | string | wipe only: a wipe of your own, drawn by a greyscale image (png or jpg) at the frame's shape. Black turns over to the next clip first and white last, so a left-to-right gradient is an edge wipe and a radial one an iris. Takes no `shape` or `direction`. |
| `scenes.transition.duration` \* | number | Overlap in seconds. 0.4-0.8 is the professional range. Leave the next clip's `start` out and it is placed this far before the clip before it ends. Two clips placed by hand blend over the overlap they have. over 0. |
| `scenes.clips` \* | object\[] | Clips layered within this scene: first is the background, later clips composite on top. |
| `scenes.clips.asset` \* | object | |
| `scenes.clips.start` | number | Seconds into the scene. Omit to start at the scene's beginning. A clip is measured from its own start, so one placed 2s into a 5s scene has 3s of room. min 0. |
| `scenes.clips.length` | number \| `"end"` | Seconds. Omit it and the clip runs as long as its content does, never past the scene. Use "end" to span the scene whatever the content is, which is also what omitting means for text and images. |
| `scenes.clips.opacity` | number \| object\[] | Clip opacity: a constant 0..1, or keyframes \[\{time, value, easing}] for animated fades. Fade a clip in with \[\{time:0,value:0},\{time:1,value:1}]. default `1`. |
| `scenes.clips.transform` | object | Position/scale/rotate the clip within the frame (picture-in-picture, Ken Burns). Omit for full-frame. A 3D turn (rotateX, rotateY) works only in `overlays`, not inside a scene. |
| `scenes.clips.crop` | object | Trim edges off the frame by percent. The kept region scales back up to fill. Use to reframe landscape footage for a vertical canvas, and `radius` to round its corners. |
| `scenes.clips.speed` | number | Playback rate: 0.5 = slow motion, 2 = timelapse. Pitch shifts with speed. Not allowed on composition clips. Avoid slow motion on the OUTGOING side of a transition (it can run out of frames). over 0. |
| `scenes.clips.effects` | object\[] | What is done to the clip's picture or sound: one ordered list, each entry an object with a "type". Picture effects run in the order listed, and so do sound effects. Any entry takes "start" and "length" (seconds, or a percent of the clip) to run for part of the clip, and a number parameter marked animatable takes keyframes. Effects: chromaKey(color, similarity): Remove a solid background colour (green screen); color(brightness, contrast, saturation, gamma, hue, temperature): Grade the picture by hand; look(name): A one-word look: greyscale, boost (vivid social pop), muted (desaturated, cinematic), lighten and darken (exposure), contrast, negative, sepia (brown archive tone), oldFilm (sepia with grain, dust, scratches, projector flicker and a vignette); blur(radius): Soften the picture; sharpen(amount): Crisp up soft footage; denoise(amount): Clean the grain a small sensor adds in low light; glow(amount): Make the bright parts of the picture bloom; grain(amount): A layer of film grain, so digital footage feels less clinical; lut(src): Grade the picture with a 3D LUT, the .cube file a colourist or a grading app exports; vignette(amount, radius): Darken the corners to pull the eye to the middle of the frame; shake(amount, speed): Handheld camera energy on a steady shot; glitch(amount): Digital break-up: blocks of the picture jump sideways and the colours tear; pixelate(size): Large square pixels over the whole picture; posterize(levels): Flatten the picture into a few steps of each colour, like a screen print; rgbShift(distance): Pull the red and blue channels apart sideways, for a chromatic, analogue-video edge; scanLines(): The dark horizontal lines of a CRT monitor; sketch(amount): Turn the picture into a pencil drawing; trails(duration): Blend the last moments of the clip together, so moving lights and people leave streaks; blurRegion(x, y, width, height, shape, radius): Blur one part of the picture and leave the rest sharp: a face, a number plate, a logo, a screen; mask(src, channel): Show the clip only where an image says: white or opaque keeps it, black or clear cuts it away, grey fades it; outline(color, width): A stroke round the edge of a layer that has transparency: a keyed subject, a picture in picture, a logo; dropShadow(color, opacity, blur, offsetX, offsetY): A soft shadow under a layer that has transparency, so a logo, a cut-out or a picture in picture lifts off what is behind it; visualizer(kind, color, x, y, width, height): Draw the sound over the picture: the audiogram look; eq(bass, mid, treble): Three-band tone control; compressor(threshold, ratio, makeup): Even out a voice, so quiet words and loud words sit at one level; limiter(gain, ceiling): Stop peaks from clipping; gate(threshold): Close the microphone between phrases, so room noise drops away in the pauses; highPass(cutoff): Cut everything below a frequency; lowPass(cutoff): Cut everything above a frequency; loudness(target): Bring sound to a standard loudness, riding the level as it goes; pitch(semitones): Raise or lower the pitch without changing the speed; echo(delay, amount): A repeat behind the sound; reverb(amount): Place a dry voice in a hall; voiceDenoise(amount): Remove steady background noise from under speech: a river, a fan, a street; engine(filter, params): any other filter by name, strictly typed ones only. |
| `scenes.clips.blendMode` | `"normal"` \| `"multiply"` \| `"screen"` \| `"overlay"` \| `"darken"` \| `"lighten"` \| `"add"` \| `"difference"` | How this clip mixes with the layer below: screen for light leaks/glows, multiply for darkening textures, overlay for contrast looks, add/lighten/darken/difference for effects. Meaningful on overlay tracks. |
| `scenes.clips.pan` | number | Stereo balance: -1 full left, 0 centered, 1 full right. min -1, max 1. |
| `scenes.clips.flip` | object | Mirror the clip horizontally and/or vertically. |
| `overlays` | object\[] | Clips composited over the WHOLE video regardless of scenes: a logo, a watermark, a persistent title. The whole video is their container, so omitting `length` spans it. `start` defaults to 0. |
| `overlays.asset` \* | object | |
| `overlays.start` | number | When the clip begins, in seconds from the start of the video. Omit it and the clip starts after everything already placed on its track, pulled back by any transition sitting immediately before it. The first clip on a track starts at 0. min 0. |
| `overlays.length` | number \| `"end"` | How long the clip plays. Omit it and the clip runs as long as its CONTENT does: the trim span, the source duration divided by speed, or a composition's own end. Use "end" and it runs to the end of the video instead, whatever the source says, which is what a music bed wants. Text and images have no duration of their own, so omitting is the same as "end" for them and a title with no length stays up. A clip that runs to the end must be the last on its track. A video, audio or animation clip that runs past the end of its file holds the last frame, silent, until the clip ends, and the job says which clip in the render step's `clipOverruns`. |
| `overlays.opacity` | number \| object\[] | Clip opacity: a constant 0..1, or keyframes \[\{time, value, easing}] for animated fades. Fade a clip in with \[\{time:0,value:0},\{time:1,value:1}]. default `1`. |
| `overlays.transform` | object | Position/scale/rotate the clip within the frame (picture-in-picture, Ken Burns), or turn it in 3D with rotateX and rotateY (rendered up to 1080p at 30 fps on self-serve plans). Omit for full-frame. |
| `overlays.transform.position` | object \| object\[] | Where to place the clip, in pixels like \{x:1600,y:900} or percent like \{x:"75%",y:"75%"}, or keyframes of them to move it. Omit it and the clip is centred, so a scale of 0.5 alone is a centred picture-in-picture. |
| `overlays.transform.scale` | number \| object\[] | Size relative to the frame: 1 = full frame, 0.3 = a corner PiP, above 1 zooms in (crops edges). Keyframes animate it: \[\{time:"0%",value:1,easing:"easeInOutSine"},\{time:"100%",value:1.15}] is a Ken Burns push-in. A keyframe's easing shapes the move into the next one. default `1`. |
| `overlays.transform.rotate` | number \| object\[] | Rotation in degrees, clockwise. Keyframes spin it. default `0`. |
| `overlays.transform.rotateX` | number \| object\[] | Tilt about the horizontal axis, in degrees: a number, or keyframes to turn it over time. \[\{time:0,value:60},\{time:0.8,value:0}] tips the clip up from lying flat. |
| `overlays.transform.rotateY` | number \| object\[] | Turn about the vertical axis, in degrees: a number, or keyframes to turn it over time. \[\{time:0,value:-90},\{time:0.8,value:0}] swings the clip in like a door opening toward you. |
| `overlays.transform.perspective` | number | Distance of the viewer from the frame in pixels. Smaller is a stronger 3D effect: 600 is dramatic, 2000 is subtle. Omit for 1200. over 0. |
| `overlays.transform.anchor` | `"center"` \| `"topLeft"` | What `position` points at: the clip's center (default) or its top-left corner. It is also what the clip turns about. With no position the clip is centred either way. On text, x follows style.align, so anchor only decides whether y is the text's middle or its top edge. default `"center"`. |
| `overlays.transform.fit` | `"contain"` \| `"cover"` \| `"fill"` \| `"blur"` | How a picture fills its box when their shapes differ: contain shows all of it, cover fills the box and cuts what overflows (a vertical phone clip in a 16:9 frame with no bars), fill stretches it, blur shows all of it over an enlarged, blurred copy that fills the bars, for a clip that fills the frame. The box is `size`, or the frame. default `"contain"`. |
| `overlays.transform.size` | object \| object\[] | The clip's box, in pixels like \{width:480,height:480} or a percent of the frame. Omit it and the box is the whole frame. A picture fills it the way `fit` says: \{width:400,height:400} with fit "cover" is a square cut from 16:9 footage. A shape is drawn to it: \{width:"100%",height:"12%"} is a lower-third bar. Give one side and the clip keeps its own shape, which for a shape is SQUARE IN PIXELS, the only way to a true circle on a 16:9 frame. `scale` then multiplies the box, for zooms. Keyframes resize it: a width from "0%" to "80%" is a progress bar. |
| `overlays.transform.corners` | object \| object\[] | Pins the clip's four corners to four points, in pixels or percent: a picture on a screen, a sign seen in perspective. It is the other form of a transform, so it is not combined with position, scale, rotate or fit. A corner may sit up to a frame beyond each edge. Keyframes move the corners. |
| `overlays.crop` | object | Trim edges off the frame by percent. The kept region scales back up to fill. Use to reframe landscape footage for a vertical canvas, and `radius` to round its corners. |
| `overlays.crop.top` | string | Percent of the frame height to remove from the top. default `"0%"`, pattern `^-?\d+(\.\d+)?%$`. |
| `overlays.crop.right` | string | Percent of the frame width to remove from the right. default `"0%"`, pattern `^-?\d+(\.\d+)?%$`. |
| `overlays.crop.bottom` | string | Percent of the frame height to remove from the bottom. default `"0%"`, pattern `^-?\d+(\.\d+)?%$`. |
| `overlays.crop.left` | string | Percent of the frame width to remove from the left. default `"0%"`, pattern `^-?\d+(\.\d+)?%$`. |
| `overlays.crop.radius` | number | Rounds the corners of what is kept, 0 to 1. 1 rounds the shorter side fully, a pill. The corners ride the transform, so a scaled-down clip becomes a rounded picture-in-picture. The kept part fills the frame, so radius 1 is only a circle on a square frame. min 0, max 1. |
| `overlays.speed` | number | Playback rate: 0.5 = slow motion, 2 = timelapse. Pitch shifts with speed. Not allowed on composition clips. Avoid slow motion on the OUTGOING side of a transition (it can run out of frames). over 0. |
| `overlays.effects` | object\[] | What is done to the clip's picture or sound: one ordered list, each entry an object with a "type". Picture effects run in the order listed, and so do sound effects. Any entry takes "start" and "length" (seconds, or a percent of the clip) to run for part of the clip, and a number parameter marked animatable takes keyframes. Effects: chromaKey(color, similarity): Remove a solid background colour (green screen); color(brightness, contrast, saturation, gamma, hue, temperature): Grade the picture by hand; look(name): A one-word look: greyscale, boost (vivid social pop), muted (desaturated, cinematic), lighten and darken (exposure), contrast, negative, sepia (brown archive tone), oldFilm (sepia with grain, dust, scratches, projector flicker and a vignette); blur(radius): Soften the picture; sharpen(amount): Crisp up soft footage; denoise(amount): Clean the grain a small sensor adds in low light; glow(amount): Make the bright parts of the picture bloom; grain(amount): A layer of film grain, so digital footage feels less clinical; lut(src): Grade the picture with a 3D LUT, the .cube file a colourist or a grading app exports; vignette(amount, radius): Darken the corners to pull the eye to the middle of the frame; shake(amount, speed): Handheld camera energy on a steady shot; glitch(amount): Digital break-up: blocks of the picture jump sideways and the colours tear; pixelate(size): Large square pixels over the whole picture; posterize(levels): Flatten the picture into a few steps of each colour, like a screen print; rgbShift(distance): Pull the red and blue channels apart sideways, for a chromatic, analogue-video edge; scanLines(): The dark horizontal lines of a CRT monitor; sketch(amount): Turn the picture into a pencil drawing; trails(duration): Blend the last moments of the clip together, so moving lights and people leave streaks; blurRegion(x, y, width, height, shape, radius): Blur one part of the picture and leave the rest sharp: a face, a number plate, a logo, a screen; mask(src, channel): Show the clip only where an image says: white or opaque keeps it, black or clear cuts it away, grey fades it; outline(color, width): A stroke round the edge of a layer that has transparency: a keyed subject, a picture in picture, a logo; dropShadow(color, opacity, blur, offsetX, offsetY): A soft shadow under a layer that has transparency, so a logo, a cut-out or a picture in picture lifts off what is behind it; visualizer(kind, color, x, y, width, height): Draw the sound over the picture: the audiogram look; eq(bass, mid, treble): Three-band tone control; compressor(threshold, ratio, makeup): Even out a voice, so quiet words and loud words sit at one level; limiter(gain, ceiling): Stop peaks from clipping; gate(threshold): Close the microphone between phrases, so room noise drops away in the pauses; highPass(cutoff): Cut everything below a frequency; lowPass(cutoff): Cut everything above a frequency; loudness(target): Bring sound to a standard loudness, riding the level as it goes; pitch(semitones): Raise or lower the pitch without changing the speed; echo(delay, amount): A repeat behind the sound; reverb(amount): Place a dry voice in a hall; voiceDenoise(amount): Remove steady background noise from under speech: a river, a fan, a street; engine(filter, params): any other filter by name, strictly typed ones only. |
| `overlays.blendMode` | `"normal"` \| `"multiply"` \| `"screen"` \| `"overlay"` \| `"darken"` \| `"lighten"` \| `"add"` \| `"difference"` | How this clip mixes with the layer below: screen for light leaks/glows, multiply for darkening textures, overlay for contrast looks, add/lighten/darken/difference for effects. Meaningful on overlay tracks. |
| `overlays.pan` | number | Stereo balance: -1 full left, 0 centered, 1 full right. min -1, max 1. |
| `overlays.flip` | object | Mirror the clip horizontally and/or vertically. |
| `overlays.flip.horizontal` | boolean | Mirror left-right. default `false`. |
| `overlays.flip.vertical` | boolean | Mirror top-bottom. default `false`. |
## Track
| Field | Type | What it does |
| - | - | - |
| `name` | string | Optional label for your own reference, not rendered. |
| `effects` | object\[] | Effects on the whole track, after its clips are laid out: grade every clip on it at once, or put a limiter on a music track. |
| `clips` \* | object\[] | Clips in time order, with optional transition items between adjacent clips. Omit start and length and they lay themselves out end to end, each as long as its source, overlapping by any transition between them. Two clips that overlap with no transition between them crossfade over the overlap, and the job says which in the render step's `clipOverlaps`. Text and image clips have no source, so they run to the end of the video and must come last on their track. |
## Clip
Every clip takes these, whatever its asset.
| Field | Type | What it does |
| - | - | - |
| `start` | number | When the clip begins, in seconds from the start of the video. Omit it and the clip starts after everything already placed on its track, pulled back by any transition sitting immediately before it. The first clip on a track starts at 0. min 0. |
| `length` | number \| `"end"` | How long the clip plays. Omit it and the clip runs as long as its CONTENT does: the trim span, the source duration divided by speed, or a composition's own end. Use "end" and it runs to the end of the video instead, whatever the source says, which is what a music bed wants. Text and images have no duration of their own, so omitting is the same as "end" for them and a title with no length stays up. A clip that runs to the end must be the last on its track. A video, audio or animation clip that runs past the end of its file holds the last frame, silent, until the clip ends, and the job says which clip in the render step's `clipOverruns`. |
| `opacity` | number \| object\[] | Clip opacity: a constant 0..1, or keyframes \[\{time, value, easing}] for animated fades. Fade a clip in with \[\{time:0,value:0},\{time:1,value:1}]. default `1`. |
| `transform` | object | Position/scale/rotate the clip within the frame (picture-in-picture, Ken Burns), or turn it in 3D with rotateX and rotateY (rendered up to 1080p at 30 fps on self-serve plans). Omit for full-frame. |
| `transform.position` | object \| object\[] | Where to place the clip, in pixels like \{x:1600,y:900} or percent like \{x:"75%",y:"75%"}, or keyframes of them to move it. Omit it and the clip is centred, so a scale of 0.5 alone is a centred picture-in-picture. |
| `transform.position.x` \* | number \| string | Horizontal: pixels from the left edge of the output frame, like 960, or a percent of its width, like "50%". |
| `transform.position.y` \* | number \| string | Vertical: pixels from the top edge, like 540, or a percent of the frame height, like "80%". |
| `transform.scale` | number \| object\[] | Size relative to the frame: 1 = full frame, 0.3 = a corner PiP, above 1 zooms in (crops edges). Keyframes animate it: \[\{time:"0%",value:1,easing:"easeInOutSine"},\{time:"100%",value:1.15}] is a Ken Burns push-in. A keyframe's easing shapes the move into the next one. default `1`. |
| `transform.rotate` | number \| object\[] | Rotation in degrees, clockwise. Keyframes spin it. default `0`. |
| `transform.rotateX` | number \| object\[] | Tilt about the horizontal axis, in degrees: a number, or keyframes to turn it over time. \[\{time:0,value:60},\{time:0.8,value:0}] tips the clip up from lying flat. |
| `transform.rotateY` | number \| object\[] | Turn about the vertical axis, in degrees: a number, or keyframes to turn it over time. \[\{time:0,value:-90},\{time:0.8,value:0}] swings the clip in like a door opening toward you. |
| `transform.perspective` | number | Distance of the viewer from the frame in pixels. Smaller is a stronger 3D effect: 600 is dramatic, 2000 is subtle. Omit for 1200. over 0. |
| `transform.anchor` | `"center"` \| `"topLeft"` | What `position` points at: the clip's center (default) or its top-left corner. It is also what the clip turns about. With no position the clip is centred either way. On text, x follows style.align, so anchor only decides whether y is the text's middle or its top edge. default `"center"`. |
| `transform.fit` | `"contain"` \| `"cover"` \| `"fill"` \| `"blur"` | How a picture fills its box when their shapes differ: contain shows all of it, cover fills the box and cuts what overflows (a vertical phone clip in a 16:9 frame with no bars), fill stretches it, blur shows all of it over an enlarged, blurred copy that fills the bars, for a clip that fills the frame. The box is `size`, or the frame. default `"contain"`. |
| `transform.size` | object \| object\[] | The clip's box, in pixels like \{width:480,height:480} or a percent of the frame. Omit it and the box is the whole frame. A picture fills it the way `fit` says: \{width:400,height:400} with fit "cover" is a square cut from 16:9 footage. A shape is drawn to it: \{width:"100%",height:"12%"} is a lower-third bar. Give one side and the clip keeps its own shape, which for a shape is SQUARE IN PIXELS, the only way to a true circle on a 16:9 frame. `scale` then multiplies the box, for zooms. Keyframes resize it: a width from "0%" to "80%" is a progress bar. |
| `transform.size.width` | number \| string | Width: pixels of the output frame, like 480, or a percent of its width, like "25%". |
| `transform.size.height` | number \| string | Height: pixels, or a percent of the frame height. |
| `transform.corners` | object \| object\[] | Pins the clip's four corners to four points, in pixels or percent: a picture on a screen, a sign seen in perspective. It is the other form of a transform, so it is not combined with position, scale, rotate or fit. A corner may sit up to a frame beyond each edge. Keyframes move the corners. |
| `transform.corners.topLeft` \* | object | |
| `transform.corners.topRight` \* | object | |
| `transform.corners.bottomRight` \* | object | |
| `transform.corners.bottomLeft` \* | object | |
| `crop` | object | Trim edges off the frame by percent. The kept region scales back up to fill. Use to reframe landscape footage for a vertical canvas, and `radius` to round its corners. |
| `crop.top` | string | Percent of the frame height to remove from the top. default `"0%"`, pattern `^-?\d+(\.\d+)?%$`. |
| `crop.right` | string | Percent of the frame width to remove from the right. default `"0%"`, pattern `^-?\d+(\.\d+)?%$`. |
| `crop.bottom` | string | Percent of the frame height to remove from the bottom. default `"0%"`, pattern `^-?\d+(\.\d+)?%$`. |
| `crop.left` | string | Percent of the frame width to remove from the left. default `"0%"`, pattern `^-?\d+(\.\d+)?%$`. |
| `crop.radius` | number | Rounds the corners of what is kept, 0 to 1. 1 rounds the shorter side fully, a pill. The corners ride the transform, so a scaled-down clip becomes a rounded picture-in-picture. The kept part fills the frame, so radius 1 is only a circle on a square frame. min 0, max 1. |
| `speed` | number | Playback rate: 0.5 = slow motion, 2 = timelapse. Pitch shifts with speed. Not allowed on composition clips. Avoid slow motion on the OUTGOING side of a transition (it can run out of frames). over 0. |
| `effects` | object\[] | What is done to the clip's picture or sound: one ordered list, each entry an object with a "type". Picture effects run in the order listed, and so do sound effects. Any entry takes "start" and "length" (seconds, or a percent of the clip) to run for part of the clip, and a number parameter marked animatable takes keyframes. Effects: chromaKey(color, similarity): Remove a solid background colour (green screen); color(brightness, contrast, saturation, gamma, hue, temperature): Grade the picture by hand; look(name): A one-word look: greyscale, boost (vivid social pop), muted (desaturated, cinematic), lighten and darken (exposure), contrast, negative, sepia (brown archive tone), oldFilm (sepia with grain, dust, scratches, projector flicker and a vignette); blur(radius): Soften the picture; sharpen(amount): Crisp up soft footage; denoise(amount): Clean the grain a small sensor adds in low light; glow(amount): Make the bright parts of the picture bloom; grain(amount): A layer of film grain, so digital footage feels less clinical; lut(src): Grade the picture with a 3D LUT, the .cube file a colourist or a grading app exports; vignette(amount, radius): Darken the corners to pull the eye to the middle of the frame; shake(amount, speed): Handheld camera energy on a steady shot; glitch(amount): Digital break-up: blocks of the picture jump sideways and the colours tear; pixelate(size): Large square pixels over the whole picture; posterize(levels): Flatten the picture into a few steps of each colour, like a screen print; rgbShift(distance): Pull the red and blue channels apart sideways, for a chromatic, analogue-video edge; scanLines(): The dark horizontal lines of a CRT monitor; sketch(amount): Turn the picture into a pencil drawing; trails(duration): Blend the last moments of the clip together, so moving lights and people leave streaks; blurRegion(x, y, width, height, shape, radius): Blur one part of the picture and leave the rest sharp: a face, a number plate, a logo, a screen; mask(src, channel): Show the clip only where an image says: white or opaque keeps it, black or clear cuts it away, grey fades it; outline(color, width): A stroke round the edge of a layer that has transparency: a keyed subject, a picture in picture, a logo; dropShadow(color, opacity, blur, offsetX, offsetY): A soft shadow under a layer that has transparency, so a logo, a cut-out or a picture in picture lifts off what is behind it; visualizer(kind, color, x, y, width, height): Draw the sound over the picture: the audiogram look; eq(bass, mid, treble): Three-band tone control; compressor(threshold, ratio, makeup): Even out a voice, so quiet words and loud words sit at one level; limiter(gain, ceiling): Stop peaks from clipping; gate(threshold): Close the microphone between phrases, so room noise drops away in the pauses; highPass(cutoff): Cut everything below a frequency; lowPass(cutoff): Cut everything above a frequency; loudness(target): Bring sound to a standard loudness, riding the level as it goes; pitch(semitones): Raise or lower the pitch without changing the speed; echo(delay, amount): A repeat behind the sound; reverb(amount): Place a dry voice in a hall; voiceDenoise(amount): Remove steady background noise from under speech: a river, a fan, a street; engine(filter, params): any other filter by name, strictly typed ones only. |
| `blendMode` | `"normal"` \| `"multiply"` \| `"screen"` \| `"overlay"` \| `"darken"` \| `"lighten"` \| `"add"` \| `"difference"` | How this clip mixes with the layer below: screen for light leaks/glows, multiply for darkening textures, overlay for contrast looks, add/lighten/darken/difference for effects. Meaningful on overlay tracks. |
| `pan` | number | Stereo balance: -1 full left, 0 centered, 1 full right. min -1, max 1. |
| `flip` | object | Mirror the clip horizontally and/or vertically. |
| `flip.horizontal` | boolean | Mirror left-right. default `false`. |
| `flip.vertical` | boolean | Mirror top-bottom. default `false`. |
Fields marked `*` are required. Every table on this page is generated from the schema the API validates with, so it cannot drift from what a render accepts.
# Timer asset reference
Source: https://rendobar.com/docs/jobs/compose/reference/timer
Add a clock that counts up or down over the length of its own clip, with every field the asset accepts listed.
Set `asset.type` to `"timer"`. These are its own fields, on top of the [clip fields](/docs/jobs/compose/reference/timeline#clip) every clip takes.
| Field | Type | What it does | | |
| - | - | - | - | - |
| `direction` | `"up"` \| `"down"` | up counts from zero, down counts to zero from the clip's length. default `"up"`. | | |
| `format` | `"SS"` \| `"SS.S"` \| `"SS.SS"` \| `"MM:SS"` \| `"MM:SS.SS"` \| `"HH:MM:SS"` | What the clock shows. SS.SS is a race clock, MM:SS a countdown to a launch, HH:MM:SS a stream timer. default `"MM:SS"`. | | |
| `style` | object | default `{}`. | | |
| `style.font` | string | Font family, or a CSS fallback stack. Any Google Fonts family works by name. Bundled and instant: Inter, Bebas Neue, Anton, Montserrat, Poppins, Roboto, Oswald. Families declared in the `fonts` job input win over both. A stack falls through in CSS order, so "Display, Inter, sans-serif" tries each in turn. default `"Inter"`. | | |
| `style.size` | number | Font size in pixels of the output frame. \~64-96 for titles at 1080p, \~36-48 for lower thirds. Defaults to 64. default `64`, over 0. | | |
| `style.weight` | integer | Font weight 100..1000 (400 regular, 700 bold, 800+ display). Honoured exactly on variable fonts; snapped to the nearest available weight otherwise. default `400`, min 100, max 1000. | | |
| `style.italic` | boolean | Render the italic cut of the family, when it has one. default `false`. | | |
| `style.color` | string | Text fill color, hex like "#FFFFFF". default `"#FFFFFF"`, pattern \`^#(\[0-9A-Fa-f]3 | \[0-9A-Fa-f]6 | \[0-9A-Fa-f]8)\$\`. |
| `style.stroke` | object | Outline around the glyphs. A 2-4px black stroke keeps white text readable on bright footage. | | |
| `style.stroke.color` \* | string | Outline color, hex like "#000000". pattern \`^#(\[0-9A-Fa-f]3 | \[0-9A-Fa-f]6 | \[0-9A-Fa-f]8)\$\`. |
| `style.stroke.width` \* | number | Outline width in pixels. 2 to 4 keeps text readable over busy footage. min 0. | | |
| `style.background` | string | Solid box color behind the text, hex. Omit for no box. pattern \`^#(\[0-9A-Fa-f]3 | \[0-9A-Fa-f]6 | \[0-9A-Fa-f]8)\$\`. |
| `style.align` | `"left"` \| `"center"` \| `"right"` | How the lines line up, and which side of the text sits on the clip's transform.position x: left starts there, center is centred on it, right ends there. Place the text with the clip's transform, not here. default `"center"`. | | |
| `style.animate` | object | How the text enters: \{"type":"fade"} or one of the slides. A split (`by`), a blur or scale entrance and an exit (`out`) are not available here, because the text changes as it plays. | | |
| `style.animate.type` \* | `"fade"` \| `"slideUp"` \| `"slideDown"` \| `"slideLeft"` \| `"slideRight"` \| `"blur"` \| `"scale"` | How the text arrives: fade in place, slide in from the named direction while fading, blur comes into focus, scale grows from small. | | |
| `style.animate.duration` | number | Seconds the whole entrance takes. With `by`, the last unit lands at this time. 0.4 to 0.8 reads polished for one piece of text, 0.8 to 1.5 for a split title. default `0.5`, over 0. | | |
| `style.animate.by` | `"letter"` \| `"word"` \| `"line"` | Animate the text one letter, word or line at a time: kinetic titles and lower thirds. Omit it and the text moves as one piece. | | |
| `style.animate.stagger` | number | Seconds between one unit starting and the next. Omit it and the units spread evenly over the first 40% of `duration`. min 0. | | |
| `style.animate.order` | `"start"` \| `"end"` \| `"center"` \| `"edges"` \| `"random"` | Which unit starts first. center and edges start units at the same distance together. random is seeded by the clip, so a re-render is identical. default `"start"`. | | |
| `style.animate.out` | `"fade"` \| `"slideUp"` \| `"slideDown"` \| `"slideLeft"` \| `"slideRight"` \| `"blur"` \| `"scale"` | How the text leaves over the clip's last `duration` seconds, with the same split and order. Omit it to hold until the clip ends. | | |
| `style.shadow` | object | Drop shadow behind the text, adds depth and readability. | | |
| `style.shadow.color` | string | Shadow color, hex. default `"#000000"`, pattern \`^#(\[0-9A-Fa-f]3 | \[0-9A-Fa-f]6 | \[0-9A-Fa-f]8)\$\`. |
| `style.shadow.opacity` | number | Shadow opacity 0..1. default `0.6`, min 0, max 1. | | |
| `style.shadow.offsetX` | number | Horizontal shadow offset in pixels. default `4`. | | |
| `style.shadow.offsetY` | number | Vertical shadow offset in pixels. default `4`. | | |
Fields marked `*` are required. Every table on this page is generated from the schema the API validates with, so it cannot drift from what a render accepts.
# Transition reference
Source: https://rendobar.com/docs/jobs/compose/reference/transition
Add a transition on the clip it brings in, or as a clip of its own, with every field it accepts listed in full.
A transition is a clip of its own, placed between the two clips it joins. There is no transition field on an ordinary clip.
| Field | Type | What it does |
| - | - | - |
| `transition` \* | `"crossfade"` \| `"fade"` \| `"slide"` \| `"push"` \| `"wipe"` \| `"zoom"` \| `"none"` | crossfade dissolves A into B, fade dips through black, slide moves B in over A, push moves B in and A out together, wipe reveals B in place along an edge or a shape, zoom grows B from the center, none is a hard cut. |
| `direction` | `"left"` \| `"right"` \| `"up"` \| `"down"` | slide, push and an edge wipe: which way the picture travels. Default left. |
| `shape` | `"edge"` \| `"circle"` \| `"box"` \| `"barnDoorHorizontal"` \| `"barnDoorVertical"` | wipe only. edge (default) sweeps a straight line across in `direction`, circle opens an iris from the centre, box opens a rectangle from the centre, barnDoorVertical opens a vertical gap from the middle out to the sides, barnDoorHorizontal opens a horizontal gap up and down. |
| `map` | string | wipe only: a wipe of your own, drawn by a greyscale image (png or jpg) at the frame's shape. Black turns over to the next clip first and white last, so a left-to-right gradient is an edge wipe and a radial one an iris. Takes no `shape` or `direction`. |
| `duration` \* | number | Overlap in seconds. 0.4-0.8 is the professional range. Leave the next clip's `start` out and it is placed this far before the clip before it ends. Two clips placed by hand blend over the overlap they have. over 0. |
| `type` \* | `"transition"` | Marks this track item as a transition. Place it BETWEEN two clips; leave the second clip's `start` out and the engine overlaps them by `duration`. |
The kinds and what each looks like are on [Transitions](/docs/jobs/compose/transitions).
Fields marked `*` are required. Every table on this page is generated from the schema the API validates with, so it cannot drift from what a render accepts.
# Video asset reference
Source: https://rendobar.com/docs/jobs/compose/reference/video
Add a video clip and set its source, trim, speed and volume, with every field it accepts listed in full.
Set `asset.type` to `"video"`. These are its own fields, on top of the [clip fields](/docs/jobs/compose/reference/timeline#clip) every clip takes.
| Field | Type | What it does |
| - | - | - |
| `src` \* | string | Video URL: an https URL or an uploaded asset's content URL. |
| `trim` | object | Which part of the source file to use, in source seconds. Omit to play from the start. |
| `trim.from` \* | number | Start second in the SOURCE file. min 0. |
| `trim.to` \* | number | End second in the SOURCE file (exclusive). over 0. |
| `volume` | number \| object\[] | Audio gain for this clip: 1 = source level, 0 mutes, 0.2 ducks it under a music track. Keyframes change it over time. default `1`. |
Fields marked `*` are required. Every table on this page is generated from the schema the API validates with, so it cannot drift from what a render accepts.
# Shapes and masks
Source: https://rendobar.com/docs/jobs/compose/shapes
Add rectangles, circles, paths and masks with fills, outlines, corners and shadows, and see which combinations the API refuses.
A `shape` asset draws a rect, ellipse, circle, triangle, diamond or any SVG path. You need no image file, and the shape stays sharp at any output resolution.
```json theme={null}
{
"asset": { "type": "shape", "color": "#0A0A0ACC" },
"transform": { "size": { "width": "100%", "height": "22%" }, "position": { "x": "50%", "y": "86%" } }
}
```
This is a see-through bar across the lower third to hold a title. Put it on a track below the text.
The clip's `transform` places a shape like any other clip. `size` is its box, `position` is its centre unless `anchor` says otherwise, and `rotate` turns it about that anchor. The asset only says what to draw.
With no `size`, a shape fills the frame, which gives you a tint or a background in one line. Like text, it has no duration of its own, so without `length` it runs to the end of its container.
`width` is a percent of the frame's width and `height` a percent of its height. Both also take pixels as plain numbers.
a bar and a text track
before
width keyframed 2% to 86%
rect, ellipse, circle, triangle, diamond
## Leave the height out to get a circle
Omit `size.height` and the box is square in pixels. This is the only way to get a true circle or square on a frame that is not square.
A `10%` by `10%` box on a 16:9 frame is 192 by 108 pixels, so rounding it fully gives a pill. Omit the height and the engine works out 17.8% for you.
```json theme={null}
{
"asset": { "type": "shape", "shape": "circle", "color": "#059669" },
"transform": { "size": { "width": "12%" }, "position": { "x": "88%", "y": "18%" } }
}
```
`shape: "circle"` is an `ellipse` that always uses this rule, so it rejects a height if you set one. Leaving out the height works on every kind: a `rect` becomes a square and a `diamond` becomes a regular one.
## Anchor
`anchor: "topLeft"` points `position` at the box's corner instead of its centre. With it, you place letterbox bars without any maths.
```json theme={null}
{
"asset": { "type": "shape", "color": "#000000" },
"transform": { "anchor": "topLeft", "position": { "x": "0%", "y": "90%" }, "size": { "width": "100%", "height": "10%" } }
}
```
## Fills, flat and gradient
`color` takes `#RRGGBB`, or the 8-digit `#RRGGBBAA` for constant transparency, as `#0A0A0ACC` does above.
Keep the clip's `opacity` for fades, since it fades the whole clip. Put constant transparency in the colour.
Give `color` two colours to make a gradient. `gradient` sets the direction: `vertical` (the default), `horizontal`, `diagonal` or `radial`.
```json theme={null}
{
"asset": { "type": "shape", "color": ["#E11D48", "#3B82F6"], "gradient": "diagonal" },
"transform": { "size": { "width": "40%", "height": "30%" }, "position": { "x": "50%", "y": "50%" } }
}
```
The gradient spans the shape's own box, so a small badge shows the whole gradient. Stops take the 8-digit form too, so you can make a dark overlay that fades to nothing: `["#0A0A0A00", "#0A0A0AFF"]`.
before
two colours, diagonal
## Outlines, with a real hole
`stroke` draws a border along the inside of the shape's edge, with `width` in output pixels. Add a `color` for a filled shape with a border. `radius` rounds both.
Leave out `color` and only the outline draws, with a transparent middle that shows the footage. This works on every kind except a path.
```json theme={null}
{
"asset": { "type": "shape", "shape": "ellipse", "stroke": { "color": "#F59E0B", "width": 5 } },
"transform": { "size": { "width": "26%", "height": "40%" }, "position": { "x": "62%", "y": "40%" } }
}
```
before
stroke with no fill
## Rounded corners
`radius` runs from `0` (square) to `1` (fully round) on a `rect`. At `1` a wide box becomes a pill and a square one becomes a circle.
before
radius 0.4
## Drop shadows
`shadow` follows the shape, including its outline, rotation and animation. Every field has a default, so `"shadow": {}` gives a usable shadow.
```json theme={null}
{
"asset": {
"type": "shape",
"color": ["#FFFFFF", "#E5E7EB"],
"radius": 0.3,
"stroke": { "color": "#111827", "width": 3 },
"shadow": { "color": "#00000099", "blur": 14, "x": 8, "y": 10 }
},
"transform": { "size": { "width": "34%", "height": "40%" }, "position": { "x": "30%", "y": "50%" } }
}
```
before
a shadow behind it
## Rotation turns about the anchor, not the frame
`transform.rotate` turns the shape clockwise in degrees about its own anchor, so it spins in place.
```json theme={null}
{
"asset": { "type": "shape", "color": "#FFFFFF" },
"transform": { "rotate": 30, "size": { "width": "40%", "height": "0.8%" }, "position": { "x": "50%", "y": "72%" } }
}
```
There is no `line` or `square` type. A line is a rect with a small height, and `rotate` makes it diagonal, as above.
## Softness
`softness` runs from 0 to 1 and softens the edge. At 0.2 to 0.4, an ellipse looks like a spotlight or a vignette. A full-frame ellipse with `softness: 0.5` and a radial `["#00000000", "#000000CC"]` fill gives you a vignette with no image asset.
before
softness 0.3
## Paths
`shape: "path"` takes SVG path data as a design tool exports it. `viewBox` sets the coordinate space it was drawn in and defaults to `"0 0 100 100"`. The engine scales the path to the transform's `size`, so the same data works at any size on any frame.
```json theme={null}
{
"asset": {
"type": "shape",
"shape": "path",
"viewBox": "0 0 24 24",
"path": "M12 21C12 21 3 14.5 3 8.5C3 5.5 5.5 3 8.5 3C10.4 3 12 4.5 12 4.5C12 4.5 13.6 3 15.5 3C18.5 3 21 5.5 21 8.5C21 14.5 12 21 12 21Z",
"color": "#E11D48"
},
"transform": { "size": { "width": "20%" }, "position": { "x": "50%", "y": "50%" } }
}
```
`M L H V C S Q T Z` work in absolute and relative form. Elliptical arcs (`A`) are rejected, so re-export with arcs converted to curves. A path takes a fill, a gradient, a shadow, rotation and softness, but not a `stroke`.
before
SVG path data
## Animation
You animate a shape with [keyframes](/docs/jobs/compose/motion) on `position`, `size` and `rotate` in the transform, and on `color` and `radius` in the shape. For a progress bar, grow the width.
```json theme={null}
{
"asset": { "type": "shape", "color": "#FFFFFF" },
"transform": {
"anchor": "topLeft",
"position": { "x": "2%", "y": "86%" },
"size": [
{ "time": "0%", "value": { "width": "0%", "height": "1.5%" }, "easing": "smooth" },
{ "time": "100%", "value": { "width": "96%", "height": "1.5%" } }
]
}
}
```
A shape that is square in pixels stays square as it grows, so an animated circle stays a circle. A solid colour can animate into a gradient, and keyframes on `radius` can round off a square. An animated `rotate` has no limit: 0 to 720 is two full turns.
## Combinations the API refuses
The engine has two ways to draw a shape, with different features. The API rejects the combinations below at submit time instead of rendering them wrong. Each error names the fix.
| Not combinable | Why | What to do instead |
| - | - | - |
| `radius` on anything but a `rect` | only rectangles have corners | drop it |
| `radius` with no `color` | outline-only shapes are drawn the way that cannot round corners | give it a fill |
| `radius` with `rotate` or `softness` | the way that rounds corners cannot rotate or soften edges | drop one of them |
| `stroke` on a `path` | outlining arbitrary path data needs true path offsetting | draw the outline into the path itself |
| `speed` on a shape | there is no file to play faster | animate it with keyframes |
## What else a shape takes
[`blendMode`](/docs/jobs/compose/media#blend-modes) mixes a shape with the layer below. Effects apply to it as to any clip, and opacity keyframes fade it in and out. A track of only shapes renders as a base layer, so a solid colour background needs no files at all.
Shapes have no path stroke and no per-corner radius. For anything beyond that, use an `image` asset.
Every shape field is in the [shape reference](/docs/jobs/compose/reference/shape).
# Text and titles
Source: https://rendobar.com/docs/jobs/compose/text
Add a styled title to a video, keep it readable over any footage, and animate it in and out a letter, word or line at a time.
A `text` clip renders a styled title. `style` holds `font`, `size`, `weight`, `italic`, `color`, `align`, a `stroke`, a `background` box, a `shadow` and `animate`, which sets the entrance (`fade`, `slideUp`, `slideDown`, `slideLeft`, `slideRight`, `blur` or `scale`), whether it arrives a letter, word or line at a time, and the exit. `font` takes any Google Fonts family by name, a bundled family, or your own file. See [Fonts and languages](/docs/jobs/compose/fonts).
Captions and timers are separate clips, on [Subtitles and timers](/docs/jobs/compose/captions). Lottie animations are on [Media clips](/docs/jobs/compose/media#lottie-animations).
Place the text with `transform`, like any other clip.
```json theme={null}
{
"asset": {
"type": "text",
"text": "Coastal Escape",
"style": {
"font": "Inter",
"size": 84,
"weight": 800,
"color": "#FFFFFF",
"stroke": { "color": "#000000", "width": 6 },
"animate": { "type": "slideUp", "duration": 0.7 }
}
},
"transform": { "position": { "x": "50%", "y": "38%" } },
"start": 0,
"length": 3
}
```
Colours are hex: `#RGB`, `#RRGGBB`, or `#RRGGBBAA` with alpha. `weight` runs from 100 to 1000, and `italic: true` slants the text. Text does not wrap to a width, so put a line break (`
`) in `text` where each new line starts. Keep a title to two to six words.
## Keeping text readable
White text gets lost over bright footage. Three fields fix it, in order of how much they change the look.
before
a 5px stroke
before
a shadow
before
a box
## Where the lines sit
before
align left
## Arriving
before
slideUp over 0.6s
## Kinetic titles
`by` splits the text so it arrives one unit at a time: `"letter"`, `"word"` or `"line"`. `duration` is when the last unit lands. `stagger` is the gap between the start of one unit and the next. `order` picks which unit goes first: `start`, `end`, `center`, `edges` or `random`. `random` uses a seed from the clip, so re-renders match.
```json theme={null}
{
"asset": {
"type": "text",
"text": "AFTER DARK",
"style": {
"font": "Inter",
"size": 58,
"weight": 800,
"animate": { "type": "slideUp", "by": "word", "duration": 1.1 }
}
},
"transform": { "position": { "x": "50%", "y": "46%" } },
"start": 0,
"length": 6
}
```
before
slideUp by word over 1.1s
Split at most one title per shot, on a top-level track or in `overlays`. On body text or captions, a split slows reading.
## Leaving
`out` animates the text away over the clip's last `duration` seconds, with any motion `type` takes and the same split and order. Without `out`, the text stays until the clip ends.
```json theme={null}
"animate": { "type": "fade", "duration": 0.6, "out": "blur" }
```
before
out: blur
> [!NOTE]
>
> A split, an exit, or a `blur` or `scale` entrance makes the clip an animated graphic. It costs the same per minute, and renders up to 1080p at 30 fps on every self-serve plan. It works only on a top-level track or in `overlays`, not inside a scene or a composition. A `fade` or a slide of the whole title does not count as one. See [what each plan renders](/docs/jobs/compose/pricing#what-each-plan-renders).
Every text field is in the [text reference](/docs/jobs/compose/reference/text).
# How the timeline works
Source: https://rendobar.com/docs/jobs/compose/timeline
Build a compose timeline from tracks and clips, and learn when you can leave start and length out of a clip.
A timeline holds tracks, and each track holds clips.
* **Tracks stack.** The first track is the background. Each later track draws on top of the ones below it, for overlays, titles and picture-in-picture.
* **Clips sit in time.** A clip can have a `start` and a `length` in seconds, or leave both out. A transition joins two clips on the same track. A gap between clips plays nothing.
## Timing is optional
Every clip sits in a container, which is its scene or the whole video.
* Omit `length` and the clip runs as long as its content, but never past its container.
* Write `length: "end"` and it runs to the end of its container, however long its content is.
Content length is the source duration, the trim span, the source duration divided by `speed`, or a composition's own end. For example, `speed: 0.5` on a 4 second clip lasts 8 seconds.
Text and images have no duration of their own, so both rules give the same result. A title with no `length` stays up for the whole video, which suits a watermark.
`start` works the same way. Omit it and the clip begins after the clips already on its track, moved earlier by any transition right before it. Set a number and the clip starts that many seconds into its container.
Set either field when you want different timing. Timelines that set every `start` and `length` render as they always did.
## Worked examples
A music bed. The source is three minutes long and the video is shorter. `"end"` stops the music with the video, without you adding up the clips above it.
```json theme={null}
"tracks": [
{ "clips": [
{ "asset": { "type": "video", "src": "https://cdn.rendobar.com/assets/examples/river.mp4" } },
{ "asset": { "type": "video", "src": "https://cdn.rendobar.com/assets/examples/forest.mp4" } }
] },
{ "clips": [
{ "asset": { "type": "audio", "src": "https://cdn.rendobar.com/assets/showcase/music.mp3", "volume": 0.35, "fadeOut": 2 },
"length": "end" }
] }
]
```
A watermark needs no timing fields at all.
```json theme={null}
{ "clips": [
{ "asset": { "type": "image", "src": "https://cdn.rendobar.com/assets/brand/logo-mark.png" },
"transform": { "scale": 0.15, "position": { "x": "88%", "y": "12%" } }, "opacity": 0.8 }
] }
```
Both stop on the last frame, however long the other clips run. If you add another clip later, they still do.
The music bed as a chart. On track 1 the two clips play in turn because neither sets a `start`. The music has `length: "end"`, so it stops on the last frame.
```mermaid theme={null}
gantt
title Two clips and a music bed, in seconds
dateFormat X
axisFormat %S
section Track 2, music
audio, length "end" : 0, 12
section Track 1, video
river.mp4 : 0, 6
forest.mp4 : 6, 12
```
## The rules that fall out of it
A clip that runs to the end of the video is measured against every clip that does not, so two of them on different tracks both stop on the real last frame. Nothing may follow it on the same track. A timeline where no clip has a length of its own has no end to measure, and the API rejects it.
If two clips on one track overlap with no transition between them, they dissolve into each other across the overlap, as if a `crossfade` sat there. For a cut, start the second clip where the first ends.
A clip never runs past its container. A 6 second video in a 3 second scene plays 3 seconds, and a 2 second video in a 5 second scene plays 2. This holds whether you wrote the length or left it out.
`"end"` does not cap. It asks for the full length of the container, however long the source is. If the source is shorter, the job is rejected for outrunning its source. Leave `length` off, or trim less.
Inside a `composition`, `start` and `length` are both required. The clip that holds the composition sets its length, so there is nothing to append to and no container to measure against.
## Add a layer
A second track renders over the first. This example puts an animated title over the video.
```json theme={null}
"tracks": [
{ "clips": [
{ "asset": { "type": "video", "src": "https://cdn.rendobar.com/assets/examples/sea.mp4" }, "start": 0, "length": 3 }
] },
{ "clips": [
{ "asset": { "type": "text", "text": "Coastal Escape", "style": { "font": "Inter", "size": 84, "color": "#FFFFFF" } },
"start": 0, "length": 3 }
] }
]
```
## Background
`background` is the colour that shows wherever no clip draws, such as the bars around a boxed shot. The default is black. `"transparent"` makes those areas see-through on png and webm output. See [transparent video](/docs/jobs/compose/output#transparent-video).
```json theme={null}
"timeline": {
"background": "#059669",
"tracks": [{ "clips": [{ "asset": { "type": "video", "src": "https://cdn.rendobar.com/assets/examples/sea.mp4" }, "transform": { "size": { "width": "46%", "height": "100%" } } }] }]
}
```
before
background #059669
## Scene-first authoring
Tracks give you precise multi-track control. For an edit that plays one segment after another, you can write a list of scenes. Each scene is a segment with its own clips. A scene's `transition` blends into it from the previous scene, so put it on the second of two scenes. `overlays` is a flat list of clips that sit over the whole video, such as a logo or watermark.
```json theme={null}
{
"scenes": [
{ "duration": 4,
"clips": [{ "asset": { "type": "video", "src": "https://cdn.rendobar.com/assets/examples/river.mp4" } }] },
{ "duration": 4, "transition": { "transition": "crossfade", "duration": 0.6 },
"clips": [{ "asset": { "type": "video", "src": "https://cdn.rendobar.com/assets/examples/forest.mp4" } }] }
],
"overlays": [
{ "asset": { "type": "image", "src": "https://cdn.rendobar.com/assets/brand/logo-mark.png" },
"transform": { "scale": 0.2, "position": { "x": "88%", "y": "12%" } } }
]
}
```
A scene's clips can omit `start` and `length` to fill the whole scene. A scene can omit `duration` to take the length of the video inside it. Clip fields work the same as with tracks, except that animated text and 3D turns work only on top-level tracks and in `overlays`, not inside a scene or a composition. A timeline uses `scenes` or `tracks`, never both.
two scenes, crossfaded
before
a logo over both scenes
## A timeline as one clip
A `composition` asset holds a timeline of its own, so you can move, scale and fade a group of layers together. Its `timeline` takes `tracks` only, and every clip inside needs an explicit `start` and `length`. Compositions nest up to three levels deep.
```json theme={null}
{
"asset": {
"type": "composition",
"timeline": {
"tracks": [
{ "clips": [{ "asset": { "type": "video", "src": "https://cdn.rendobar.com/assets/examples/sea.mp4" }, "start": 0, "length": 6 }] },
{ "clips": [{ "asset": { "type": "text", "text": "OPEN WATER", "style": { "font": "Bebas Neue", "size": 84, "color": "#FFFFFF" } }, "start": 0, "length": 6 }] }
]
}
},
"transform": { "scale": 0.52, "rotate": -5 },
"start": 0,
"length": 6
}
```
before
scaled and tilted as one clip
## Where to go next
See [Transitions](/docs/jobs/compose/transitions) to blend clips together and [Keyframes and easing](/docs/jobs/compose/motion) to make things move. [Media clips](/docs/jobs/compose/media) covers what a clip can hold, and the [clip reference](/docs/jobs/compose/reference/timeline) lists every field.
# Transitions between clips
Source: https://rendobar.com/docs/jobs/compose/transitions
Use a crossfade, fade, slide, push, wipe or zoom between two clips, pick a wipe shape or your own wipe pattern, and see when a hard cut is better.
Two clips side by side on a track cut straight from one to the other. To blend them, put a transition clip between them in the track's list. Ordinary clips have no transition field.
```json theme={null}
"clips": [
{ "asset": { "type": "video", "src": "https://example.com/a.mp4" } },
{ "type": "transition", "transition": "crossfade", "duration": 0.8 },
{ "asset": { "type": "video", "src": "https://example.com/b.mp4" } }
]
```
A scene instead takes a `transition` field that sets how it enters from the scene before.
The blend overlaps the two clips, so a transition never makes the render longer.
## The seven kinds
`crossfade` dissolves one picture into the other. `fade` dips to black, like a chapter break. `slide` moves the new clip in over the old one. `push` moves the old one out of frame. `wipe` reveals the new clip in place, along a moving edge or through a shape. `zoom` scales into the new clip. `none` is a hard cut, which professional editors use for almost every join.
All the videos below join the same two shots.
crossfade
fade, through black
slide, direction left
push, direction left
wipe, shape circle
zoom
## Direction
`slide`, `push` and an `edge` wipe take a `direction` for the way the picture moves: `left`, `right`, `up` or `down`.
```json theme={null}
{ "type": "transition", "transition": "push", "direction": "up", "duration": 0.5 }
```
## Wipe shapes
A wipe's `shape` defaults to `edge`, a straight line moving in `direction`. `circle` opens from the centre, `box` opens as a rectangle, and `barnDoorHorizontal` and `barnDoorVertical` split from the middle outwards.
```json theme={null}
{ "type": "transition", "transition": "wipe", "shape": "circle", "duration": 0.8 }
```
## Your own wipe
`map` takes the URL of a greyscale image and wipes in its pattern. Black areas change first, white last, and greys in between. A radial gradient gives a circular iris and a brush stroke gives a painted reveal. A `map` replaces both `shape` and `direction`.
```json theme={null}
{ "type": "transition", "transition": "wipe", "map": "https://example.com/brush-wipe.png", "duration": 1 }
```
## How long it can be
A transition cannot be longer than either clip it joins. Ask for more and the render shortens it to fit and adds a warning to the job, so a template made for long clips still works with a short one. [Validation](/docs/jobs/compose/pricing#check-a-timeline-before-you-render) reports the same warning before you spend anything.
## How to use them
Cut hard for most joins and keep crossfades under 10% of them. Use one decorative style (slide or zoom) per video, and only between sections.
| Use | Transition | Duration |
| - | - | - |
| Almost every join | none (hard cut) | 0 |
| Time passes, mood softens | `crossfade` | 0.6 to 1.0s |
| Chapter break | `fade` | 1 to 2s |
| Energy, social | `slide`, `push` or `zoom` | 0.3 to 0.7s |
Every field is in the [transition reference](/docs/jobs/compose/reference/transition).
# Compress media to a target quality or size
Source: https://rendobar.com/docs/jobs/compress
Get an image, video, or audio file down to a target quality or byte budget. The encoder searches candidate encodes and returns the smallest that clears it.
`compress.target` takes a media URL and a target, then searches candidate encodes for the smallest file that still clears the bar. Images are scored with SSIMULACRA2, video with VMAF, and every job returns a report: the achieved score, the compression ratio, and what the search did.
> [!TIP]
>
> **Live.** Accepts video, image, and audio URLs.
## Compress an image for the web
```ts SDK theme={null}
import { createClient } from "@rendobar/sdk";
const client = createClient({ apiKey: "rb_YOUR_KEY" });
const job = await client.jobs.create({
type: "compress.target",
inputs: { source: "https://cdn.rendobar.com/assets/examples/photo.jpg" },
params: { for: "web", target: "efficient" },
});
const done = await client.jobs.wait(job.id);
console.log(done.output.data.compressionRatio); // 2.8
console.log(done.output.file.url); // the compressed AVIF
```
```python Python theme={null}
import requests, time
base = "https://api.rendobar.com"
headers = {"Authorization": "Bearer rb_YOUR_KEY"}
job = requests.post(
f"{base}/jobs",
headers=headers,
json={
"type": "compress.target",
"inputs": {"source": "https://cdn.rendobar.com/assets/examples/photo.jpg"},
"params": {"for": "web", "target": "efficient"},
},
).json()["data"]
while job["status"] not in ("complete", "failed", "cancelled"):
time.sleep(1)
job = requests.get(f"{base}/jobs/{job['id']}", headers=headers).json()["data"]
print(job["output"]["data"]["compressionRatio"])
```
```bash cURL theme={null}
curl -X POST "https://api.rendobar.com/jobs" \
-H "Authorization: Bearer rb_YOUR_KEY" \
-H "Content-Type: application/json" \
-d '{
"type": "compress.target",
"inputs": { "source": "https://cdn.rendobar.com/assets/examples/photo.jpg" },
"params": { "for": "web", "target": "efficient" }
}'
# Returns { "data": { "id": "job_...", "status": "waiting" } }.
# Poll GET /jobs/{id} until "status": "complete".
```
The compressed file lands in `output.file` and the report in `output.data`. Images finish in about 10 seconds, audio in about 1, video takes longer because every search probe is a real encode plus a VMAF pass.
## What does the report show?
Every completed job carries the search's account of itself:
```json theme={null}
{
"status": "ok",
"verdict": "high",
"mode": "quality",
"codec": "avif",
"metric": "ssimulacra2",
"achievedScore": 79.11,
"compressionRatio": 2.8,
"originalBytes": 179208,
"outputBytes": 64031,
"qualityLevel": 82,
"probes": 7,
"scoredOn": "full"
}
```
`status` is the honest part. `ok` means the target was met. `infeasible_quality` means even the best encode could not reach the score you asked for, and you got the best effort. `infeasible_size` means the byte cap and the quality floor could not both hold. `skipped_no_improvement` means no encode beat your original, so the original came back untouched with `compressionRatio: 1` and `verdict: "passthrough"`. Set `forceReencode: true` to get the re-encode anyway. A passthrough result reports `achievedScore: null` and `qualityLevel: null`, because the file you got back was never encoded. A `dryRun` predicts passthrough the same way.
`scoredOn` says where the score was measured. `full` means the delivered file. `sample` means a long video was searched on samples taken across its length, and the score is the samples' score.
`verdict` maps the score to a label. For images: 90+ is `visually_lossless`, 70+ is `high`, 50+ is `medium`, below that `low`. For video on VMAF: 94+, 90+, and 80+ (`acceptable`).
## Should I target a size or a quality?
`target` takes one of four shapes:
| Shape | Example | What the search does |
| - | - | - |
| Named tier | `"visually-lossless"`, `"balanced"`, `"efficient"` | Finds the smallest file clearing that tier's score |
| Quality number | `85` | Same, with your own 1-100 score as the bar |
| Byte budget | `{ "maxSize": "500kb" }` or `{ "maxBytes": 512000 }` | Fits the file under the cap and reports the score it got |
| Bitrate | `{ "bitrate": 128 }` | One encode at that bitrate in kbps, no search |
The tier thresholds per medium: images clear SSIMULACRA2 90 / 85 / 78, video clears VMAF 94 / 91 / 86. Video is scored with the VMAF NEG model, which reads one to two points under the standard VMAF scale, so 94 here sits near 96 on the numbers you may know. Audio has no metric loop. Tiers map to a channel-aware Opus bitrate ladder, so a mono voice track gets half the budget of stereo music.
A byte budget on H.264 video runs one two-pass encode at a planned bitrate, with no search. When the budget is too small for the source resolution, the video steps down to a smaller frame, because a sharp small picture beats a blocky large one. The result reports `probes: 1` and `qualityLevel: null`, and the audio is re-encoded to AAC to fit. A video that already fits the budget comes back untouched. Other codecs and images still search for the best level under the cap.
A JPEG headed for JPEG XL is also repacked with its pixels untouched, and the smaller of that and the lossy search ships. A repacked result reports `mode: "lossless"` with no score.
## Which codecs does it use?
With `codec: "auto"`, the pick follows `compatibility`:
| Medium | `modern` (\~90% reach) | `broad` (\~99%, default) | `legacy` (\~100%) |
| - | - | - | - |
| Image | JPEG XL | AVIF | JPEG |
| Video | AV1 | H.264 | H.264 |
| Audio | Opus | Opus | AAC |
Or pin one: `av1`, `hevc`, `h264`, `vp9`, `avif`, `jxl`, `jpegli`, `webp`, `png`, `opus`, `aac`, `mp3`, `flac`, `alac`. The lossless-only codecs (`png`, `flac`, `alac`) always encode losslessly; combined with a byte budget, the report tells you whether the lossless file fit.
`for: "archive"` skips the lossy ladder entirely and produces a lossless master: PNG for images, FFV1 in MKV for video, FLAC for audio.
## Can I predict the result without encoding?
`dryRun: true` runs the search and returns the report with a predicted `outputBytes`, but writes no file and uploads nothing. `output.file` is `null`, the same shape as a data job. Use it to quote a compression before committing to it.
## Parameters
**for** `string`
Delivery posture. `"web"` resolves the defaults to sRGB + stripped metadata; `"archive"` resolves to lossless with everything preserved. Any explicit field you set wins over the profile.
**target** `string | number | object` (default: balanced)
The compression target. One of the four shapes above.
**compatibility** `string` (default: broad)
Decode reach `codec: "auto"` must guarantee: `"modern"`, `"broad"`, or `"legacy"`.
**codec** `string` (default: auto)
Output codec, or `"auto"` to follow the compatibility ladder.
**maxResolution** `string | number | null` (default: null)
Cap the longest edge: a pixel count or a rung like `"1080p"` / `"720p"`. Images downscale before encoding; video scales in-encode and the VMAF score is measured against the full-resolution source.
**alpha** `string` (default: preserve)
Transparency: `"preserve"`, `"flatten"` (onto white), or a `"#RRGGBB"` fill color.
**metadata** `string` (default: colorOnly)
`"all"` keeps everything, `"colorOnly"` strips EXIF and GPS (ICC preservation is best-effort), `"none"` strips all.
**effort** `string` (default: balanced)
`"fast"`, `"balanced"`, or `"thorough"` — trades encode time for extra compression on every codec that has a speed knob.
**forceReencode** `boolean` (default: false)
Re-encode even when the result would not beat the original.
**dryRun** `boolean` (default: false)
Return the predicted report without producing a file.
**video** `object`
Video-only policies. `audioTracks`: `"all"` (default), `"primary"`, or `"none"`. `subtitles`: `"strip"` (default) or `"preserve"` (best-effort copy; fails when the output container cannot hold the codec).
**audio** `object`
Audio-only policies. `loudnessLufs`: normalize to an integrated LUFS target such as `-14`, or `null` (default) for off. `channels`: `"preserve"` (default), `"mono"`, or `"stereo"`.
**tuning** `object`
Expert knobs. `metric`: `"auto"` (default), `"ssimulacra2"`, or `"vmaf"` to override the scoring oracle. `floor`: a hard minimum score the output must never drop below, in any mode.
**timeout** `integer` (default: plan maximum)
Max execution time in seconds. Plan caps apply, same as [FFmpeg](/docs/jobs/ffmpeg#parameters).
## How does the search pick an encode?
The search is a binary search over the encoder's quality scale, so a job costs about 7 probe encodes at most, each scored against the source. Videos longer than 12 seconds probe on three 2-second samples instead of the full file, and only the final encode runs over everything. A byte-budget search always encodes the full file, because the budget is exact.
Compression ratios depend on the input. A camera original shrinks hard; a file that is already well-compressed often comes back as `skipped_no_improvement`, which is the job telling you the original was already the smallest honest answer.
## Errors
A malformed request (an unknown codec name, a removed tuning knob, two target goals at once) returns `VALIDATION_ERROR` on `POST /jobs` before anything is billed. A URL that resolves somewhere Rendobar won't fetch from returns `INPUT_URL_BLOCKED`.
After the job starts, failures carry the standard `error` shape. `INPUT_FETCH_FAILED` follows the same retryable rules as [ffprobe](/docs/jobs/ffprobe#errors). An infeasible target is not an error: the job completes with `status: "infeasible_quality"` or `"infeasible_size"` in the report and the best file the search found.
## See also
* [Job output](/docs/concepts/job#the-output): the output shape every job returns
* [ffprobe](/docs/jobs/ffprobe): inspect a file before deciding how to compress it
* [FFmpeg](/docs/jobs/ffmpeg): full manual control when you want to write the command yourself
* [Compose](/docs/jobs/compose): render the video you are about to compress
* [Upscale an image](/docs/jobs/image-upscale): enlarge rather than shrink
* [Plan limits](/docs/support/limits): file-size caps and timeouts per plan
* [Webhooks](/docs/guides/webhooks): receive `job.completed` instead of polling
# Run any FFmpeg command
Source: https://rendobar.com/docs/jobs/ffmpeg
Run any FFmpeg command in the cloud with ~120 whitelisted flags, sandboxed execution, and a signed output URL.
You write the FFmpeg command. Rendobar downloads inputs, runs the command in an isolated container, returns a signed download URL. Same syntax you would run locally.
The `inputs` map stages source files into the working directory by name. The command references them by bare name, and inline `-i` URLs also work.
> [!NOTE]
>
> **Accepts:** video, audio, image
> [!TIP]
>
> From a shell? Use [the CLI](/docs/cli): `rb ffmpeg -i input.mp4 -vf scale=1280:720 out.mp4`. Local files upload automatically.
## Request
```ts SDK theme={null}
import { createClient, outputUrl } from "@rendobar/sdk";
const client = createClient({ apiKey: "rb_YOUR_KEY" });
const job = await client.jobs.create({
type: "ffmpeg",
params: {
command: "ffmpeg -i https://cdn.rendobar.com/assets/examples/sample.mp4 -vf scale=1280:720 -c:v libx264 -crf 23 -preset fast output.mp4",
},
});
const result = await client.jobs.wait(job.id);
console.log(outputUrl(result));
```
```python Python theme={null}
import requests
res = requests.post(
"https://api.rendobar.com/jobs",
headers={"Authorization": "Bearer rb_YOUR_KEY"},
json={
"type": "ffmpeg",
"params": {
"command": "ffmpeg -i https://cdn.rendobar.com/assets/examples/sample.mp4 -vf scale=1280:720 -c:v libx264 -crf 23 -preset fast output.mp4",
},
},
)
```
```bash cURL theme={null}
curl -X POST https://api.rendobar.com/jobs \
-H "Authorization: Bearer rb_YOUR_KEY" \
-H "Content-Type: application/json" \
-d '{
"type": "ffmpeg",
"params": {
"command": "ffmpeg -i https://cdn.rendobar.com/assets/examples/sample.mp4 -vf scale=1280:720 -c:v libx264 -crf 23 -preset fast output.mp4"
}
}'
```
## How does an FFmpeg job run?
1. **Validate**: command parsed against 8 security layers (flag whitelist, format/filter blocklists)
2. **Download**: input URLs pulled to a sandboxed runner
3. **Substitute**: URLs replaced with local paths in the FFmpeg command
4. **Execute**: FFmpeg runs in an isolated container with network disabled
5. **Upload**: output goes to R2
6. **Return**: signed `output.file.url` available via `GET /jobs/{id}`
## What can I use as an input?
Most commands put the source URL straight in the command and skip `inputs` entirely. It is optional and defaults to an empty map:
```json theme={null}
{
"type": "ffmpeg",
"params": {
"command": "ffmpeg -i https://example.com/clip.mp4 -vf scale=1280:720 output.mp4"
}
}
```
Reach for the `inputs` map only when a file cannot go inline: a file a filter reads by name (see below), inline text you do not want to host, an already-uploaded asset, or when you need a stable filename. Each key is a filename staged under that exact name, and the command references it by bare name.
A value can be one of three shapes:
| Value | Use it for |
| - | - |
| `"https://..."` | A remote file. Shorthand for `{ "url": "..." }` |
| `{ "url": "https://..." }` | A remote file, explicit form |
| `{ "content": "...text..." }` | Inline text you do not want to host (≤64 KB) |
A file you already uploaded is referenced by its **content URL**: the `url`
returned by the uploads endpoint, like `https://api.rendobar.com/assets/asset_abc123/content`.
Pass it like any other URL.
```json theme={null}
{
"type": "ffmpeg",
"inputs": {
"clip.mp4": "https://example.com/clip.mp4",
"logo.png": "https://api.rendobar.com/assets/asset_brandlogo/content"
},
"params": {
"command": "ffmpeg -i clip.mp4 -i logo.png -filter_complex overlay=10:10 output.mp4"
}
}
```
### Auxiliary files read by a filter
Some files are not passed as `-i` arguments. Filters like `subtitles=`, `lut3d=`, and `drawtext fontfile=`, and the lists read by the `concat` demuxer, read a file by name from the working directory. Provide those through `inputs` so they are staged before the command runs.
This burns a subtitle track that lives only in the request, with no file to host:
```json theme={null}
{
"type": "ffmpeg",
"inputs": {
"video.mp4": "https://example.com/video.mp4",
"subs.srt": {
"content": "1\n00:00:01,000 --> 00:00:04,000\nRendered on Rendobar.\n"
}
},
"params": {
"command": "ffmpeg -i video.mp4 -vf subtitles=subs.srt -c:v libx264 -c:a copy output.mp4"
}
}
```
## Parameters
**inputs** `object` (default: \{})
Working directory for the command. Optional, defaults to an empty map. Each key is a path-safe filename staged under that exact name. Each value is the source for that file. Omit it when every input is an inline `-i` URL. A value is one of:
**Input source shapes**
**URL string** `string`
Remote file. Shorthand for `{ "url": "..." }`.
**url** `object`
`{ "url": "https://..." }`. Remote file, explicit form.
**content** `object`
`{ "content": "...text..." }`. Inline text staged verbatim, up to 64 KB. For subtitles, `concat` lists, and LUTs with nothing to host.
**uploaded file** `string`
A file you already uploaded is referenced by its content URL: the `url` returned by the uploads endpoint, like `https://api.rendobar.com/assets/asset_abc123/content`. Pass it like any other URL string.
Filters that read a file by name (`subtitles=`, `lut3d=`, `drawtext fontfile=`, `concat` lists) must get that file through `inputs`. They are not `-i` arguments. See [Input sources](#what-can-i-use-as-an-input).
**command** `string` *required*
Real FFmpeg command starting with `ffmpeg`. Input URLs go in `-i` positions, or reference staged `inputs` files by name.
**outputFormat** `enum` (default: inferred)
Container format. Inferred from the trailing filename if omitted. One of: `mp4`, `mkv`, `webm`, `mov`, `avi`, `ts`, `gif`, `png`, `jpg`, `mp3`, `wav`, `flac`, `ogg`, `aac`, `opus`, `m4a`, `srt`, `vtt`.
**timeout** `integer`
Max execution time in seconds. Defaults to your plan's full job budget (Free 1 hour, Pro and Studio 9 hours), so you only set this when you want a job to fail sooner. Asking for more than your plan allows is rejected at submit with `PLAN_LIMIT`.
**compute** `enum` (default: auto)
Which machine class runs the job. One of `auto`, `cpu`, `gpu`.
* `auto` (default): a command using an NVENC or CUDA encoder, like `h264_nvenc`, routes to a GPU. Everything else runs on CPU. You do not set anything.
* `gpu`: force a GPU machine.
* `cpu`: force a CPU machine. A command that calls an NVENC encoder is rejected with `VALIDATION_ERROR`.
GPU jobs run the hardware encoders `h264_nvenc`, `hevc_nvenc`, and `av1_nvenc` on NVIDIA L4 GPUs, billed per second. `gpu` and `auto`-routed GPU jobs **require a Pro or Studio plan**. A GPU job on the Free plan returns `403 PLAN_LIMIT`. `cpu` and `auto` work on every plan. See [GPU acceleration](#can-i-use-gpu-acceleration).
## Can I validate a command without running it?
Free, no auth:
```bash theme={null}
curl -X POST https://api.rendobar.com/ffmpeg/validate \
-H "Content-Type: application/json" \
-d '{ "command": "ffmpeg -i video.mp4 -vf scale=1280:720 output.mp4" }'
```
Returns `{ data: { valid: true, args: [...], inferredOutputFormat: "mp4" } }` or `{ data: { valid: false, error: "..." } }`.
## Which flags are allowed?
\~120 whitelisted flags. Common ones:
| Flag | Purpose |
| - | - |
| `-i` | Input file |
| `-f` | Force format |
| `-c:v`, `-c:a` | Video / audio codec (stream specifiers like `-c:v:0` work) |
| `-vf`, `-af` | Video / audio filter |
| `-filter_complex` | Complex filter graph |
| `-map` | Stream mapping |
| `-ss`, `-t` | Seek position, duration |
| `-r`, `-s` | Frame rate, resolution |
| `-b:v`, `-b:a` | Video / audio bitrate |
| `-crf`, `-preset` | Quality + preset |
| `-an`, `-vn` | Disable audio / video |
| `-y` | Overwrite output |
| `-movflags`, `-strict` | Container flags, strict standards |
Unrecognised flags are rejected before dispatch with `VALIDATION_ERROR`.
## Can I use GPU acceleration?
Your jobs run on CPU-powered or GPU-powered machines. `compute` defaults to `auto`, so a command that uses an NVENC encoder routes to a GPU on its own. You do not send anything.
Switch one flag to move an encode to the hardware encoder. The GPU path runs `h264_nvenc`, `hevc_nvenc`, and `av1_nvenc` on NVIDIA L4 GPUs, several times faster than software `libx264` at the same resolution.
```bash CPU (libx264) theme={null}
ffmpeg -i input.mp4 -c:v libx264 -preset medium -crf 23 output.mp4
```
```bash GPU (h264_nvenc) theme={null}
ffmpeg -i input.mp4 -c:v h264_nvenc -preset p5 -cq 23 output.mp4
```
Set `compute` only to force a choice. `gpu` pins the job to a GPU. `cpu` pins it to CPU and rejects an NVENC command with `VALIDATION_ERROR`.
```json theme={null}
{
"type": "ffmpeg",
"params": {
"command": "ffmpeg -i https://example.com/video.mp4 -c:v h264_nvenc -preset p5 -cq 23 output.mp4",
"compute": "gpu"
}
}
```
> [!NOTE]
>
> GPU jobs require a Pro or Studio plan and bill per second at GPU rates. A GPU job on the Free plan returns `403 PLAN_LIMIT`. CPU jobs run on every plan.
## How is a command sandboxed?
Every command is validated before it runs, then executed in an isolated, network-restricted sandbox.
* **Flag allowlist.** Only known-safe flags pass. Anything unrecognised is rejected with `VALIDATION_ERROR` before dispatch.
* **No reads through filters.** Filters and formats that read from disk, fetch over the network, or run external code are blocked.
* **Path containment.** Inputs are limited to the files you provide. Path traversal and access to system paths are rejected.
* **Sandboxed execution.** Each job runs in an isolated container with a clean environment, restricted I/O, and no ambient network access.
## What does it cost and when does it time out?
Priced per compute second from your [credit balance](/docs/concepts/credits), the wall-clock time FFmpeg ran, excluding file transfer.
Plan job budgets: 1 hour (Free), 9 hours (Pro and Studio). That is a bound on processing time, not on how long your output can be. See [plan limits](/docs/support/limits) for the full table. A job that runs past its budget fails with `JOB_TIMEOUT` and is billed for the compute it used. A job a runner accepted but never started fails with `RUNNER_TIMEOUT` and is not charged.
## Examples
### Scale to 720p
```json theme={null}
{
"type": "ffmpeg",
"params": {
"command": "ffmpeg -i https://example.com/video.mp4 -vf scale=1280:720 -c:v libx264 -preset fast -crf 23 output.mp4"
}
}
```
### Extract audio
```json theme={null}
{
"type": "ffmpeg",
"params": {
"command": "ffmpeg -i https://example.com/video.mp4 -vn -c:a aac -b:a 128k output.m4a"
}
}
```
### Trim 30s starting at 1:00
```json theme={null}
{
"type": "ffmpeg",
"params": {
"command": "ffmpeg -i https://example.com/video.mp4 -ss 00:01:00 -t 00:00:30 -c:v libx264 -c:a aac output.mp4"
}
}
```
### Merge video + audio tracks
```json theme={null}
{
"type": "ffmpeg",
"params": {
"command": "ffmpeg -i https://example.com/video.mp4 -i https://example.com/narration.mp3 -c:v libx264 -c:a aac -map 0:v -map 1:a output.mp4"
}
}
```
## How do I return more than one file?
The filenames your command writes define the output. You get back every file it produced.
Every completed job, FFmpeg or otherwise, returns the same `output` shape. [Job output](/docs/concepts/job#the-output) documents it in full. The short version:
* `output.data`: the computed answer (a probe result, a transcript). `null` for FFmpeg jobs, which only write files.
* `output.file`: the headline result you play or download, one file or a stream manifest. `null` for pure file sets.
* `output.files`: every file the job produced, the complete list.
* `output.expiresAt`: Unix ms when the URLs expire, present when `files` is non-empty.
Each file is `{ url, path, type, size, meta? }`. The `type` is an open enum: `video`, `image`, `audio`, `captions`, `playlist`, `data`, or `other`. Tolerate values you do not recognise.
A command that writes one file sets `output.file` to that file, and `output.files` to a list of one:
```json theme={null}
{
"data": {
"id": "job_abc123",
"status": "complete",
"output": {
"data": null,
"file": {
"url": "https://api.rendobar.com/dl/job_abc123?token=",
"path": "output.mp4",
"type": "video",
"size": 4194304,
"sha256": "9f2c41d0b7a3e5f48c1d6e02a97b3c5f1e8d4a60b2c7f9e3d5a1b8c4e6f0a41e",
"meta": { "format": "mp4", "width": 1280, "height": 720, "durationMs": 30000 }
},
"files": [
{
"url": "https://api.rendobar.com/dl/job_abc123?token=",
"path": "output.mp4",
"type": "video",
"size": 4194304,
"sha256": "9f2c41d0b7a3e5f48c1d6e02a97b3c5f1e8d4a60b2c7f9e3d5a1b8c4e6f0a41e",
"meta": { "format": "mp4", "width": 1280, "height": 720, "durationMs": 30000 }
}
],
"expiresAt": 1735689600000
}
}
}
```
`sha256` is the SHA-256 of the output file. To confirm a download or a delivered copy, hash it with `sha256sum` and compare the result with `output.file.sha256`. You do not need a second job with `-f hash` to get a checksum of an output.
A command that writes a stream (HLS or DASH) sets `output.file` to the manifest, typed `playlist`. Point a player at `output.file.url` directly. `output.files` carries the manifest plus every segment:
```json theme={null}
{
"type": "ffmpeg",
"inputs": { "video.mp4": "https://example.com/video.mp4" },
"params": {
"command": "ffmpeg -i video.mp4 -c:v libx264 -c:a aac -f hls -hls_time 6 -hls_segment_filename seg_%03d.ts master.m3u8"
}
}
```
```json theme={null}
{
"data": {
"id": "job_abc123",
"status": "complete",
"output": {
"data": null,
"file": {
"url": "https://api.rendobar.com/v/job_abc123//master.m3u8",
"path": "master.m3u8",
"type": "playlist",
"size": 412,
"sha256": null
},
"files": [
{ "url": "https://api.rendobar.com/v/job_abc123//master.m3u8", "path": "master.m3u8", "type": "playlist", "size": 412, "sha256": null },
{ "url": "https://api.rendobar.com/v/job_abc123//seg_000.ts", "path": "seg_000.ts", "type": "video", "size": 1048576, "sha256": null },
{ "url": "https://api.rendobar.com/v/job_abc123//seg_001.ts", "path": "seg_001.ts", "type": "video", "size": 1041203, "sha256": null }
],
"expiresAt": 1735689600000
}
}
}
```
A command that writes an unordered set (image sequence, `-f segment`, a resolution ladder) has no single headline result. `output.file` is `null`. Read `output.files` for the list:
```json theme={null}
{
"data": {
"id": "job_abc123",
"status": "complete",
"output": {
"data": null,
"file": null,
"files": [
{ "url": "https://api.rendobar.com/v/job_abc123//frame_000.png", "path": "frame_000.png", "type": "image", "size": 204800, "sha256": null },
{ "url": "https://api.rendobar.com/v/job_abc123//frame_001.png", "path": "frame_001.png", "type": "image", "size": 205120, "sha256": null },
{ "url": "https://api.rendobar.com/v/job_abc123//frame_002.png", "path": "frame_002.png", "type": "image", "size": 203904, "sha256": null }
],
"expiresAt": 1735689600000
}
}
}
```
Consuming the result is the same every time. The answer is `output.data`. The thing you play or download is `output.file.url`. The full list is `output.files`. Two invariants hold: `output.file` is always one of `output.files` (or `null`), and `output.expiresAt` is present whenever `output.files` is non-empty.
URLs expire at `output.expiresAt`. Re-fetch the job with `GET /jobs/{id}` to mint fresh ones.
## How do I handle an error?
A failed job carries an `error` object with `code`, `message`, `detail`, and `retryable`. When FFmpeg exits non-zero, `error.detail` holds the last \~2 KB of the real stderr. Fetch the job to see exactly why FFmpeg stopped.
```json theme={null}
{
"data": {
"id": "job_abc123",
"status": "failed",
"error": {
"code": "RUNNER_ERROR",
"message": "FFmpeg process exited with code 1",
"detail": "[in#0 @ 0x55…] Error opening input: Invalid data found when processing input\nError opening input file clip.mp4.\n",
"retryable": false
}
}
}
```
A disallowed flag is rejected before dispatch. The request fails with the error envelope, so no job is created:
```json theme={null}
{ "error": { "code": "VALIDATION_ERROR", "message": "Flag '-protocol_whitelist' is not allowed in FFmpeg commands" } }
```
Full error catalogue: [Error codes](/docs/support/errors).
## See also
* [Job output](/docs/concepts/job#the-output): the output shape every job returns
* [CLI](/docs/cli): run the same job from your terminal with `rb ffmpeg`
* [Compose](/docs/jobs/compose): describe a render as a JSON timeline instead of a command
* [Compress](/docs/jobs/compress): hit a size or quality budget without tuning flags yourself
* [ffprobe](/docs/jobs/ffprobe): inspect a file before you write the command
* [Burn captions](/docs/jobs/captions/burn): subtitles without building the filter graph
* [Webhooks](/docs/guides/webhooks): receive `job.completed` instead of polling
* [Credits and billing](/docs/concepts/credits): per-compute-second pricing detail
* [Plan limits](/docs/support/limits): file-size caps, timeouts, and concurrency per plan
* [Job lifecycle](/docs/concepts/job): how a job moves from dispatched to complete
For a full list of FFmpeg-based operations supported by the API, see [rendobar.com/ffmpeg/](https://rendobar.com/ffmpeg/).
# Probe media metadata
Source: https://rendobar.com/docs/jobs/ffprobe
Run ffprobe on a video, audio, or image URL and get a normalized summary plus the full raw report: codec, resolution, duration, fps, rotation, HDR, audio.
You write the `command` and Rendobar runs `ffprobe` as written, the same model as [FFmpeg](/docs/jobs/ffmpeg). A bare media URL is a valid command: the defaults get filled in and you get a normalized `summary` next to the raw `format`, `streams`, and `chapters`.
> [!TIP]
>
> **Live.** Accepts video, audio, and image URLs.
> [!TIP]
>
> From a shell? Use [the CLI](/docs/cli): `rb ffprobe https://example.com/video.mp4`. Local files upload automatically.
## Probe a file
```ts SDK theme={null}
import { createClient } from "@rendobar/sdk";
const client = createClient({ apiKey: "rb_YOUR_KEY" });
const job = await client.jobs.create({
type: "ffprobe",
params: { command: "ffprobe -show_format -show_streams https://cdn.rendobar.com/assets/examples/sample.mp4" },
});
const done = await client.jobs.wait(job.id);
console.log(done.output.data.summary.kind); // "video"
```
```python Python theme={null}
import requests, time
base = "https://api.rendobar.com"
headers = {"Authorization": "Bearer rb_YOUR_KEY"}
job = requests.post(
f"{base}/jobs",
headers=headers,
json={
"type": "ffprobe",
"params": {"command": "ffprobe -show_format -show_streams https://cdn.rendobar.com/assets/examples/sample.mp4"},
},
).json()["data"]
while job["status"] not in ("complete", "failed", "cancelled"):
time.sleep(1)
job = requests.get(f"{base}/jobs/{job['id']}", headers=headers).json()["data"]
print(job["output"]["data"]["summary"]["kind"])
```
```bash cURL theme={null}
curl -X POST "https://api.rendobar.com/jobs" \
-H "Authorization: Bearer rb_YOUR_KEY" \
-H "Content-Type: application/json" \
-d '{
"type": "ffprobe",
"params": { "command": "ffprobe -show_format -show_streams https://cdn.rendobar.com/assets/examples/sample.mp4" }
}'
# Returns { "data": { "id": "job_...", "status": "waiting" } }.
# Poll GET /jobs/{id} until "status": "complete", then read output.data.
```
A probe is a data job. The answer lands in `output.data`, and `output.file` is `null` because nothing is written. Most probes finish in a few seconds. The SDK's `jobs.wait` polls for you; over raw HTTP, poll `GET /jobs/{id}` or subscribe with [webhooks](/docs/guides/webhooks).
## What does ffprobe return?
Your flags are honored. Rendobar fills in only what you left out:
| You didn't pass | Rendobar adds |
| - | - |
| `-v` or `-loglevel` | `-v error` |
| A writer flag (`-of`, `-print_format`, `-output_format`) | `-print_format json` |
| Any `-show_*` flag | `-show_format -show_streams -show_chapters` |
So a bare URL returns `summary`, `format`, `streams`, and `chapters`. Name one `-show_*` yourself and it replaces the whole trio, so `-show_frames -read_intervals %+#5` comes back with `frames` and no `summary`. Pick a writer other than JSON and nothing is parsed at all: ffprobe's text lands in `output.data.stdout`.
Four things are rejected with `VALIDATION_ERROR` before the job is created: `-protocol_whitelist`, `-protocol_blacklist`, shell control characters (`>`, `|`, `;`), and `-o`/`-output_file`. Output always comes back to you and is never written to a file.
Rendobar reads the URL directly, so a faststart MP4 transfers only its header and a file over your plan's input limit still probes. When a server refuses range requests, the runner downloads the file first and the input limit applies.
## What is in the summary?
`summary` normalizes what's awkward to read raw: rotation buried in side data, fractional frame rates, HDR spread across three color fields, cover art masquerading as video. Here is the sample file above, probed:
```json theme={null}
{
"kind": "video",
"container": "mp4",
"formatLongName": "QuickTime / MOV",
"durationSec": 5.013,
"sizeBytes": 352121,
"bitrateBps": 561932,
"startTimeSec": 0,
"streamCounts": { "video": 1, "audio": 1, "subtitle": 0, "data": 0, "attachment": 0 },
"tags": { "major_brand": "isom", "encoder": "Lavf62.3.100" },
"video": {
"codec": "h264",
"profile": "High",
"width": 1280,
"height": 720,
"displayAspectRatio": "16:9",
"pixelFormat": "yuv420p",
"bitDepth": 8,
"fps": 24,
"isVariableFrameRate": false,
"rotation": 0,
"isHdr": false,
"bitrateBps": 459337,
"language": null
},
"audio": {
"codec": "aac",
"profile": "LC",
"channels": 2,
"channelLayout": "stereo",
"sampleRate": 48000,
"bitrateBps": 95699,
"language": null
}
}
```
Switch on `kind` first. It tells you which block to read:
| `kind` | Extra field | What it means |
| - | - | - |
| `"video"` | `video` (never `null`), `audio` (primary audio stream, or `null`) | A real, non-cover-art video stream is present |
| `"audio"` | `audio` (never `null`) | No video stream, at least one audio stream |
| `"image"` | `image` (never `null`) | A still image: an image container, or a zero-duration file with no audio |
| `"other"` | none | Subtitle-only, data-only, or an attached-pic-only file with no audio track |
Three things it gets right that raw ffprobe doesn't. `video.rotation` is `0`, `90`, `180`, or `270`, read from the display matrix, while `width` and `height` stay as stored, so a portrait phone clip reads 1920×1080 with `rotation: 90`. An MP3 with embedded art reads `kind: "audio"`, because the `attached_pic` stream is excluded from both `streamCounts.video` and `summary.video`. And `video.isHdr` collapses PQ, HLG, and BT.2020 primaries into one boolean, with the exact color fields left in the raw stream.
Fields are `null`, never absent, when a value doesn't apply or ffprobe couldn't read it. `sizeBytes` is `null` when a remote server doesn't report length, and `tags` is `{}` when the container carries none.
> [!TIP]
>
> Every `summary` field name is stable. Write your checks against `summary.kind` and `summary.video.width` directly.
## Parameters
**command** `string` *required*
A raw ffprobe command, run as written. Minimal form is the media URL on its own. The `ffprobe` prefix is optional.
**timeout** `integer` (default: plan maximum)
Max execution time in seconds. Plan caps apply, same as [FFmpeg](/docs/jobs/ffmpeg#parameters). A probe rarely approaches it.
## How do I read the result?
On a JSON run, `output.data` carries `summary` plus every section ffprobe emitted, under ffprobe's own field names:
```json theme={null}
{
"summary": { "kind": "video", "container": "mp4", "durationSec": 5.013, "...": "..." },
"format": {
"filename": "https://cdn.rendobar.com/assets/examples/sample.mp4",
"format_name": "mov,mp4,m4a,3gp,3g2,mj2",
"duration": "5.013000",
"size": "352121",
"bit_rate": "561932",
"tags": { "encoder": "Lavf62.3.100" }
},
"streams": [
{ "index": 0, "codec_type": "video", "codec_name": "h264", "width": 1280, "height": 720, "avg_frame_rate": "24/1", "...": "..." },
{ "index": 1, "codec_type": "audio", "codec_name": "aac", "sample_rate": "48000", "channels": 2, "...": "..." }
],
"chapters": []
}
```
Pick a non-JSON writer and you get ffprobe's text verbatim instead, with nothing parsed and no `summary`:
```json theme={null}
{ "stdout": "format,https://cdn.rendobar.com/assets/examples/sample.mp4,2,0,mov,mp4,m4a,3gp,3g2,mj2,...\n" }
```
`warnings` appears only when there's something to say. Each entry is `{ code, message }`, and you branch on `code`.
| `code` | Meaning |
| - | - |
| `DURATION_UNKNOWN` | The container reports no duration, a common sign of truncation |
| `REPORT_SPILLED` | The report was too large to return inline. On a JSON writer `frames`/`packets` were dropped, on a text writer `stdout` was truncated. Re-run with a narrower `-read_intervals` |
## Errors
Two things are caught before a job exists, so nothing is billed: a malformed `command` (no URL, a blocked flag, a shell redirect) returns `VALIDATION_ERROR`, and a URL that resolves somewhere Rendobar won't fetch from, such as a private address, returns `INPUT_URL_BLOCKED`. Both are 400s on `POST /jobs`.
A probe that fails after it starts carries `error` with `code`, `message`, `detail`, and `retryable`.
| `code` | Meaning |
| - | - |
| `INPUT_UNREADABLE` | The file is corrupt, or a format ffprobe can't read. Never retryable. |
| `INPUT_FETCH_FAILED` | The URL couldn't be fetched. Check `retryable`: a 404 or an expired link is `false`, a timeout or a 5xx is `true`. |
```json theme={null}
{
"code": "INPUT_UNREADABLE",
"message": "ffprobe could not read the input",
"detail": "Invalid data found when processing input",
"retryable": false
}
```
Read `error.retryable` rather than mapping codes yourself. A file that probes but looks truncated succeeds with a `DURATION_UNKNOWN` warning instead of failing, so treat a video with `durationSec: null` as suspect.
## See also
* [Job output](/docs/concepts/job#the-output): the output shape every job returns
* [FFmpeg](/docs/jobs/ffmpeg): run a command against the file you probed
* [Compress](/docs/jobs/compress): shrink the file you just inspected
* [Compose](/docs/jobs/compose): use the probed dimensions to lay out a timeline
* [Burn captions](/docs/jobs/captions/burn): read the subtitle streams a probe reports
* [Webhooks](/docs/guides/webhooks): receive `job.completed` instead of polling
* [Error codes](/docs/support/errors): the full error catalogue
# Edit an image with an instruction
Source: https://rendobar.com/docs/jobs/image-edit
Use a written instruction to edit one to four reference images on hosted diffusion models. Swap a background, restyle, or compose.
`image.edit` takes one to four reference images and a written instruction, then produces a new image on a hosted diffusion model. No masks and no coordinates. You describe the change in plain language and the model applies it. The result is a webp file returned as a signed URL.
This is one product in [Rendobar's Generation API](/docs/concepts/generation).
## Edit an image
Reference images go in `inputs.images` as an array of URLs. The instruction goes in `params.prompt`.
```ts SDK theme={null}
import { createClient, outputUrl } from "@rendobar/sdk";
const client = createClient({ apiKey: "rb_YOUR_KEY" });
const job = await client.jobs.run({
type: "image.edit",
inputs: { images: ["https://cdn.rendobar.com/assets/examples/photo.jpg"] },
params: {
prompt: "Place the product on a pale grey studio backdrop with a soft shadow underneath",
},
});
console.log(outputUrl(job)); // signed URL to the edited webp
```
```bash cURL theme={null}
curl -X POST "https://api.rendobar.com/jobs" \
-H "Authorization: Bearer rb_YOUR_KEY" \
-H "Content-Type: application/json" \
-d '{
"type": "image.edit",
"inputs": { "images": ["https://cdn.rendobar.com/assets/examples/photo.jpg"] },
"params": { "prompt": "Place the product on a pale grey studio backdrop with a soft shadow underneath" }
}'
# Returns { "data": { "id": "job_...", "status": "waiting" } }.
# Poll GET /jobs/{id} until "status": "complete".
```
```python Python theme={null}
import requests, time
base = "https://api.rendobar.com"
headers = {"Authorization": "Bearer rb_YOUR_KEY"}
job = requests.post(
f"{base}/jobs",
headers=headers,
json={
"type": "image.edit",
"inputs": {"images": ["https://cdn.rendobar.com/assets/examples/photo.jpg"]},
"params": {"prompt": "Place the product on a pale grey studio backdrop with a soft shadow underneath"},
},
).json()["data"]
while job["status"] not in ("complete", "failed", "cancelled"):
time.sleep(1)
job = requests.get(f"{base}/jobs/{job['id']}", headers=headers).json()["data"]
print(job["output"]["file"]["url"]) # the edited webp
```
Each URL can be a public link or an [uploaded asset's](/docs/sdk#uploads) content URL. The output size follows the first reference image unless you set `width` and `height`.
## How do reference images work?
`inputs.images` accepts one to four URLs. The per-model cap is tighter than the schema ceiling, so a request that clears the schema can still be rejected against the resolved model.
| Model | Reference images |
| - | - |
| `flux-2-klein-4b` (economy) | Up to 4 |
| `qwen-image-edit-2511-lightning` (standard) | Up to 3 |
| `qwen-image-edit-2511` (premium) | Up to 3 |
Passing more images than the resolved model accepts returns `VALIDATION_ERROR` before anything is billed. Multiple references let you compose a scene, for example a product from one image on a background from another.
## Should I pick a tier or a model?
Set `model` to a tier alias or pin an exact model id. Omit it and you get the `economy` tier. Aliases can be re-pointed as the catalog grows, so pin an exact id when you need a result to stay stable.
| Tier | Model | Price | Reference images | Controls when pinned |
| - | - | - | - | - |
| `economy` (default) | `flux-2-klein-4b` | `$` | Up to 4 | prompt only |
| `standard` | `qwen-image-edit-2511-lightning` | `$$$` | Up to 3 | steps (4 to 8) |
| `premium` | `qwen-image-edit-2511` | `$$$$` | Up to 3 | steps (20 to 40), guidance, negative prompt |
Every `image.edit` model is reachable through a tier. There is no pin-only model on this job type today.
> [!NOTE]
>
> `Price` is the model's `priceTier`, a relative comparison from `$` to `$$$$`. It is not a per-image charge. Jobs bill on the compute they actually use, cost-plus. See [credits and billing](/docs/concepts/credits).
## Model-specific controls
Tier aliases accept the base fields only. To use `steps`, `guidance`, or `negativePrompt`, pin an exact model id. Only `qwen-image-edit-2511` accepts `guidance` and `negativePrompt`. `flux-2-klein-4b` fixes its own step count and exposes the base fields only.
```ts SDK theme={null}
await client.jobs.run({
type: "image.edit",
inputs: { images: ["https://cdn.rendobar.com/assets/examples/photo.jpg"] },
params: {
prompt: "Turn the daytime sky into a clear starry night",
model: "qwen-image-edit-2511",
steps: 30,
guidance: 4,
negativePrompt: "artifacts, halos",
},
});
```
```bash cURL theme={null}
curl -X POST "https://api.rendobar.com/jobs" \
-H "Authorization: Bearer rb_YOUR_KEY" \
-H "Content-Type: application/json" \
-d '{
"type": "image.edit",
"inputs": { "images": ["https://cdn.rendobar.com/assets/examples/photo.jpg"] },
"params": {
"prompt": "Turn the daytime sky into a clear starry night",
"model": "qwen-image-edit-2511",
"steps": 30,
"guidance": 4,
"negativePrompt": "artifacts, halos"
}
}'
```
```python Python theme={null}
requests.post(
f"{base}/jobs",
headers=headers,
json={
"type": "image.edit",
"inputs": {"images": ["https://cdn.rendobar.com/assets/examples/photo.jpg"]},
"params": {
"prompt": "Turn the daytime sky into a clear starry night",
"model": "qwen-image-edit-2511",
"steps": 30,
"guidance": 4,
"negativePrompt": "artifacts, halos",
},
},
)
```
## What does an edit job return?
A completed job carries a single webp file in `output.file`, typed `image`. `output.data` is `null`.
```json theme={null}
{
"data": null,
"file": {
"url": "https://api.rendobar.com/dl/job_abc123?token=",
"path": "output.webp",
"type": "image",
"size": 498000,
"sha256": "9f2c41d0b7a3e5f48c1d6e02a97b3c5f1e8d4a60b2c7f9e3d5a1b8c4e6f0a41e",
"meta": { "format": "webp", "width": 1024, "height": 1024 }
},
"files": [
{ "url": "https://api.rendobar.com/dl/job_abc123?token=", "path": "output.webp", "type": "image", "size": 498000, "meta": { "format": "webp", "width": 1024, "height": 1024 } }
],
"expiresAt": 1735689600000
}
```
The full [output shape](/docs/concepts/job#the-output) is the same for every job type.
## Can I watch it render?
An edit job emits `job.preview` events while the model denoises, each carrying a small webp frame. Subscribe with the SDK to show the edit resolving instead of a spinner.
```ts theme={null}
const sub = client.realtime.subscribeJob(created.id, {
onPreview: (e) => setPreview(`data:image/webp;base64,${e.data}`),
onComplete: (job) => sub.unsubscribe(),
});
```
Previews are decoration and never hold up a job. The `standard` tier finishes in four steps, so it usually completes before a frame is worth showing. See [the field reference](/docs/jobs/image-generate#watch-it-render) on the generate page.
## Parameters
**inputs.images** `string[]` *required*
One to four reference image URLs. A public link or an uploaded asset's content URL. The per-model cap applies.
**prompt** `string` *required*
The change to make, in plain language. No masks, no coordinates. Up to 4000 characters.
**model** `string` (default: economy)
A tier alias (`economy`, `standard`, `premium`) or an exact model id. A tier lets the platform pick the model. A pinned id unlocks that model's own controls.
**width** `integer`
Requested output width in pixels, up to 4096. Defaults to the first reference image. Snapped to what the model can render.
**height** `integer`
Requested output height in pixels, up to 4096. Defaults to the first reference image.
**seed** `integer`
A fixed seed makes the result reproducible. Omit it for a fresh result each time.
**enhancePrompt** `boolean`
Rewrite the instruction for the model before editing. Off by default on every model in the catalog today. The default is per model (`enhanceDefault` in [`GET /models`](#how-do-i-discover-models)), so omit it to keep whatever the model ships with.
**steps** `integer`
Denoise steps. More steps means more detail and more time. Requires a pinned model that exposes steps. The accepted range depends on the model.
**guidance** `number`
How strictly to follow the instruction. Higher is stricter. Range 1 to 10. Requires `qwen-image-edit-2511`.
**negativePrompt** `string`
What to keep out of the edited image. Up to 1000 characters. Requires `qwen-image-edit-2511`.
## How do I discover models?
`GET /models?job=image.edit` lists the edit models with their reference-image caps, controls, and relative price. The [response shape](/docs/jobs/image-generate#discover-models) is the same for both generation job types.
```bash theme={null}
curl "https://api.rendobar.com/models?job=image.edit" \
-H "Authorization: Bearer rb_YOUR_KEY"
```
## See also
* [Generation API](/docs/concepts/generation): the modalities and the shared model catalog
* [Image generate](/docs/jobs/image-generate): make an image from a text prompt
* [Image upscale](/docs/jobs/image-upscale): enlarge the edited result
* [Job output](/docs/concepts/job#the-output): the output shape every job returns
* [SDK](/docs/sdk): `jobs.run`, uploads, and reading the output
* [Webhooks](/docs/guides/webhooks): receive `job.completed` instead of polling
# Generate an image from a prompt
Source: https://rendobar.com/docs/jobs/image-generate
Generate a webp image from a text prompt on hosted diffusion models. Pick an economy, standard, or premium tier, or pin an exact model id.
`image.generate` turns a text prompt into an image on a hosted diffusion model. Ask for a tier and the platform picks the model, or pin an exact model id to reach its own controls. The result is a webp file returned as a signed URL, the same async job shape as everything else on Rendobar.
This is one product in [Rendobar's Generation API](/docs/concepts/generation).
## Generate an image
```ts SDK theme={null}
import { createClient, outputUrl } from "@rendobar/sdk";
const client = createClient({ apiKey: "rb_YOUR_KEY" });
// jobs.run submits and waits for the finished job in one call.
const job = await client.jobs.run({
type: "image.generate",
params: {
prompt:
"A ceramic pour-over coffee dripper on a walnut counter, morning light from the left, soft shadows",
width: 1024,
height: 1024,
},
});
console.log(outputUrl(job)); // signed URL to the webp
```
```bash cURL theme={null}
curl -X POST "https://api.rendobar.com/jobs" \
-H "Authorization: Bearer rb_YOUR_KEY" \
-H "Content-Type: application/json" \
-d '{
"type": "image.generate",
"params": {
"prompt": "A ceramic pour-over coffee dripper on a walnut counter, morning light from the left, soft shadows",
"width": 1024,
"height": 1024
}
}'
# Returns { "data": { "id": "job_...", "status": "waiting" } }.
# Poll GET /jobs/{id} until "status": "complete".
```
```python Python theme={null}
import requests, time
base = "https://api.rendobar.com"
headers = {"Authorization": "Bearer rb_YOUR_KEY"}
job = requests.post(
f"{base}/jobs",
headers=headers,
json={
"type": "image.generate",
"params": {
"prompt": "A ceramic pour-over coffee dripper on a walnut counter, morning light from the left, soft shadows",
"width": 1024,
"height": 1024,
},
},
).json()["data"]
while job["status"] not in ("complete", "failed", "cancelled"):
time.sleep(1)
job = requests.get(f"{base}/jobs/{job['id']}", headers=headers).json()["data"]
print(job["output"]["file"]["url"]) # the webp
```
No `inputs` are needed. The prompt is the whole request. Every generation job is async, so you submit, then poll, [wait](/docs/sdk#wait), or receive a [webhook](/docs/guides/webhooks).
## What does an image job return?
A completed job carries a single webp file in `output.file`. `output.data` is `null`, because generation writes a file rather than computing an answer.
```json theme={null}
{
"data": null,
"file": {
"url": "https://api.rendobar.com/dl/job_abc123?token=",
"path": "output.webp",
"type": "image",
"size": 512000,
"sha256": "9f2c41d0b7a3e5f48c1d6e02a97b3c5f1e8d4a60b2c7f9e3d5a1b8c4e6f0a41e",
"meta": { "format": "webp", "width": 1024, "height": 1024 }
},
"files": [
{ "url": "https://api.rendobar.com/dl/job_abc123?token=", "path": "output.webp", "type": "image", "size": 512000, "meta": { "format": "webp", "width": 1024, "height": 1024 } }
],
"expiresAt": 1735689600000
}
```
The real dimensions are in `output.file.meta`. Each model snaps your requested `width` and `height` to a size it can render, so the returned image can differ from what you asked for. The full [output shape](/docs/concepts/job#the-output) is the same for every job type.
## Can I watch it render?
A generation job emits `job.preview` events while the model denoises, each carrying a small webp frame. Subscribe with the SDK to show the picture resolving instead of a spinner.
```ts theme={null}
const sub = client.realtime.subscribeJob(created.id, {
onPreview: (e) => {
// e.data is base64 webp, roughly 256px on its long edge.
setPreview(`data:image/webp;base64,${e.data}`);
setBlur((1 - (e.progress ?? 0)) * 20); // ease the blur out as it sharpens
},
onComplete: (job) => sub.unsubscribe(),
});
```
| Field | Meaning |
| - | - |
| `seq` | Monotonic per job. Drop any frame whose `seq` is at or below the last one you rendered. |
| `progress` | Denoise progress from 0 to 1 at capture, or `null` when the model does not report it. |
| `width` / `height` | Dimensions of the preview frame, not of the final image. |
| `data` | Base64 webp, roughly 256px on its long edge. |
Previews are decoration and never hold up a job. They are ephemeral: nothing is replayed on reconnect, and a late subscriber sees only the newest frame. A model with no fast decoder emits none, and a four-step model resolves too late to be worth watching. Build for zero frames and treat anything you get as a bonus.
## Should I pick a tier or a model?
Set `model` to a tier alias for a price and quality posture without naming a model, or pin an exact model id to reach that model's own controls. Omit `model` and you get the `economy` tier.
```ts SDK theme={null}
// Tier alias: the platform picks the model.
await client.jobs.run({
type: "image.generate",
params: { prompt: "A red bicycle leaning on a brick wall", model: "premium" },
});
// Pinned model id: unlocks that model's own controls.
await client.jobs.run({
type: "image.generate",
params: {
prompt: "A red bicycle leaning on a brick wall",
model: "qwen-image-2512",
steps: 40,
guidance: 4.5,
negativePrompt: "blurry, low quality",
},
});
```
```bash cURL theme={null}
curl -X POST "https://api.rendobar.com/jobs" \
-H "Authorization: Bearer rb_YOUR_KEY" \
-H "Content-Type: application/json" \
-d '{
"type": "image.generate",
"params": { "prompt": "A red bicycle leaning on a brick wall", "model": "premium" }
}'
```
```python Python theme={null}
requests.post(
f"{base}/jobs",
headers=headers,
json={
"type": "image.generate",
"params": {"prompt": "A red bicycle leaning on a brick wall", "model": "premium"},
},
)
```
The three tiers map to these models today. Aliases can be re-pointed as the catalog grows, so pin an exact id when you need a result to stay stable.
| Tier | Model | Price | Controls when pinned | Best for |
| - | - | - | - | - |
| `economy` (default) | `flux-2-klein-4b` | `$` | prompt only | Drafts and fast iteration at the lowest cost |
| `standard` | `z-image-turbo` | `$$` | steps (8 to 12) | Everyday images at turbo speed |
| `premium` | `qwen-image-2512` | `$$$$` | steps, guidance, negative prompt | Highest fidelity with full control |
You can also pin a model that no tier points at:
| Model | Price | Controls | Best for |
| - | - | - | - |
| `flux-2-dev` | `$$$$` | steps (10 to 50), guidance | FLUX.2 quality with guidance control |
> [!NOTE]
>
> `Price` is the model's `priceTier`, a relative comparison from `$` to `$$$$`. It is not a per-image charge. Jobs bill on the compute they actually use, cost-plus, so a slower model on a bigger GPU costs more per image. See [credits and billing](/docs/concepts/credits).
### Models under review
A model can be pulled from tier resolution while we re-evaluate its cost and quality. It stays in [`GET /models`](#discover-models) with `underReview: true`, and pinning it returns `VALIDATION_ERROR` at submit before anything is billed.
`ernie-image-turbo` and `qwen-image-2512-lightning` are under review today. Use a tier, or pin one of the models above.
## Model-specific controls
Tier aliases accept the base fields only. To use `steps`, `guidance`, or `negativePrompt`, pin an exact model id. Sending a control the resolved model does not support returns `VALIDATION_ERROR` before anything is billed.
| Control | Models that accept it | Range |
| - | - | - |
| `steps` | `z-image-turbo`, `qwen-image-2512`, `flux-2-dev` | Per model, see table above |
| `guidance` | `qwen-image-2512`, `flux-2-dev` | 1 to 10 |
| `negativePrompt` | `qwen-image-2512` | Up to 1000 characters |
`flux-2-klein-4b` fixes its own step count and exposes the base fields only.
## Parameters
**prompt** `string` *required*
What you want, in plain language. No special syntax. Up to 4000 characters.
**model** `string` (default: economy)
A tier alias (`economy`, `standard`, `premium`) or an exact model id. A tier lets the platform pick the model. A pinned id unlocks that model's own controls.
**width** `integer`
Requested output width in pixels, up to 4096. Snapped to what the model can render. The real size comes back in `output.file.meta`.
**height** `integer`
Requested output height in pixels, up to 4096. Snapped to what the model can render.
**seed** `integer`
A fixed seed makes the result reproducible. Omit it for a fresh random image each time.
**enhancePrompt** `boolean`
Rewrite the prompt for the model before generating. Off by default on every model in the catalog today. The default is per model (`enhanceDefault` in [`GET /models`](#discover-models)), so omit it to keep whatever the model ships with.
**steps** `integer`
Denoise steps. More steps means more detail and more time. Requires a pinned model that exposes steps. The accepted range depends on the model.
**guidance** `number`
How strictly to follow the prompt. Higher is stricter. Range 1 to 10. Requires `qwen-image-2512` or `flux-2-dev`.
**negativePrompt** `string`
What to keep out of the image. Up to 1000 characters. Requires `qwen-image-2512`.
## How do I discover models?
`GET /models` lists every generation model with its tier, relative price, capabilities, and step range, so a model picker never has to hardcode the catalog. Filter to one job type with `?job=`.
```bash theme={null}
curl "https://api.rendobar.com/models?job=image.generate" \
-H "Authorization: Bearer rb_YOUR_KEY"
```
```json theme={null}
{
"data": [
{
"id": "flux-2-klein-4b",
"jobs": ["image.generate", "image.edit"],
"tier": "economy",
"underReview": false,
"priceTier": "$",
"maxRefImages": 4,
"steps": null,
"supports": { "negativePrompt": false, "guidance": false },
"enhanceDefault": false,
"status": "active"
}
]
}
```
Read `tier` to group models, `priceTier` to sort them by cost, and `underReview` to grey out the ones that will not run. `steps` is `null` on a model that fixes its own step count.
## Errors
A bad request fails on `POST /jobs` before anything is billed. An unknown model id, or a control the resolved model does not support, returns `VALIDATION_ERROR`. After the job starts, failures carry the standard [error](/docs/support/errors) shape.
## See also
* [Generation API](/docs/concepts/generation): the modalities and the shared model catalog
* [Image edit](/docs/jobs/image-edit): change an existing image from an instruction
* [Image upscale](/docs/jobs/image-upscale): enlarge what you generated
* [Job output](/docs/concepts/job#the-output): the output shape every job returns
* [SDK](/docs/sdk): `jobs.run`, `jobs.wait`, and reading the output
* [Webhooks](/docs/guides/webhooks): receive `job.completed` instead of polling
# Upscale an image
Source: https://rendobar.com/docs/jobs/image-upscale
Run an image through a one-step diffusion restoration model to raise its resolution. Ask for a factor or a target height, and transparency survives.
`image.upscale` increases an image's resolution on a hosted one-step diffusion model. Ask for a factor or a target height and the other side follows the source aspect ratio. The result is a png returned as a signed URL, the same async job shape as everything else on Rendobar.
This model reconstructs detail rather than only sharpening what is already there. A compressed or soft source comes back rebuilt, not just enlarged. That is a different job from a faithful resize, and it is worth knowing which one you asked for.
This is one product in [Rendobar's Generation API](/docs/concepts/generation).
## Upscale an image
```ts SDK theme={null}
import { createClient, outputUrl } from "@rendobar/sdk";
const client = createClient({ apiKey: "rb_YOUR_KEY" });
// jobs.run submits and waits for the finished job in one call.
const job = await client.jobs.run({
type: "image.upscale",
inputs: { source: "https://example.com/photo.jpg" },
params: {
sizing: { mode: "factor", factor: 2 },
},
});
console.log(outputUrl(job)); // signed URL to the png
```
```bash cURL theme={null}
curl -X POST "https://api.rendobar.com/jobs" \
-H "Authorization: Bearer rb_YOUR_KEY" \
-H "Content-Type: application/json" \
-d '{
"type": "image.upscale",
"inputs": { "source": "https://example.com/photo.jpg" },
"params": {
"sizing": { "mode": "factor", "factor": 2 }
}
}'
# Returns { "data": { "id": "job_...", "status": "waiting" } }.
# Poll GET /jobs/{id} until "status": "complete".
```
```python Python theme={null}
import requests, time
base = "https://api.rendobar.com"
headers = {"Authorization": "Bearer rb_YOUR_KEY"}
job = requests.post(
f"{base}/jobs",
headers=headers,
json={
"type": "image.upscale",
"inputs": {"source": "https://example.com/photo.jpg"},
"params": {"sizing": {"mode": "factor", "factor": 2}},
},
).json()["data"]
while job["status"] not in ("complete", "failed", "cancelled"):
time.sleep(1)
job = requests.get(f"{base}/jobs/{job['id']}", headers=headers).json()["data"]
print(job["output"]["file"]["url"]) # the png
```
## How do I control the output size?
`sizing` is a union, because "twice as big" and "2160 pixels tall" are different questions and only one can be answered per request.
```json Factor theme={null}
{ "sizing": { "mode": "factor", "factor": 2 } }
```
```json Target height theme={null}
{ "sizing": { "mode": "height", "height": 2160 } }
```
Either way the output lands on exactly the size you asked for, as long as it fits on the GPU. The default is `factor: 2`. See [Size limits](#what-are-the-size-limits) for what happens when it does not.
## Parameters
| Parameter | Default | Description |
| - | - | - |
| `model` | `seedvr2-3b` | `seedvr2-3b` or `seedvr2-7b`. The 7B is the larger checkpoint, offered as an option rather than an upgrade. |
| `sizing` | `{ mode: "factor", factor: 2 }` | How large the output should be. |
| `inputNoise` | `0.1` | Artifact reduction, 0 to 1. Higher is smoother and reconstructs less. 0.1 to 0.3 is the useful band. |
| `inputScale` | `1` | Shrink the source before upscaling, 0.25 to 1. Below 1 gives the model less to preserve and more to rebuild. |
| `passes` | auto | Run the model repeatedly, each pass covering an equal share of the total factor. Left unset it follows the factor, keeping every step near a doubling. Costs one full render per pass. |
| `latentNoise` | `0` | Softens excessive detail, 0 to 1. Reach for it when a result looks overcooked rather than soft. 0.05 to 0.15 is the useful band. |
| `colorCorrection` | `lab` | How colour is matched back to the source: `lab`, `wavelet`, `wavelet_adaptive`, `hsv`, `adain`, `none`. `lab` is the most faithful. |
| `seed` | `42` | The same seed returns the same image. This model reconstructs detail rather than copying it, so a different seed is a different plausible result. |
Every parameter is optional. Send none of them and you get the defaults above,
which are the settings this job was tuned on.
### Choosing a factor
2x is where this model does its best work. It reconstructs about one doubling,
so a larger factor adds pixels faster than it adds detail. Ask for 4x and the
job runs two 2x steps automatically, which looks close to a native 2x and costs
two renders. A single large step is available with `passes: 1`, and looks worse.
### Choosing inputScale
Leave it at `1` for photographs. Lowering it hands the model less to work from and more to invent, which suits a clean uncompressed source and hurts a compressed one, where the reconstruction follows the compression artifacts instead of the subject.
## Is transparency preserved?
A transparent png stays transparent. Alpha is upscaled alongside the colour channels rather than flattened, so a logo keeps its edge.
## What does an upscale job return?
A completed job carries a single png file in `output.file`. `output.data` is `null`, because upscaling writes a file rather than computing an answer.
png rather than webp on purpose. Re-compressing lossily is the one thing that would undo the point of an upscale.
```json theme={null}
{
"data": null,
"file": {
"url": "https://api.rendobar.com/dl/job_abc123?token=",
"path": "output.png",
"type": "image",
"size": 4194304,
"sha256": "9f2c41d0b7a3e5f48c1d6e02a97b3c5f1e8d4a60b2c7f9e3d5a1b8c4e6f0a41e",
"meta": { "format": "png", "width": 3840, "height": 2160 }
},
"expiresAt": 1735689600000
}
```
## What are the size limits?
There is no product cap on how large an output you can ask for. The bound is what the GPU can physically hold.
Ask for more than that and the job still runs. The output is capped to the largest size that fits, keeping your source's aspect ratio, and the job log says what happened:
```
requested 2730x4096 (11.2 MP) is larger than the 9.9 MP this GPU can hold,
so it was capped to 2568x3852 (about 1.87x this 1365x2048 source)
```
Read the real dimensions off `output.file.meta` rather than assuming they match what you asked for. Everything under the ceiling is untouched and lands exactly on the requested size.
The limit is on output **pixels**, not on the factor, so how far you can go depends on the source. A 1365x2048 photo is already 2.8 megapixels, and 2x of it is 11.2, which is why the example above caps at under 2x. A small source can go to 4x and beyond.
The ceiling also depends on the model. `seedvr2-7b` holds about twice the weights of `seedvr2-3b` and keeps less room for the image, so it caps roughly 40% sooner. If you are working near the limit, `seedvr2-3b` is the one that goes further, and it is also the default.
## Related
* [Generate an image from a prompt](/docs/jobs/image-generate)
* [Edit an image from an instruction](/docs/jobs/image-edit)
* [How the Generation API works](/docs/concepts/generation)
* [Compress the result](/docs/jobs/compress): shrink the enlarged file before delivery
* [Plan limits](/docs/support/limits): resolution and file-size caps per plan
# Connect AI agents with the MCP server
Source: https://rendobar.com/docs/mcp-server
Connect Claude Code, claude.ai, or any MCP client to Rendobar over OAuth, then submit jobs, upload files, and chain job outputs from the chat.
The MCP server at `https://api.rendobar.com/mcp` gives an MCP client the whole platform: submit a job, upload a file, poll status, chain a completed job into the next one, and manage API keys. Connect it with one command over OAuth, no API key to copy.
## Connect
**Claude Code**
```bash theme={null}
claude mcp add --transport http rendobar https://api.rendobar.com/mcp
```
Your browser opens once to approve access.
**claude.ai**
[Add to Claude](https://claude.ai/customize/connectors?modal=add-custom-connector\&connectorName=Rendobar\&connectorUrl=https%3A%2F%2Fapi.rendobar.com%2Fmcp)
Or add it by hand in Settings, Connectors:
```text theme={null}
https://api.rendobar.com/mcp
```
**Other MCP clients**
Any client that speaks Streamable HTTP with OAuth 2.1 connects the same way: point it at the URL below and approve in the browser that opens.
```text theme={null}
https://api.rendobar.com/mcp
```
Clients without OAuth support can authenticate with an API key instead: header `Authorization: Bearer rb_...`, from [Settings, API keys](https://app.rendobar.com) on the dashboard.
## What can I do with it?
Call `list_job_types` first. It returns every active job type fresh, so it never goes stale like a hardcoded list would. Pass `type` (for example `"compose"`) to get that one job type's complete parameter schema instead, with per-field documentation: ranges, defaults, units, and usage notes. Agents should do this before authoring a complex payload like a compose timeline. On `compose` it also carries the editor guide. Add `effect` to read one compose effect's parameters on its own, or `effect: "engine"` for the engine's other filters, instead of pulling the whole reference.
| Tool | What it does | Returns |
| - | - | - |
| `list_job_types` | Every active job type: use cases, what it chains with, a params digest, and an example payload. With `type`, the full annotated parameter schema for that one type. | `{ jobTypes[], guidance }` or `{ type, paramsJsonSchema, example, guidance }` |
| `validate_compose` | Check compose params without rendering and get the price of the render. Free, nothing is stored, and it runs the same checks a submit does. Call it before `submit_job` on any timeline you wrote. | `{ valid: true, params, upgraded[], warnings[], price }` or `{ valid: false, problems[], params, upgraded[], warnings[] }`. `params` is null when the document did not parse. |
| `submit_job` | Submit a job. `inputs` accepts a URL string, `{ url }`, `{ content }` (inline text), or `{ job: "job_..." }` for chaining. A URL can be a `storage://` URI, and `destinations` writes the output to a connected bucket. | `{ jobId, status }` |
| `get_job` | Check status and results. `wait: true` blocks up to 45 seconds instead of polling. A completed video job includes an inline poster image. | `{ id, status, output?, cost?, error? }` |
| `list_jobs` | Recent jobs, filterable by `status` and `type`. | `{ jobs[], total }` |
| `probe_media` | Run ffprobe against a media URL as an async job. Poll `get_job` for the normalized summary and full report. | `{ jobId, status }` |
| `get_account` | Credit balance, plan limits, active jobs, and rate limit usage. | `{ balance, plan, limits }` |
| `cancel_job` | Cancel a `waiting`, `dispatched` or `running` job. | `{ id, status: "cancelled" }` |
| `upload_media` | Open an upload session. Presigned URLs for shell-capable callers, or a `pageUrl` for the user to upload from their own device. | `{ session, pageUrl, files[] }` |
| `complete_upload` | Finalize an asset after its bytes land in storage. | `{ asset: { id, url, status } }` |
| `get_upload` | Check an upload session's progress. `wait: true` blocks up to 45 seconds. | `{ status, assets[] }` |
| `list_storage` | The organization's [connected buckets](/docs/storage). Use an id as `storage:///` in `inputs`, or as `storage://` in `destinations` unless its `access` is `"read"`. Credentials are never returned. | `{ storage[], note }` |
`{ job: "job_..." }` inside `submit_job`'s `inputs` chains a completed job straight into the next one today for `ffmpeg` inputs. For any other job type, pass the prior job's output URL (from `get_job`) as a plain URL input instead.
A failed call returns `isError: true` with `{ error: { code, message, retryable } }` instead of throwing, so the agent can react to it. See the [error catalogue](/docs/support/errors) for codes.
## Can I use it from my phone?
A phone has no filesystem the agent can reach, so a media file routes through a page you open yourself.
**1. Connect on claude.ai mobile**
Settings, Connectors, Add custom connector, paste `https://api.rendobar.com/mcp`, approve.
**2. Ask for the edit**
"Trim this video to the first 10 seconds and burn in captions." Claude calls `list_job_types`, then `upload_media` with no files declared, since it can't read anything off your phone.
**3. Tap the upload link**
`upload_media` returns a `pageUrl`. Claude sends it to you in the chat. Open it, pick the file from your camera roll, and it uploads.
**4. Get the result in chat**
Claude polls `get_upload({ wait: true })` until the asset is ready, calls `submit_job` with its URL, then `get_job({ wait: true })`, and replies with the finished clip.
## From an agent with shell access
An agent that can run shell commands skips the upload page and PUTs bytes directly.
**1. Declare the file**
Pass the filename and size. A known size gets you a presigned URL right away: a single PUT under 100 MB, part URLs above it.
```text theme={null}
upload_media({ files: [{ filename: "clip.mp4", size: 8421312 }] })
```
**2. PUT the bytes**
```bash theme={null}
curl -sS -X PUT --upload-file clip.mp4 "https://"
```
**3. Finalize the asset**
```text theme={null}
complete_upload({ assetId: "asset_8f2a1c" })
```
Returns the ready asset, including its stable `url`. For a multipart upload, pass `parts: [{ partNumber, etag }]` collected from each part's PUT response.
**4. Submit the job**
```text theme={null}
submit_job({
type: "ffmpeg",
inputs: { "clip.mp4": "https://api.rendobar.com/assets/asset_8f2a1c/content" },
params: { command: "ffmpeg -i clip.mp4 -vf scale=1280:720 -c:v libx264 -crf 23 out.mp4" }
})
```
Returns `{ jobId: "job_9c31", status: "waiting" }`.
**5. Chain a second job off the first**
Pass the completed job's id as the next job's input. No download, no re-upload.
```text theme={null}
submit_job({
type: "ffmpeg",
inputs: { "out.mp4": { job: "job_9c31" } },
params: { command: "ffmpeg -i out.mp4 -vf drawtext=text='done':x=10:y=10 final.mp4" }
})
```
**6. Wait for the result**
```text theme={null}
get_job({ jobId: "job_a71f", wait: true })
```
Blocks up to 45 seconds, then returns `output.file.url`.
## Run the local server for direct disk access
The hosted server can't read your disk, so even a shell-capable agent goes through the presigned-URL handshake above. `@rendobar/mcp`, the local stdio server, skips that: its `upload_file` tool reads a file off disk and uploads it in a single call.
It has the same storage tools as the hosted server, plus `list_storage_files` for finding a path inside a connected bucket.
Get an API key at [app.rendobar.com](https://app.rendobar.com), Settings, API keys.
**Claude Code**
```bash theme={null}
claude mcp add rendobar -s user --env RENDOBAR_API_KEY=rb_... -- npx -y @rendobar/mcp
```
**Claude Desktop**
Edit the config file, then restart Claude Desktop.
* macOS: `~/Library/Application Support/Claude/claude_desktop_config.json`
* Windows: `%APPDATA%\Claude\claude_desktop_config.json`
```json theme={null}
{
"mcpServers": {
"rendobar": {
"command": "npx",
"args": ["-y", "@rendobar/mcp"],
"env": { "RENDOBAR_API_KEY": "rb_..." }
}
}
}
```
**Other clients**
Cursor, Cline, Windsurf, Zed, and Continue all run the same `npx -y @rendobar/mcp` command with the `RENDOBAR_API_KEY` env var. Only the config file and the top-level key name differ (`mcpServers` for most, `context_servers` for Zed).
> [!NOTE]
>
> Needs Node 20.10 or later. The server checks at startup and exits with a clear message if it's older.
## How do I limit what it can reach?
Approving a connection grants access to one workspace, and you can take it back.
**[Account, Security](https://app.rendobar.com/account/security)** lists every app you have
connected, what each one can reach, and the workspace it was granted in. Revoking cuts an app off
and forces it to ask again from the start.
One caveat worth knowing: revoking deletes the grant and every stored token, so the app cannot get
new access or renew what it has, but an access token it is already holding stays valid until it
expires. That is under an hour.
An app connected before 2026-09-13 cannot call `list_storage`, because storage scopes did not exist
when you approved it. Revoke it and connect again to allow Storage.
## See also
* [FFmpeg reference](/docs/jobs/ffmpeg): the job type `submit_job` calls in every example on this page
* [How a job works](/docs/concepts/job): the job lifecycle and the `output` shape
* [Error codes](/docs/support/errors): every code behind an `isError` response
* [Plan limits](/docs/support/limits): file size caps and concurrency by plan
* [Scopes](/docs/concepts/scopes): what an app is asking for, and how to narrow it
# API quickstart guide
Source: https://rendobar.com/docs/quickstart
Submit your first ffmpeg job, poll to completion, and download the result. Under 5 minutes from API key to finished MP4.
Get an API key, submit an [`ffmpeg`](/docs/jobs/ffmpeg) job, poll until complete, download the output.
> [!TIP]
>
> **Fastest path: let your AI do it.** Paste this into your coding agent, or grab the one-click links on [Build with AI](/docs/build-with-ai):
>
> ```text theme={null}
> Add Rendobar to my app: read and follow https://rendobar.com/prompts/integrate.md
> ```
## Get an API key
Sign up at [app.rendobar.com](https://app.rendobar.com) and create a key from **Settings → API keys**. Keys start with `rb_`. New accounts get \$5 in free [credits](/docs/concepts/credits).
Prefer the terminal? Skip steps 2–4 and use [the CLI](/docs/cli) instead.
## 2. Submit a job
```ts SDK theme={null}
import { createClient, outputUrl } from "@rendobar/sdk";
const client = createClient({ apiKey: "rb_YOUR_KEY" });
const created = await client.jobs.create({
type: "ffmpeg",
params: {
command: "ffmpeg -i https://example.com/video.mp4 -vf scale=1280:720 -c:v libx264 -preset fast -crf 23 output.mp4",
},
});
const job = await client.jobs.wait(created.id);
console.log(outputUrl(job));
```
```python Python theme={null}
import requests
res = requests.post(
"https://api.rendobar.com/jobs",
headers={"Authorization": "Bearer rb_YOUR_KEY"},
json={
"type": "ffmpeg",
"params": {
"command": "ffmpeg -i https://example.com/video.mp4 -vf scale=1280:720 -c:v libx264 -preset fast -crf 23 output.mp4",
},
},
)
print(res.json()["data"]["id"]) # job_abc123
```
```bash cURL theme={null}
curl -X POST https://api.rendobar.com/jobs \
-H "Authorization: Bearer rb_YOUR_KEY" \
-H "Content-Type: application/json" \
-d '{
"type": "ffmpeg",
"params": {
"command": "ffmpeg -i https://example.com/video.mp4 -vf scale=1280:720 -c:v libx264 -preset fast -crf 23 output.mp4"
}
}'
```
Put input URLs directly in `-i` flags. The output format is inferred from the trailing filename (`output.mp4` → MP4).
Response:
```json theme={null}
{ "data": { "id": "job_abc123", "status": "waiting" } }
```
## 3. Poll for completion
```bash theme={null}
curl https://api.rendobar.com/jobs/job_abc123 \
-H "Authorization: Bearer rb_YOUR_KEY"
```
Statuses: `waiting → dispatched → running → complete | failed | cancelled`. See [job lifecycle](/docs/concepts/job) for what each status means. Poll every 1–2 seconds.
For push instead of poll, configure a [webhook](/docs/guides/webhooks).
## 4. Download the result
When `status` is `complete`, the response contains an `output` object. The file to download is `output.file.url`, signed and valid for one hour:
```json theme={null}
{
"data": {
"id": "job_abc123",
"status": "complete",
"output": {
"data": null,
"file": {
"url": "https://r2.rendobar.com/...",
"path": "output.mp4",
"type": "video",
"size": 4194304,
"sha256": "9f2c41d0b7a3e5f48c1d6e02a97b3c5f1e8d4a60b2c7f9e3d5a1b8c4e6f0a41e",
"meta": { "format": "mp4", "width": 1280, "height": 720, "durationMs": 30000 }
},
"files": [
{
"url": "https://r2.rendobar.com/...",
"path": "output.mp4",
"type": "video",
"size": 4194304,
"sha256": "9f2c41d0b7a3e5f48c1d6e02a97b3c5f1e8d4a60b2c7f9e3d5a1b8c4e6f0a41e",
"meta": { "format": "mp4", "width": 1280, "height": 720, "durationMs": 30000 }
}
],
"expiresAt": 1735689600000
},
"cost": { "amount": 50000000, "currency": "USD", "formatted": "$0.05" }
}
}
```
Every job type returns this same `output` shape: `data` for a computed answer, `file` for the headline result, `files` for the full list. Re-fetch the job to refresh the URLs after they expire.
## What's next
* [Rendobar CLI](/docs/cli): skip the curl, run `rb ffmpeg` from your terminal
* [FFmpeg](/docs/jobs/ffmpeg): full guide with the security model and examples
* [Compose](/docs/jobs/compose): render video from a JSON timeline
* [Compress](/docs/jobs/compress): hit a size or quality target
* [Animated captions](/docs/jobs/captions/animate): transcribe and burn word-level captions
* [Generate an image](/docs/jobs/image-generate): text to image on hosted models
* [Webhooks](/docs/guides/webhooks): push events instead of polling
* [Credits and billing](/docs/concepts/credits): plans, balance, billing
* [MCP](/docs/mcp-server): drive Rendobar from an AI agent
Need more credits? See [pricing](https://rendobar.com/pricing/) for plan and credit-pack options.
## Related
* [FFmpeg guide](/docs/jobs/ffmpeg): security model, allowed flags, worked examples
* [Job lifecycle](/docs/concepts/job): the six statuses and what triggers each
* [Pricing and plans](https://rendobar.com/pricing/): Free, Pro and Studio plans and credit-pack pricing
* [All supported FFmpeg operations](https://rendobar.com/features/): full feature index
# Use the TypeScript SDK
Source: https://rendobar.com/docs/sdk
Submit a job from Node, Deno, Bun, or Workers with @rendobar/sdk, wait for it to finish, and read the signed output URL.
`@rendobar/sdk` is the TypeScript client for the Rendobar API: typed methods, automatic retries, and responses already unwrapped from the `{ data }` envelope. ESM and CommonJS builds run on Node 18+, Deno, Bun, Workers, and the browser.
```bash theme={null}
npm install @rendobar/sdk
```
```ts title="render.ts" theme={null}
import { createClient, outputUrl } from "@rendobar/sdk";
const client = createClient({ apiKey: "rb_YOUR_KEY" });
const created = await client.jobs.create({
type: "ffmpeg",
params: {
command: "ffmpeg -i https://example.com/input.mp4 -c:v libx265 -crf 28 output.mp4",
},
});
const job = await client.jobs.wait(created.id);
if (job.status === "complete") {
console.log(outputUrl(job)); // signed download URL
}
```
`jobs.create` returns as soon as the job is queued. A job settles on one of three outcomes, and you learn which by polling or by being pushed to.
```mermaid theme={null}
flowchart LR
create["jobs.create()"] --> waiting["status: waiting"]
waiting --> poll["jobs.wait()"]
waiting --> push["webhook or realtime"]
poll --> ends{"outcome"}
push --> ends
ends -->|complete| ok["outputUrl(job)"]
ends -->|failed| bad["job.error"]
ends -->|cancelled| stop["nothing to read"]
```
## Jobs
Every method takes an optional `{ signal }` to abort the request or the `wait` loop.
| Method | Returns |
| - | - |
| `jobs.create({ type, inputs, params })` | `{ id, status: "waiting" }` |
| `jobs.wait(id, options)` | the job once it is `complete`, `failed`, or `cancelled` |
| `jobs.get(id)` | one job |
| `jobs.list({ status, type, limit, offset })` | `{ data, meta }` |
| `jobs.listAll(params)` | async iterator across every page |
| `jobs.cancel(id)` | the cancelled job |
| `jobs.download(id)` | the output as a raw `Response` |
| `jobs.logs(id)` | execution log lines |
| `jobs.types()` | job types available to your org |
| `jobs.stats({ window })` | counts, success rate, and spend over `24h`, `7d`, `30d`, `90d`, `365d`, or `all` (since your first job) |
`type`, `inputs`, and `params` are per [job type](/docs/jobs/ffmpeg). Pass `idempotencyKey` so a retried request returns the original job instead of a second one.
### Wait
```ts theme={null}
const job = await client.jobs.wait(created.id, {
timeout: 600_000, // default: the job's own budget
onProgress: (j) => console.log(j.status),
});
```
`wait` polls until the job is `complete`, `failed`, or `cancelled`, then hands it back. Polling starts at 2s and backs off to 10s. Past the timeout it throws `WaitTimeoutError` carrying the last status seen.
With no `timeout` given, the wait follows the job's own budget (`job.timeoutMs`, your plan's per-job limit) plus grace for upload and callback, so a long job is never reported as timed out while it is still running. Until the server reports that budget the bound is 5 minutes, which is also the floor. Pass a `timeout` to bound the wait yourself. Pass `throwOnFailure: true` to throw `JobFailedError` on a failed or cancelled job instead of returning it.
### Read the output
A `Job` is a union discriminated on `status`. `output` exists only on `complete` and `error` only on `failed`, so narrow before reading either.
```ts theme={null}
import { outputUrl, jobData } from "@rendobar/sdk";
if (job.status === "complete") {
outputUrl(job); // headline URL: the single file, or the HLS/DASH manifest
job.output.files; // every file, for frame sequences, segments, or a ladder
jobData(job); // output.data as Probe | null
} else if (job.status === "failed") {
console.error(job.error.code, job.error.message, job.error.retryable);
}
```
`outputUrl` is `undefined` for data-only jobs and for file sets with no headline file. `jobData` trusts the `T` you give it, so validate the shape yourself when the input is untrusted. The [output shape](/docs/concepts/job#the-output) is identical for every job type.
## Uploads
`uploads.create` runs the whole asset flow (init, presigned PUT or parallel multipart, complete) and returns the ready `Asset`. Assets expire after 24 hours unless you pass `persist: true`.
```ts theme={null}
const asset = await client.uploads.create(bytes, { filename: "clip.mp4", persist: true });
await client.jobs.create({
type: "ffmpeg",
inputs: { "clip.mp4": asset.url },
params: { command: "ffmpeg -i clip.mp4 -c:v libx265 output.mp4" },
});
```
Each `inputs` key is the filename staged in the working directory, and the command refers to it by that bare name. `asset.url` resolves to a presigned read at dispatch.
## Storage
Use `storage://` URIs to read from and write to a [connected bucket](/docs/storage):
```ts theme={null}
await client.jobs.create({
type: "ffmpeg",
inputs: { source: "storage://demo-bucket/raw/clip.mp4" },
params: { command: "ffmpeg -i source out.mp4" },
destinations: ["storage://demo-bucket/exports"],
});
```
`jobs.get(id)` returns `deliveries`, one entry per destination, and `jobs.retryDeliveries(id)` retries the failed ones. `client.storage` manages the connections. See [SDK methods](/docs/storage#sdk-methods).
## Webhooks
`webhooks.create({ name, url, subscribedEvents })` registers an endpoint. `rotateSecret`, `test`, `listDeliveries`, and `retryDelivery` operate it.
Verify every delivery with `verifyWebhook`, a zero-dependency entry point that runs anywhere Web Crypto does.
```ts theme={null}
import { verifyWebhook } from "@rendobar/sdk/webhooks";
const raw = await req.text();
const valid = await verifyWebhook(raw, req.headers, process.env.WEBHOOK_SECRET);
if (!valid) return new Response("invalid signature", { status: 401 });
```
Pass the raw body, never parsed JSON. It checks the HMAC over `${timestamp}.${body}`, rejects deliveries more than 5 minutes old, and accepts the previous secret during the 24-hour rotation window.
## Realtime
`realtime.subscribeJob` streams one job over a WebSocket. `realtime.connect` streams every event in the org.
```ts theme={null}
const sub = client.realtime.subscribeJob(created.id, {
onProgress: (e) => console.log(e.progress),
onComplete: (e) => console.log(e.status),
});
sub.unsubscribe();
```
> [!NOTE]
>
> A WebSocket can't carry an `Authorization` header, so the SDK appends your API key to the URL as a query param. Subscribe from your server, not from a browser. First-party browser apps authenticate with the session cookie instead (`credentials: "include"`).
## Billing
`billing.state()` returns balance and plan. `billing.usage({ start, end })` totals spend for a window, `billing.usageByClient({ days })` groups that spend by what submitted each job (`dashboard`, `sdk`, `cli`, `mcp`, `n8n`, `api`), and `billing.transactions({ page, limit })` reads the ledger. `billing.checkoutPlan("pro" | "studio")` returns a checkout URL, or moves an existing paid subscription to that plan. It replaces `billing.checkoutPro()`, which is deprecated.
`compose.validate(params)` checks a [compose](/docs/jobs/compose) timeline for free and, when it is valid, returns its price. `compose.effects()` and `compose.engineEffects()` list the effects a timeline can name.
`apiKeys`, `assets`, and `orgs` follow the same shape. Organization membership lives on `orgs.members` (`invite`, `changeRole`, `remove`) and `orgs.invitations` (`revoke`). The older `team` resource still works and is marked deprecated.
## Client options
```ts theme={null}
const server = createClient({ apiKey: "rb_YOUR_KEY" }); // server side
const browser = createClient({ credentials: "include" }); // first-party browser, cookie auth
```
| Option | Default | Purpose |
| - | - | - |
| `apiKey` | — | `rb_` key from [Settings → API keys](https://app.rendobar.com). Required server-side. |
| `baseUrl` | `https://api.rendobar.com` | API origin. Override for staging. |
| `timeout` | `30000` | Per-request timeout in ms. |
| `maxRetries` | `2` | Retries for 429 and 5xx. |
| `orgId` | — | Default org, sent as `X-Org-Id`. |
| `client` | `"sdk"` | Attribution label, sent as `X-Rendobar-Client`. |
| `debug` | `false` | Log request metadata. |
## Errors
A failed request throws an `ApiError` with `code`, `statusCode`, `message`, `details`, and `retryAfter` on `RATE_LIMITED`. When the API refuses a request with a list of problems, `problems` holds them typed (`path`, `message`, and `upgradeTo` on a plan refusal). Narrow it with `isApiError`.
```ts theme={null}
import { isApiError } from "@rendobar/sdk";
try {
await client.jobs.create({ type: "ffmpeg", params: { command: "ffmpeg -i in.mp4 out.webm" } });
} catch (err) {
if (isApiError(err)) console.log(err.code, err.statusCode, err.message);
}
```
429 (respecting `Retry-After`) and 5xx retry with backoff before they throw. Every other 4xx throws on the first attempt. The codes are in the [error catalogue](/docs/support/errors).
Every response and param type is exported from `@rendobar/sdk` as a named `type`.
## See also
* [Job types](/docs/jobs/ffmpeg): the type, inputs, and params for every job
* [How a job works](/docs/concepts/job): statuses and the output shape
* [Webhooks](/docs/guides/webhooks): event payloads and delivery retries
* [Error codes](/docs/support/errors): every code a request or job returns
# Connect an Amazon S3 bucket
Source: https://rendobar.com/docs/storage/amazon-s3
Connect an Amazon S3 bucket to Rendobar with a one-click IAM role or an access key pair, so jobs can read files from it and write outputs back.
Connect an Amazon S3 bucket so jobs can read files from it and write outputs back to it. For how connections work across providers, see [storage connections](/docs/storage).

Rendobar reading inputs from an S3 bucket and writing outputs back.
## Prerequisites
You need an AWS account with permission to create CloudFormation stacks and IAM roles. The bucket can already exist, or the stack can create it.
Amazon S3 offers two ways to connect. Choose one in the connect dialog:
| Way | Use when | Rendobar stores |
| - | - | - |
| **One-click role** | You can create a CloudFormation stack in the account that owns the bucket | The role's ARN. No keys |
| **Access keys** | You cannot create stacks, or one-click connect does not support the bucket's region | An access key ID and secret access key, encrypted |
This page uses **One-click role**. To use keys instead, see [Connect with access keys](#connect-with-access-keys).
## 1. Prepare the role in Rendobar
1. In [**Storage**](https://app.rendobar.com/storage), select **Connect Storage**, then **Amazon S3**.
2. Select **One-click role**.
3. In **Bucket**, select or enter the bucket name. Rendobar looks up the bucket and shows its region. Bucket names are global, so check that the bucket is in your AWS account.
4. Under **Access**, choose what the role can do:
* **Deliver and read**: write job outputs to the bucket, and read files from it.
* **Read only**: read files only, for a bucket you use for job inputs. A read-only connection cannot be a destination.
Neither lets the role delete objects.
5. (Optional) Under **More options**, turn on **Create the bucket**, or change the **ID**, region, or public URL.
6. Select **Create the Role in AWS**. The AWS console opens in a new tab.

The bucket, the role's access, and Create the Role in AWS.
## 2. Create the stack
The AWS console opens the stack with every value filled in. Check that the console is signed in to the AWS account that owns the bucket, and leave the values as they are.

The quick create page, with Rendobar's template and the stack name filled in.
1. Under **Capabilities**, select **I acknowledge that AWS CloudFormation might create IAM resources with customised names.**
2. Select **Create stack**.

The acknowledgement and Create stack.
The stack creates these resources:
| Resource | Purpose |
| - | - |
| IAM role `rendobar-` | The role Rendobar assumes. It trusts only Rendobar's identity for this connection, and allows sessions of up to 12 hours |
| OpenID Connect provider for `https://api.rendobar.com/federation` | Lets the role trust Rendobar without keys. The first stack in an account creates it, and it stays when the stack is deleted |
| S3 bucket | Only when **Create the bucket** is on. It blocks public access, and stays when the stack is deleted |
The role's policy allows these actions:
| Actions | Resource |
| - | - |
| `s3:GetObject`, `s3:PutObject`, `s3:AbortMultipartUpload` | Objects in the bucket |
| `s3:ListBucket` | The bucket |
| `s3:ListAllMyBuckets`, `s3:GetBucketLocation` | Bucket names and regions in the account, not their contents |
With **Read only**, the role does not get `s3:PutObject` or `s3:AbortMultipartUpload`.
## 3. Wait for the connection
Return to Rendobar. The dialog follows the stack, which usually finishes in under two minutes. When the stack reports, Rendobar assumes the role, runs the [access checks](/docs/storage#connect-a-bucket), and saves the connection. If you close the dialog, the connection still finishes.

Rendobar waiting for the stack to report.
If the stack reports a problem, the dialog shows it and nothing is saved. Delete the stack in CloudFormation before you try again, because the stack name stays taken.

A connected bucket. Delete is not checked, because the role cannot delete objects.
**Delete** shows a dash because the role has no delete permission, which Rendobar does not need. The empty test object from the access checks stays in the bucket at `.rendobar/probe-`. You can delete it.
A read-only connection writes nothing to the bucket, not even a test object, so **Write** also shows a dash.
## 4. Use the bucket in a job
Put an object in `inputs` to read it, and the connection in `destinations` to write the output:
```typescript SDK theme={null}
import { createClient, outputUrl } from "@rendobar/sdk";
const client = createClient({
apiKey: process.env.RENDOBAR_API_KEY,
});
const job = await client.jobs.run({
type: "ffmpeg",
inputs: { source: "storage://test-1/raw/clip.mp4" },
params: {
command: "ffmpeg -i source -vf scale=1280:-2 out.mp4",
},
destinations: ["storage://test-1/exports"],
});
console.log(outputUrl(job));
console.log(job.deliveries);
```
```bash cURL theme={null}
curl https://api.rendobar.com/jobs \
-H "Authorization: Bearer $RENDOBAR_API_KEY" \
-H "Content-Type: application/json" \
-d '{
"type": "ffmpeg",
"inputs": { "source": "storage://test-1/raw/clip.mp4" },
"params": {
"command": "ffmpeg -i source -vf scale=1280:-2 out.mp4"
},
"destinations": ["storage://test-1/exports"]
}'
```
With the default output path, this writes `exports/clip.mp4`. Delivery finishes after the job, so `job.deliveries` can still show `pending` when `run` returns.
To change how outputs are named, see [delivery settings](/docs/storage#delivery-settings). If a delivery fails, see [delivery errors](/docs/storage#delivery-errors).
## Troubleshooting
| Problem | Fix |
| - | - |
| The stack rolls back because the identity provider already exists | Delete the rolled-back stack. In the Rendobar dialog, select **open AWS without creating it** |
| The stack rolls back because the identity provider does not exist | Rendobar skips the provider after your organization's first stack, and assumes the same AWS account. Delete the rolled-back stack, then select **open AWS and create it** |
| The dialog says one-click connect does not reach the bucket's region | [Connect with access keys](#connect-with-access-keys) |
| The stack is still running after a few minutes | Open the stack's **Events** tab in CloudFormation. A stack that fails before it reports cannot tell Rendobar |
## Create the role another way
To create the role with Terraform or by hand, open **Trust policy and Terraform** in the waiting dialog and copy either one. Create the role with a maximum session duration of 12 hours, which the Terraform already sets. Then select **I created the role another way**, and paste the role's ARN. Rendobar runs the access checks as soon as you finish.
## How do I revoke access?
Delete the stack in CloudFormation. This deletes the role, and Rendobar removes the connection. The OpenID Connect provider, and any bucket the stack created, stay in the account.
For a role you created another way, delete the role in IAM. Deleting the connection in Rendobar does not delete the role.
## Connect with access keys
1. In the AWS console, create an IAM user, and attach the policy that the connect dialog shows under **IAM policy for this bucket**.
2. Create an access key for the user.
3. In the connect dialog, select **Access keys**, then enter the bucket name, **Access Key ID**, and **Secret Access Key**. Rendobar finds the bucket's region.
4. Select **Connect**.
## S3-specific behavior
**Name conflicts.** S3 refuses a conditional write to a key that exists, so **Keep both** works. When two outputs share a name, Rendobar adds the end of the job id to the new one.

Keep both, available on an S3 bucket.
**Incomplete uploads.** When a large upload fails, Rendobar aborts it so its parts are not left in the bucket. As a safety net for every client that writes to the bucket, add a [lifecycle rule that deletes incomplete multipart uploads](https://docs.aws.amazon.com/AmazonS3/latest/userguide/mpu-abort-incomplete-mpu-lifecycle-config.html).
**Temporary credentials.** For a role, Rendobar gets temporary credentials from AWS STS that last up to 12 hours. A link to an input file stops working when the credentials that signed it expire, so a role limited to AWS's default one-hour session gives jobs input links that last one hour. Each delivery's credentials are limited to the one object it writes. [Why S3 presigned URLs expire early](https://rendobar.com/blog/s3-presigned-url-expires-early/) measures this, and [giving a service S3 access without an access key](https://rendobar.com/blog/s3-access-without-access-keys/) walks through the role's trust and permission policies.
**Encryption.** For a bucket encrypted with SSE-KMS, the role or user also needs `kms:GenerateDataKey` to write and `kms:Decrypt` to read, on the bucket's key.
## Next steps
> **[Storage connections](/docs/storage)**
>
> Connection ids, delivery settings, credentials, and error codes.
> **[Jobs](/docs/concepts/job)**
>
> Where `inputs` and `destinations` appear in the job payload.
> **[SDK](/docs/sdk)**
>
> Submit the job above in TypeScript.
> **[Webhooks](/docs/guides/webhooks)**
>
> Receive an event when a job completes.
# Connect a Cloudflare R2 bucket
Source: https://rendobar.com/docs/storage/cloudflare-r2
Connect a Cloudflare R2 bucket to Rendobar with an R2 API token, so that jobs can read files from it and write their outputs back to it.
Connect a Cloudflare R2 bucket so jobs can read files from it and write outputs back to it. For how connections work across providers, see [storage connections](/docs/storage).

Rendobar reading inputs from an R2 bucket and writing outputs back.
## Prerequisites
You need a Cloudflare account with an R2 bucket.
R2 accepts two kinds of credential. Choose one with **Key type** in the connect dialog:
| Key type | Use when | You enter |
| - | - | - |
| **API token** | You have no credentials for the bucket yet | API token, bucket name |
| **Access key and secret** | You already have an S3 key pair | Account ID, bucket name, access key ID, secret access key |
This page uses an API token. To use a key pair instead, see [Connect with an access key and secret](#connect-with-an-access-key-and-secret).
## 1. Create an R2 API token
1. In the Cloudflare dashboard, go to **R2 Object Storage** > **Manage API tokens**.
2. Select **Create Account API token**.
3. Under **Permissions**, select **Object Read & Write**.
4. Under **Specify bucket(s)**, select **Apply to specific buckets only**, then select your bucket.
5. Select **Create Account API Token**.
Rendobar reads, writes, lists, and deletes objects. It never creates or deletes buckets, so **Admin Read & Write** is more access than it needs.

Object Read and Write, applied to one bucket.
> [!WARNING]
>
> Cloudflare shows the token only once. Copy it before you leave the page, or you will need to create a new one.

The created token.
## 2. Connect the bucket
1. In [**Storage**](https://app.rendobar.com/storage), select **Connect Storage**, then **Cloudflare R2**.
2. In **API token**, paste the token. In **Bucket**, enter the bucket name.
3. (Optional) Under **More options**, change the **ID**. Jobs use it to reference the bucket.
4. Select **Connect**.
You can paste the whole Cloudflare token page into **API token**. Rendobar finds the token in the text.

The R2 connect dialog with a token and bucket name entered.
Rendobar runs its [access checks](/docs/storage#connect-a-bucket) and saves the connection only if they pass. If the bucket does not exist, the dialog offers **Create the bucket and connect**.

A connected bucket, with the access checks passed and the storage URIs to use in jobs.
## 3. Use the bucket in a job
Put an object in `inputs` to read it, and the connection in `destinations` to write the output:
```typescript SDK theme={null}
import { createClient, outputUrl } from "@rendobar/sdk";
const client = createClient({
apiKey: process.env.RENDOBAR_API_KEY,
});
const job = await client.jobs.run({
type: "ffmpeg",
inputs: { source: "storage://demo-bucket/raw/clip.mp4" },
params: {
command: "ffmpeg -i source -vf scale=1280:-2 out.mp4",
},
destinations: ["storage://demo-bucket/exports"],
});
console.log(outputUrl(job));
console.log(job.deliveries);
```
```bash cURL theme={null}
curl https://api.rendobar.com/jobs \
-H "Authorization: Bearer $RENDOBAR_API_KEY" \
-H "Content-Type: application/json" \
-d '{
"type": "ffmpeg",
"inputs": { "source": "storage://demo-bucket/raw/clip.mp4" },
"params": {
"command": "ffmpeg -i source -vf scale=1280:-2 out.mp4"
},
"destinations": ["storage://demo-bucket/exports"]
}'
```
With the default output path, this writes `exports/clip.mp4`. Delivery finishes after the job, so `job.deliveries` can still show `pending` when `run` returns.
To change how outputs are named, see [delivery settings](/docs/storage#delivery-settings). If a delivery fails, see [delivery errors](/docs/storage#delivery-errors).
## How do I revoke access?
1. In the Cloudflare dashboard, go to **R2 Object Storage** > [**Manage API tokens**](https://developers.cloudflare.com/r2/api/tokens/).
2. Delete the token used by the connection.
The connection stops working immediately. To replace the credential without changing job payloads, [rotate it](/docs/storage#rotate-a-credential) instead.
> [!WARNING]
>
> Deleting a bucket does not revoke its token. A token scoped to all buckets still reaches every other bucket in the account, so scope tokens to one bucket.
## Connect with an access key and secret
If you already have an S3 key pair for the bucket, set **Key type** to **Access key and secret**, then enter:
* **Account ID**: 32 hexadecimal characters, shown on the R2 overview page
* **Access Key ID** and **Secret Access Key**: from the key pair
Rendobar builds the endpoint from the account ID: `https://.r2.cloudflarestorage.com`.

The R2 connect dialog on the Access key and secret tab.
## R2-specific behavior
**Jurisdictions.** Buckets in the EU or FedRAMP jurisdiction use a different endpoint. Set the jurisdiction under **More options** when you connect.
**Public URLs.** Use the bucket's [r2.dev domain or a custom domain](https://developers.cloudflare.com/r2/buckets/public-buckets/) as the connection's [public URL](/docs/storage#public-url).
**Egress.** R2 does not charge for egress. See [R2 pricing](https://developers.cloudflare.com/r2/pricing/), and [running FFmpeg on files in R2](https://rendobar.com/ffmpeg/r2/) for how that compares with S3.
## Next steps
> **[Storage connections](/docs/storage)**
>
> Connection ids, delivery settings, credentials, and error codes.
> **[Jobs](/docs/concepts/job)**
>
> Where `inputs` and `destinations` appear in the job payload.
> **[SDK](/docs/sdk)**
>
> Submit the job above in TypeScript.
> **[Webhooks](/docs/guides/webhooks)**
>
> Receive an event when a job completes.
# Storage connections
Source: https://rendobar.com/docs/storage/index
Use your own object storage bucket with Rendobar. Jobs read input files from a connected bucket and write their outputs back to it.
A storage connection links a bucket you own to Rendobar. Jobs read inputs from the bucket and write outputs back to it, so your files never need to be public.
After you connect a bucket, reference objects in it with the connection id you chose:
```text theme={null}
storage:///
```

Rendobar reads inputs from connected buckets and writes outputs back to them.
## Which providers are supported?
| Provider | Credentials |
| - | - |
| [Cloudflare R2](/docs/storage/cloudflare-r2) | R2 API token, or access key and secret |
| [Amazon S3](/docs/storage/amazon-s3) | One-click IAM role, which can be read only, or access key and secret |
| [Supabase Storage](/docs/storage/supabase) | Supabase sign-in, or S3 access keys |
| [S3-compatible](/docs/storage/s3-compatible) | Endpoint, region, and access key pair |
Use **S3-compatible** for any service that implements the S3 API, such as MinIO, Backblaze B2, or Wasabi.
## How does a storage connection work?
A connection has three parts:
| Part | Role |
| - | - |
| Bucket | Where jobs read inputs and write outputs |
| Credential | A key, token, or role that gives Rendobar access. Jobs never receive it |
| Connection id | The name jobs use to reference the bucket |
### Connect a bucket
In [**Storage**](https://app.rendobar.com/storage), select **Connect Storage** and choose your provider. Each [provider page](#which-providers-are-supported) covers the credential it needs.

The Connect Storage dialog.
Before saving the connection, Rendobar writes a test object, reads it back, lists the bucket, and deletes the test object. If a check fails, the connection is not created, and the error names the field or permission to fix.
To run the checks again, select **Test Connection** from the connection's actions menu in [**Storage**](https://app.rendobar.com/storage), or call `client.storage.test(id)`.
### Reference the bucket
Put the connection id in a `storage://` URI, followed by the object's path in the bucket. For example, `storage://demo-bucket/raw/clip.mp4` is the object `raw/clip.mp4` in the connection `demo-bucket`.
If the path contains `%`, `?` or `#`, write those characters as `%25`, `%3F` and `%23`. For example, `storage://demo-bucket/raw/clip%231.mp4` is the object `raw/clip#1.mp4`. The Storage page, the Playground and the Rendobar clients write them this way for you.
Rendobar suggests an id from the bucket name, and any id must match `[a-z0-9-]{2,40}`. Jobs use the id, not the credential, so you can [rotate a credential](#rotate-a-credential) without changing any job.
### Use it in a job
A `storage://` URI works anywhere a job accepts a file URL. Put it in `inputs` to read an object, and in `destinations` to write the output:
```typescript theme={null}
import { createClient } from "@rendobar/sdk";
const client = createClient({
apiKey: process.env.RENDOBAR_API_KEY,
});
const job = await client.jobs.run({
type: "ffmpeg",
inputs: { source: "storage://demo-bucket/raw/clip.mp4" },
params: {
command: "ffmpeg -i source -vf scale=1280:-2 out.mp4",
},
destinations: ["storage://demo-bucket/exports"],
});
```
The same URIs work in the [MCP server](/docs/mcp-server). Call `list_storage` to get the connection ids.
In the [Playground](https://app.rendobar.com/playground), you can pick the input and the destination instead of typing URIs.

An ffmpeg job with its input as a storage:// URI, picked with From Storage, and its output destination under Deliver to.
To pick the input, select **From Storage**, choose a file, then select **Use**.

Picking an input file from a connected bucket.
To pick where the output goes, select the folder icon (**Browse folders**) on a destination under **Deliver to**, open a folder, then select **Use This Folder**.

Picking a folder to deliver the output into.
### What happens when the job runs
For the job above, which reads from the bucket and writes back to it:
```mermaid theme={null}
%%{init: {"sequence": {"mirrorActors": false, "messageFontSize": 15, "actorFontSize": 15, "actorMargin": 40}}}%%
sequenceDiagram
autonumber
participant You
participant API as Rendobar
participant Runner as Job runner
participant Bucket as Your bucket
You->>API: Submit job
API->>Runner: Signed input URL
Runner->>Bucket: Download input
Runner->>API: Upload output
API->>Bucket: Write output
```
1. You submit a job that uses `storage://` URIs.
2. Rendobar starts the job and gives the job runner a signed URL for the input. The URL covers one object and expires, so the runner never holds your credential.
3. The job runner downloads the input through the signed URL and runs the job.
4. The job runner uploads the output to Rendobar. This copy is `output.file.url`.
5. Rendobar writes the whole output to your bucket with the connection's credential, as described in [what gets delivered](#what-gets-delivered). The result is reported as a [delivery event](#delivery-events).
## Delivery settings
Each connection has four delivery settings. To change them, select the connection in [**Storage**](https://app.rendobar.com/storage), then select the edit icon on the **Delivery** card.

Delivery settings: output path, name conflicts, default destination, and public URL.
### Output path
The output path is a template. New connections use **By date**, which is `rendobar/{date}/{source_name}.{ext}`. The dialog also offers **Flat**, which is `rendobar/{source_name}.{ext}`, and **Custom template**.
| Token | Value |
| - | - |
| `{job_id}` | The job id, such as `job_ee14ffeecc3f4a1b` |
| `{ext}` | The output file extension, without the dot |
| `{source_name}` | The input file name, without its extension |
| `{date}` | The UTC date, as `YYYY-MM-DD` |
The destination in a job decides how much of the template applies. For a connection using **By date**, and an input named `clip.mp4`:
| Destination | Uses | Writes |
| - | - | - |
| `storage://demo-bucket` | The connection's template | `rendobar/2026-09-12/clip.mp4` |
| `storage://demo-bucket/exports` | The folder, then the template's file name | `exports/clip.mp4` |
| `storage://demo-bucket/exports/{job_id}.{ext}` | The path as written | `exports/job_ee14ffeecc3f4a1b.mp4` |
A path that contains a token, or ends in a file name, is used as written. Any other path is treated as a folder.
### Name conflicts
A template without `{job_id}`, including **By date**, can produce a key that already exists. **Name conflicts** decides what happens.
| Setting | Behavior |
| - | - |
| **Keep both** | The default. Appends the last six characters of the job id, so `clip.mp4` is written as `clip-4a1b6e.mp4` |
| **Replace** | Overwrites the existing object |
> [!WARNING]
>
> **Replace** permanently overwrites the existing object unless the bucket has versioning turned on. **Keep both** needs a bucket that supports conditional writes. On a bucket that does not, Rendobar replaces instead.
### Default destination
When **Default destination** is on, jobs that do not set `destinations` write their outputs to this connection. Only one connection per organization can be the default, so turning it on for one connection turns it off for the others.
### Public URL
By default, a delivery's `url` points to Rendobar. Set a public URL to return links on your own host instead, such as `https://media.example.com/exports/clip.mp4`. It must use `https` and cannot point to a private or internal host.
Leave it empty for a private bucket. Inputs and outputs still work, and only the returned `url` changes.
## What gets delivered
A destination receives the job's whole `output`, whatever the job returns. The output path splits into a name and an extension, and every piece lands under that name:
| The job returns | Written to your bucket, for the path `exports/clip.mp4` |
| - | - |
| One file | `exports/clip.mp4` |
| Several files, such as an HLS ladder or image frames | The folder `exports/clip/`, each file under its own name and subfolder |
| Structured data only, such as `ffprobe` | `exports/clip.json` |
| A file and structured data, such as `captions.animate` | `exports/clip.mp4` and `exports/clip.json` |
| Several files and structured data | The folder `exports/clip/` and `exports/clip.json` |
If the file is itself `.json`, its data is written to `exports/clip.data.json` instead.
There is no size limit on a delivery beyond your bucket's own. Large files and long file sets are written in parts over as many attempts as they need, and the delivery stays `pending` until the last part lands.
With **Keep both**, Rendobar checks the output name and the `.json` name before writing. If either is taken, the job's suffix is added to the name, so every piece moves together, for example to `exports/clip-4a1b6e/`. Inside a folder, only its first file is checked, so add `{job_id}` to the output path if files from different jobs must never share a folder.
## Delivery results
A completed job lists one entry in `deliveries` for each destination:
```json theme={null}
{
"deliveries": [
{
"storageId": "demo-bucket",
"status": "delivered",
"path": "exports/clip.mp4",
"url": "https://media.example.com/exports/clip.mp4"
}
]
}
```
| Field | Description |
| - | - |
| `storageId` | The connection id |
| `status` | `pending`, `delivered`, or `failed` |
| `path` | The key written, after the template and any rename. A folder ends in `/` |
| `url` | The public URL if one is set, otherwise a Rendobar URL. Absent for a folder |
| `reason` | Why the delivery failed. Present only when `status` is `failed` |
| `renamed` | `true` when **Keep both** added a suffix |
For a single file, `output.file.url` and `deliveries[].url` point to the same content. The first is a Rendobar URL that expires at `output.expiresAt`. The second points to the copy in your bucket, which Rendobar does not delete. For a folder, each file's key is the folder `path` plus that file's `output.files[].path`.
`deliveries` is returned by `GET /jobs/{id}`. It is not in the job list response, and it is absent when a job has no destinations.
In the dashboard, a job's **Deliveries** section shows each destination's status and failure reason, and **Retry Failed** retries the failed ones.

A job's deliveries: one delivered, one in progress, and one failed with its reason.
### Delivery events
A job is `complete` before its deliveries start, and a failed delivery does not change the job's status. Webhooks can arrive in any order, including `job.completed`.
```mermaid theme={null}
%%{init: {"sequence": {"mirrorActors": false, "messageFontSize": 15, "actorFontSize": 15, "actorMargin": 40}}}%%
sequenceDiagram
participant Rendobar
participant A as Bucket A
participant B as Bucket B
participant Hook as Your webhook
par In parallel
Rendobar->>A: Write the output
Rendobar-->>Hook: job.delivery_succeeded
and
Rendobar->>B: Write the output
Rendobar-->>Hook: job.delivery_failed
end
Rendobar-->>Hook: job.deliveries_settled
```
Wait for `job.deliveries_settled` to know every destination is done. It is sent once, after the last destination resolves, and carries every outcome, so the order of the other events does not matter. It is the only delivery event a per-job `callback.url` receives. Jobs with no destinations do not send it.
To retry failed deliveries, call `client.jobs.retryDeliveries(id)` or `POST /jobs/{id}/deliveries/retry`.
## Delivery errors
A failed delivery includes one of these `reason` codes. Rendobar never forwards the bucket's own error text.
| Reason | Cause | Fix |
| - | - | - |
| `destination_denied` | The credential cannot perform this operation on the bucket or path | Grant read and write access to objects in this bucket |
| `signature_mismatch` | The bucket rejected the request signature | Check the access key, secret, and region, or issue a new credential |
| `bucket_not_found` | No bucket with that name exists at the endpoint | Reconnect using the bucket's current name |
| `already_exists` | An object already exists at that key | Add `{job_id}` to the output path, or use **Keep both** |
| `object_too_large` | The bucket rejected the object as too large | Check the bucket's object size limit, or reduce the output size |
| `destination_unavailable` | The bucket returned a 429 or 5xx, did not respond, or an attempt stopped without finishing for 30 minutes | Rendobar retries automatically. Retry manually if it stays failed |
| `not_deliverable` | The job failed, was cancelled, stored no output, or its output expired before a retry | Run the job again if you still need its output delivered |
Errors returned when you create a connection are listed in [error codes](/docs/support/errors).
## How are credentials stored?
For connections that use keys, Rendobar stores the access key and secret, encrypted with AES-256-GCM. No API endpoint returns them. A one-click AWS role stores no keys, because Rendobar assumes the role when it needs access.
Some providers issue a different kind of credential, such as a Cloudflare R2 API token. Rendobar uses it once to get an S3 key pair, then discards it. A Supabase sign-in is used once to read the project's API keys, then discarded. See [what Rendobar stores](/docs/storage/supabase#what-rendobar-stores) for Supabase.
### Rotate a credential
Select **Replace Keys** from the connection's actions menu in [**Storage**](https://app.rendobar.com/storage), or call `client.storage.update(id, { credentials })`. Rendobar runs the access checks on the new credential before saving it. The connection id stays the same.
### Revoke access
Delete the token, key, or role in the provider's console. The connection stops working immediately.
Deleting a Rendobar connection also stops access, but it does not invalidate the credential. If you use the credential anywhere else, revoke it at the provider too.
## SDK methods
Listing and reading connections needs the `storage:read` scope. Connecting, testing, changing and
deleting them needs `storage:write` and the owner or admin role. See [scopes](/docs/concepts/scopes).
| Method | Description |
| - | - |
| `client.storage.list()` | List the connections in the organization |
| `client.storage.get(id)` | Get one connection |
| `client.storage.create(params)` | Connect a bucket. Fails if an access check fails or the id is taken |
| `client.storage.update(id, params)` | Replace the credential or change delivery settings |
| `client.storage.test(id)` | Run the access checks again |
| `client.storage.listObjects(id, params)` | List folders and objects in the bucket |
| `client.storage.stats(id)` | Get delivery activity for the connection |
| `client.storage.delete(id)` | Remove the connection. The bucket is not changed |
## Related resources
> **[Cloudflare R2](/docs/storage/cloudflare-r2)**
>
> Connect an R2 bucket with an API token or an access key pair.
> **[Amazon S3](/docs/storage/amazon-s3)**
>
> Connect an S3 bucket with a one-click IAM role or an access key pair.
> **[Supabase Storage](/docs/storage/supabase)**
>
> Connect a Supabase bucket by signing in or with S3 access keys.
> **[S3-compatible](/docs/storage/s3-compatible)**
>
> Connect MinIO, Backblaze B2, Wasabi, or any other S3-compatible bucket.
> **[Jobs](/docs/concepts/job)**
>
> Where `inputs` and `destinations` appear in the job payload.
> **[Webhooks](/docs/guides/webhooks)**
>
> Receive an event when a job completes.
> **[Errors](/docs/support/errors#storage-connections)**
>
> Error codes returned when you create or test a connection.
> **[MCP server](/docs/mcp-server)**
>
> List connections with `list_storage` and use them from an agent.
## Guides with measured results
> **[Save FFmpeg output to S3](https://rendobar.com/blog/ffmpeg-output-to-s3/)**
>
> Three ways to get output into a bucket, and what pipe-safe MP4 flags cost.
> **[Process video from an S3 bucket](https://rendobar.com/blog/process-s3-video-ffmpeg/)**
>
> Run past Lambda's 900-second limit with a storage input.
> **[Thumbnails from S3 uploads](https://rendobar.com/blog/video-thumbnail-s3-upload/)**
>
> Trigger a thumbnail job from an S3 event without black frames or duplicates.
> **[Video APIs that deliver to your bucket](https://rendobar.com/blog/video-api-output-to-your-bucket/)**
>
> 13 services compared on keys, roles, and reading inputs from your bucket.
# Connect an S3-compatible bucket
Source: https://rendobar.com/docs/storage/s3-compatible
Connect a bucket on any S3-compatible service, such as MinIO, Backblaze B2 or Wasabi, so Rendobar jobs can read files from it and write outputs back.
Connect a bucket on any service that implements the Amazon S3 API, such as MinIO, Backblaze B2, Wasabi, or Hetzner Object Storage. For how connections work across providers, see [storage connections](/docs/storage).
## Prerequisites
From your provider, you need:
| Value | Where it comes from |
| - | - |
| Endpoint | The provider's S3 API URL. It must use `https` and a public host |
| Region | The region your provider's documentation gives for S3 requests |
| Bucket name | An existing bucket, or a name for a new one |
| Access key ID and secret access key | A key that can read and write objects in the bucket |
The key does not need permission to delete objects. Listing objects is needed only to browse the bucket from the dashboard.
## 1. Connect the bucket
1. In [**Storage**](https://app.rendobar.com/storage), select **Connect Storage**, then **S3-compatible**.
2. Enter the **Endpoint**, **Region**, and **Bucket**.
3. Set **Path-style URLs** to match your provider. See [Path-style URLs](#path-style-urls).
4. Enter the **Access Key ID** and **Secret Access Key**.
5. (Optional) Under **More options**, change the **ID** or set a public URL.
6. Select **Connect**.
Rendobar runs its [access checks](/docs/storage#connect-a-bucket) and saves the connection only if they pass. If the bucket does not exist, the dialog offers **Create the bucket and connect**.
## 2. Use the bucket in a job
Put an object in `inputs` to read it, and the connection in `destinations` to write the output:
```typescript SDK theme={null}
import { createClient, outputUrl } from "@rendobar/sdk";
const client = createClient({
apiKey: process.env.RENDOBAR_API_KEY,
});
const job = await client.jobs.run({
type: "ffmpeg",
inputs: { source: "storage://demo-bucket/raw/clip.mp4" },
params: {
command: "ffmpeg -i source -vf scale=1280:-2 out.mp4",
},
destinations: ["storage://demo-bucket/exports"],
});
console.log(outputUrl(job));
console.log(job.deliveries);
```
```bash cURL theme={null}
curl https://api.rendobar.com/jobs \
-H "Authorization: Bearer $RENDOBAR_API_KEY" \
-H "Content-Type: application/json" \
-d '{
"type": "ffmpeg",
"inputs": { "source": "storage://demo-bucket/raw/clip.mp4" },
"params": {
"command": "ffmpeg -i source -vf scale=1280:-2 out.mp4"
},
"destinations": ["storage://demo-bucket/exports"]
}'
```
With the default output path, this writes `exports/clip.mp4`. Delivery finishes after the job, so `job.deliveries` can still show `pending` when `run` returns.
To change how outputs are named, see [delivery settings](/docs/storage#delivery-settings). If a delivery fails, see [delivery errors](/docs/storage#delivery-errors).
## Path-style URLs
**Path-style URLs** decides where the bucket name goes in each request. Use the style your provider documents.
| Setting | Request URL |
| - | - |
| On | `https:////` |
| Off | `https://./` |
If the access checks fail with a signature or bucket error and the keys are correct, try the other setting.
## Behavior that depends on the provider
**Name conflicts.** When you connect, Rendobar checks whether the endpoint refuses to overwrite an existing object. If it does not, **Name conflicts** is fixed to **Replace**, and an output with the same path replaces the existing object. To keep every output, add `{job_id}` to the [output path](/docs/storage#output-path).
**Deletes.** A key without delete permission works. The empty test object from the access checks then stays in the bucket at `.rendobar/probe-`, and you can delete it.
**Public URLs.** Set your provider's public or CDN domain as the connection's [public URL](/docs/storage#public-url), so deliveries return links on that domain.
## How do I revoke access?
Delete or deactivate the access key in your provider's console. The connection stops working immediately.
Deleting the connection in Rendobar removes the stored key, but does not invalidate it.
## Next steps
> **[Storage connections](/docs/storage)**
>
> Connection ids, delivery settings, credentials, and error codes.
> **[Jobs](/docs/concepts/job)**
>
> Where `inputs` and `destinations` appear in the job payload.
> **[SDK](/docs/sdk)**
>
> Submit the job above in TypeScript.
> **[Webhooks](/docs/guides/webhooks)**
>
> Receive an event when a job completes.
# Connect a Supabase Storage bucket
Source: https://rendobar.com/docs/storage/supabase
Connect a Supabase Storage bucket to Rendobar by signing in with Supabase or with S3 access keys, so jobs can read files from it and write outputs back.
Connect a Supabase Storage bucket so jobs can read files from it and write outputs back to it. For how connections work across providers, see [storage connections](/docs/storage).

Rendobar reading inputs from a Supabase Storage bucket and writing outputs back.
## Prerequisites
You need a Supabase project.
Supabase offers two ways to connect. Choose one with **Access** in the connect dialog:
| Access | Use when | You enter |
| - | - | - |
| **Sign in** | You can sign in to the Supabase organization that owns the project | Nothing. You pick the project and bucket after signing in |
| **S3 keys** | You want a credential that reaches Storage only | Endpoint, region, bucket name, access key ID, secret access key |
Both reach every bucket in the project, not only the one you connect. See [what Rendobar stores](#what-rendobar-stores).
**Sign in** needs the project's legacy `anon` and `service_role` API keys to be active, because Supabase Storage's S3 endpoint accepts only those keys. If they are turned off, turn them on under **Project Settings** > **API Keys**, or use S3 keys.
This page uses **Sign in**. To use S3 keys instead, see [Connect with S3 access keys](#connect-with-s3-access-keys).
## 1. Sign in with Supabase
1. In [**Storage**](https://app.rendobar.com/storage), select **Connect Storage**, then **Supabase Storage**.
2. Under **Access**, select **Sign in**, then select **Sign in with Supabase**.

The Supabase connect dialog on the Sign in tab.
3. On the Supabase authorization page, choose the **Organization** that owns the project, then select **Authorize Rendobar**.

Supabase asks you to approve read access to the organization's projects and secrets.
Rendobar uses the approval to list your projects and read one project's API keys, then discards it. Supabase returns you to Rendobar. Finish the next step within 10 minutes, or sign in again.
## 2. Pick the project and bucket
1. In **Project**, select the project.
2. In **Bucket**, select a bucket, or enter a new name. Rendobar creates a new bucket as private before it runs the access checks.
3. (Optional) Under **More options**, change the **ID**. Jobs use it to reference the bucket.
4. Select **Connect**.

The project and bucket, picked after signing in.
Rendobar runs its [access checks](/docs/storage#connect-a-bucket) and saves the connection only if they pass.

A connected bucket, with the access checks passed and the storage URIs to use in jobs.
## 3. Use the bucket in a job
Put an object in `inputs` to read it, and the connection in `destinations` to write the output:
```typescript SDK theme={null}
import { createClient, outputUrl } from "@rendobar/sdk";
const client = createClient({
apiKey: process.env.RENDOBAR_API_KEY,
});
const job = await client.jobs.run({
type: "ffmpeg",
inputs: { source: "storage://bucket-demo/raw/clip.mp4" },
params: {
command: "ffmpeg -i source -vf scale=1280:-2 out.mp4",
},
destinations: ["storage://bucket-demo/exports"],
});
console.log(outputUrl(job));
console.log(job.deliveries);
```
```bash cURL theme={null}
curl https://api.rendobar.com/jobs \
-H "Authorization: Bearer $RENDOBAR_API_KEY" \
-H "Content-Type: application/json" \
-d '{
"type": "ffmpeg",
"inputs": { "source": "storage://bucket-demo/raw/clip.mp4" },
"params": {
"command": "ffmpeg -i source -vf scale=1280:-2 out.mp4"
},
"destinations": ["storage://bucket-demo/exports"]
}'
```
With the default output path, this writes `exports/clip.mp4`. Delivery finishes after the job, so `job.deliveries` can still show `pending` when `run` returns.
To change how outputs are named, see [delivery settings](/docs/storage#delivery-settings). If a delivery fails, see [delivery errors](/docs/storage#delivery-errors).
## What Rendobar stores
| Access | Stored, encrypted | Reaches |
| - | - | - |
| **Sign in** | The project's `anon` and `service_role` keys | Every bucket in the project, and the project's database through the `service_role` role |
| **S3 keys** | The access key ID and secret access key | Every bucket in the project, through Storage only |
Both credentials bypass Row Level Security, so your storage policies do not limit what Rendobar can read or write. The Supabase sign-in itself is not stored.
> [!WARNING]
>
> The `service_role` key has full access to the project's data, not only Storage. If that is more access than you want to give, connect with S3 keys.
## How do I revoke access?
**S3 keys.** In the Supabase dashboard, go to **Storage** > [**S3**](https://supabase.com/dashboard/project/_/storage/s3) and delete the access key. The connection stops working immediately.
**Sign in.** Removing Rendobar's authorization in Supabase does not stop the connection, because the connection uses the project's keys, not the sign-in. To stop it, deactivate the legacy API keys under **Project Settings** > **API Keys**. This also stops every other client that uses the legacy `anon` or `service_role` key.
Deleting the connection in Rendobar removes the stored keys, but does not invalidate them.
## Connect with S3 access keys
1. In the Supabase dashboard, go to **Storage** > [**S3**](https://supabase.com/dashboard/project/_/storage/s3).
2. Create an access key, and copy the access key ID and secret access key. Copy the **Endpoint** and **Region** from the same page.
3. In the Rendobar connect dialog, set **Access** to **S3 keys**, then enter the endpoint, region, bucket name, and the key pair.
4. Select **Connect**.
The endpoint has the form `https://.storage.supabase.co/storage/v1/s3`.
## Supabase-specific behavior
**Name conflicts.** Supabase Storage does not refuse an overwrite, so **Name conflicts** is always **Replace** on a Supabase connection. An output with the same path replaces the existing object. To keep every output, add `{job_id}` to the [output path](/docs/storage#output-path).

Name conflicts is fixed to Replace on a Supabase connection.
**Public buckets.** When you pick a public bucket after signing in, Rendobar sets the connection's [public URL](/docs/storage#public-url) to `https://.supabase.co/storage/v1/object/public/`, so deliveries return links on Supabase.
## Next steps
> **[Storage connections](/docs/storage)**
>
> Connection ids, delivery settings, credentials, and error codes.
> **[Jobs](/docs/concepts/job)**
>
> Where `inputs` and `destinations` appear in the job payload.
> **[SDK](/docs/sdk)**
>
> Submit the job above in TypeScript.
> **[Webhooks](/docs/guides/webhooks)**
>
> Receive an event when a job completes.
# API error codes reference
Source: https://rendobar.com/docs/support/errors
View all 27 API error codes, their HTTP status, and recommended action. Errors follow the {error: {code, message}} envelope on every endpoint.
Every error response uses the same shape:
```json theme={null}
{ "error": { "code": "ERROR_CODE", "message": "Human-readable description" } }
```
Check the HTTP status and `error.code` before reading `data`.
## Codes
| Code | HTTP | What to do |
| - | - | - |
| `UNAUTHORIZED` | 401 | Missing or invalid auth. Check the `Authorization` header |
| `FORBIDDEN` | 403 | Authenticated but not allowed for this resource |
| `VALIDATION_ERROR` | 400 | Body failed schema validation. `details.path` points at the field |
| `INVALID_JOB_TYPE` | 400 | Job type not registered or not on your plan |
| `FEATURE_NOT_ENABLED` | 400 | A compose job uses animated text or 3D turns, which are still rolling out and not enabled for your account yet. Render without them, or contact support to get access |
| `INSUFFICIENT_CREDITS` | 402 | Top up at [app.rendobar.com/billing](https://app.rendobar.com/billing) |
| `PLAN_LIMIT` | 403 | Plan limit hit (job timeout, GPU, a compose frame or frame rate above the plan). See [Limits](/docs/support/limits) and [which plan lifts it](#plan-limit-upgrade) |
| `RATE_LIMITED` | 429 | Back off per `Retry-After` header |
| `NOT_FOUND` | 404 | Resource doesn't exist or isn't visible to your org |
| `CONFLICT` | 409 | Request conflicts with current state (e.g. cancelling a complete job) |
| `RUNNER_ERROR` | 502 | Processing failed on the runner. Check `error.message` for details |
| `RUNNER_TIMEOUT` | 504 | A runner accepted the job but never started it, or lost the run. No credits charged |
| `ORG_SUSPENDED` | 403 | Contact `hello@rendobar.com` |
| `INTERNAL_ERROR` | 500 | Server bug. Persist? Contact support with the request ID |
| `STORAGE_QUOTA_EXCEEDED` | 402 | Stored assets exceed the plan quota. Delete assets or upgrade |
| `FILE_TOO_LARGE` | 413 | Input is larger than the plan allows. Check `maxInputFileSize` on [/account/capabilities](/docs/sdk) |
| `QUEUE_FULL` | 429 | Too many jobs already waiting. Let some finish, then retry |
| `QUEUE_EXPIRED` | 400 | The job waited too long to be dispatched. Submit it again |
| `GONE` | 410 | The output has passed its retention window and was deleted |
| `INPUT_URL_BLOCKED` | 400 | The input URL is not fetchable. Private and link-local addresses are refused |
| `INPUT_FETCH_FAILED` | 400 | The input URL could not be downloaded. Check it is public and still there |
| `INPUT_NOT_MEDIA` | 422 | The input downloaded but is not media |
| `INPUT_UNSUPPORTED` | 422 | The input is media of a kind this job type cannot take |
| `PROCESSING_FAILED` | 422 | The input was readable but the job could not produce an output |
| `UPSTREAM_ERROR` | 502 | A third-party service the job depends on failed. Retry |
| `NOT_CONFIGURED` | 503 | The capability is not configured on this deployment. Contact support |
| `NOT_IMPLEMENTED` | 501 | The endpoint exists but does nothing yet |
## Which plan lifts a PLAN\_LIMIT?
A compose video above your plan and a GPU job on Free return `PLAN_LIMIT` with `error.details`, a list of problems shaped `{ path, message, upgradeTo }`. `upgradeTo` is `"pro"` or `"studio"`, the cheapest plan that runs the job. It is `null` when only an enterprise plan does. Read `upgradeTo` instead of parsing the message.
```json theme={null}
{
"error": {
"code": "PLAN_LIMIT",
"message": "A 3840x2160 video at 30 fps is above your plan, which renders compose up to 1080p at 30 fps. Studio ($29/month) renders it.",
"details": [
{ "path": ["output"], "message": "A 3840x2160 video at 30 fps is above your plan, which renders compose up to 1080p at 30 fps. Studio ($29/month) renders it.", "upgradeTo": "studio" }
]
}
}
```
## Storage connections
Creating, testing, or updating a [storage connection](/docs/storage) returns these codes:
| Code | When |
| - | - |
| `VALIDATION_ERROR` | An access check failed, or the change is not allowed, such as making a read-only connection the default destination. `details.field` names the field to fix, and `details.reason` gives the cause, such as `bucket_not_found` or `signature_mismatch` |
| `CONFLICT` | The connection id is taken, or you deleted a connection that still has deliveries in progress |
| `UPSTREAM_ERROR` | The storage provider did not respond, or failed while listing objects. Retry |
| `NOT_CONFIGURED` | Sign in with Supabase is not available. Connect with S3 access keys instead |
A failed delivery does not return an error code. The job reports a `reason` for that destination instead. See [delivery errors](/docs/storage#delivery-errors).
## How do I handle the common errors?
The three you'll hit most: `INSUFFICIENT_CREDITS`, `RATE_LIMITED`, `VALIDATION_ERROR`.
```ts SDK theme={null}
import { createClient, isApiError } from "@rendobar/sdk";
const client = createClient({ apiKey: "rb_YOUR_KEY" });
try {
const job = await client.jobs.create({
type: "ffmpeg",
params: { command: "ffmpeg -i https://example.com/video.mp4 -vf scale=1280:720 output.mp4" },
});
} catch (err) {
if (!isApiError(err)) throw err;
switch (err.code) {
case "INSUFFICIENT_CREDITS":
// redirect to billing
break;
case "RATE_LIMITED":
// back off for err.retryAfter seconds
break;
case "VALIDATION_ERROR":
// fix the request
break;
default:
console.error(`API error: ${err.code} - ${err.message}`);
}
}
```
```javascript JavaScript theme={null}
const res = await fetch("https://api.rendobar.com/jobs", {
method: "POST",
headers: {
"Authorization": "Bearer rb_YOUR_KEY",
"Content-Type": "application/json",
},
body: JSON.stringify({
type: "ffmpeg",
params: { command: "ffmpeg -i https://example.com/video.mp4 -vf scale=1280:720 output.mp4" },
}),
});
if (!res.ok) {
const { error } = await res.json();
switch (error.code) {
case "INSUFFICIENT_CREDITS":
// redirect to billing
break;
case "RATE_LIMITED":
// back off per Retry-After
break;
case "VALIDATION_ERROR":
// fix the body
break;
default:
console.error(`API error: ${error.code} - ${error.message}`);
}
}
```
```python Python theme={null}
import requests
res = requests.post(
"https://api.rendobar.com/jobs",
headers={"Authorization": "Bearer rb_YOUR_KEY"},
json={
"type": "ffmpeg",
"params": {"command": "ffmpeg -i https://example.com/video.mp4 -vf scale=1280:720 output.mp4"},
},
)
if not res.ok:
error = res.json()["error"]
print(f"API error: {error['code']} - {error['message']}")
```
## See also
* [FFmpeg](/docs/jobs/ffmpeg): the flag and command errors this job returns
* [Compress](/docs/jobs/compress): why a target can be unreachable
* [Plan limits](/docs/support/limits): the caps that produce a limit error
* [Limits](/docs/support/limits)
* [Job lifecycle](/docs/concepts/job)
* [Authentication](/docs/quickstart)
## Related
* [Plan limits](/docs/support/limits): caps behind `PLAN_LIMIT` and `RATE_LIMITED`
* [Job lifecycle](/docs/concepts/job): where `RUNNER_ERROR` and `RUNNER_TIMEOUT` surface
* [Credits and billing](/docs/concepts/credits): `INSUFFICIENT_CREDITS` and the prepaid model
* [FAQ](/docs/support/faq): common questions about failed jobs and refunds
* [Pricing](https://rendobar.com/pricing/): plan that lifts your concurrency and rate caps
# Frequently asked questions
Source: https://rendobar.com/docs/support/faq
Get quick answers about Rendobar pricing, supported formats, AI agent access, rate limits, and what counts as a failed job.
> **How much does Rendobar cost?**
>
> Free plan ships with a one-time \$5 credit grant, no card required. Pro is \$9/mo and includes \$5/mo in credits. Studio is \$29/mo and includes \$20/mo in credits. Both add a 25% bonus on every credit purchase. Credit packs \$10 to \$100 on every plan. Credits never expire. Compose bills per minute of output video: \$0.04 on every plan, billed per second with a 15-second minimum per render. Pro adds compose at 1440p and GPU FFmpeg. Studio adds compose at 4K and 60 fps and 50 concurrent jobs. Every other job type bills per second of compute. Full breakdown: [Credits and billing](/docs/concepts/credits), [compose pricing](/docs/jobs/compose/pricing), or the [pricing page](https://rendobar.com/pricing/).
> **What can I do with Rendobar today?**
>
> Nine job types are live: `ffmpeg` and `ffprobe` for any FFmpeg command and file inspection, `compose` to render a video from a JSON timeline, `compress.target` to hit a file size, `caption.burn` and `captions.animate` for subtitles, and `image.generate`, `image.edit` and `image.upscale` for images.
> **What video formats are supported?**
>
> Every FFmpeg-compatible container and codec for input. Output defaults to the extension in your trailing filename (`output.mp4` → MP4). Override with `params.outputFormat`.
> **Can I drive Rendobar from an AI agent?**
>
> Yes. Connect any MCP-compatible agent to `https://api.rendobar.com/mcp` with your API key. Six typed MCP tools: `submit_job`, `get_job`, `list_jobs`, `probe_media`, `get_account`, `upload_media`. See [MCP overview](/docs/mcp-server).
> **How long do jobs take?**
>
> Seconds to minutes, depending on input size and command. Hard caps on processing time: 1 hour (Free), 9 hours (Pro and Studio). [Limits](/docs/support/limits).
> **Is there a rate limit?**
>
> Yes. 120 req/min (Free), 600 req/min (Pro), 1200 req/min (Studio). Applies to REST and MCP. Limit hit returns `429 RATE_LIMITED` with a `Retry-After` header.
> **What happens if a job fails?**
>
> A failed compose render is free when the failure is on Rendobar's side. When it may come from your input, such as the render tool exiting on a bad file, it pays for the compute it used at 2x. Other failed jobs are charged for the compute they used, the same way successful jobs are. A job that never started is free. Rendobar has no auto-refund. If you believe a failure was caused by a Rendobar bug or platform issue, contact support and we will review for a discretionary refund. Inspect `error.code` and `error.message` on the job, and retry via `POST /jobs/{id}/retry` if appropriate. [Error codes](/docs/support/errors).
> **Can I run custom FFmpeg commands?**
>
> Yes. That is the entire `ffmpeg` job type. Commands run through 8 security layers (flag whitelist, format/filter blocklists, sandbox isolation) before execution. [FFmpeg](/docs/jobs/ffmpeg).
> **How do I get push updates instead of polling?**
>
> Configure a [webhook](/docs/guides/webhooks) endpoint on your organization. Rendobar POSTs signed JSON when jobs change status. The dashboard uses a WebSocket internally. Programmatic push is webhook-only.
For more about what Rendobar can do, see [rendobar.com](https://rendobar.com) or [rendobar.com/pricing/](https://rendobar.com/pricing/). For head-to-head comparisons with other video APIs, see [rendobar.com/vs/](https://rendobar.com/vs/).
## Related
* [Credits and billing](/docs/concepts/credits): full pricing and balance model
* [Plan limits](/docs/support/limits): every rate, file, and storage cap by plan
* [Error codes](/docs/support/errors): every `error.code` the API can return
* [Pricing](https://rendobar.com/pricing/): Free, Pro and Studio plans and credit packs
* [Rendobar vs alternatives](https://rendobar.com/vs/): comparisons with other video APIs
# Plan limits and quotas
Source: https://rendobar.com/docs/support/limits
Compare Free, Pro and Studio limits: rate limits (120 vs 600/min), file size caps (500 MB vs 10 GB), retention, concurrency, storage, compose frames.
Every limit Rendobar enforces, by plan. Pulled from `PLAN_LIMITS` in the API. For plan prices and credit packs, see [pricing](https://rendobar.com/pricing/).
## Plan limits
| | Free | Pro (\$9/mo) | Studio (\$29/mo) |
| - | - | - | - |
| Signup credits | \$5 (one-time) | - | - |
| Monthly credits | - | \$5/mo included | \$20/mo included |
| Credit-purchase bonus | - | +25% | +25% |
| Concurrent jobs | 1 | 20 | 50 |
| Queued backlog | 50 | 1000 | 2500 |
| API requests / min | 120 | 600 | 1200 |
| Max input file | 500 MB | 10 GB | 20 GB |
| Max job timeout | 1 hour | 9 hours | 9 hours |
| Output retention | 7 days | 30 days | 90 days |
| Total object storage | 5 GB | 250 GB | 250 GB |
| Compose frame | Up to 1080p at 30 fps | Up to 1440p at 30 fps | Up to 4K at 60 fps |
| Compose with animated graphics | Up to 1080p at 30 fps | Up to 1080p at 30 fps | Up to 1080p at 30 fps |
| GPU FFmpeg (NVENC/CUDA) | No | Yes | Yes |
| Faster output delivery (an output of 512 MB or more streams into your bucket while it uploads) | No | No | Yes |
| Team members | 2 | 3 | 10 |
| Priority queue (jobs start first when runners are full) | No | No | Yes |
| Audit log | No | No | Yes |
| Priority support | No | No | Yes |
`ffmpeg`, MCP, and webhooks are on every plan. A compose video above your plan's frame or frame rate returns `403 PLAN_LIMIT` before it renders, and `upgradeTo` in `error.details` names the plan that renders it. Animated graphics above 1080p or 30 fps need an enterprise plan. `GET /account/capabilities` returns these as `composeMaxPixels`, `composeMaxFps`, `composeAnimatedMaxPixels` and `composeAnimatedMaxFps`. See [compose pricing](/docs/jobs/compose/pricing).
## How long do output URLs last?
* **Signed download URL** (`output.file.url`) is valid for **1 hour**. Re-fetch via `GET /jobs/{id}` for a fresh URL.
* **Output retention**: 7 days (Free), 30 days (Pro) or 90 days (Studio). After that, the file is deleted. The job record stays, but the file URLs return 404.
* **Storage quota** caps total bytes across all your outputs. Delete old outputs or upgrade if you hit it.
* **No separate per-output size limit**. Bounded by input cap and storage quota.
## Credit packs
\$10 / \$25 / \$50 / \$100 (or custom, \$10 minimum). Pro and Studio add +25% to every purchase. Credits never expire. Failed jobs are not refunded automatically. See [credits and billing](/docs/concepts/credits) for what a failed job pays.
## API response limits
| Limit | Value |
| - | - |
| Default page size | 50 |
| Max page size | 100 |
| Max request body | 100 MB |
## Which file formats are supported?
Rendobar accepts every FFmpeg-compatible input format. Default outputs by media type:
| Input | Default output |
| - | - |
| Video | MP4 (H.264) |
| Audio | MP3 |
| Image | PNG |
For `ffmpeg`, the output format is inferred from the trailing filename (`output.mp4` → MP4). Override with `params.outputFormat`.
## See also
* [Credits and billing](/docs/concepts/credits)
* [Error codes](/docs/support/errors)
* [FFmpeg](/docs/jobs/ffmpeg)
## Related
* [Credits and billing](/docs/concepts/credits): nanodollar pricing and the prepaid model
* [Error codes](/docs/support/errors): `PLAN_LIMIT` and `RATE_LIMITED` details
* [FAQ](/docs/support/faq): cost, rate limit, and refund questions
* [FFmpeg reference](/docs/jobs/ffmpeg): how plan caps apply to FFmpeg jobs
* [Pricing](https://rendobar.com/pricing/): plan that raises your concurrency and file caps
# API versioning and deprecations
Source: https://rendobar.com/docs/support/versioning
Read how the API evolves: additive changes only, no version in the URL, deprecated surfaces keep working, and removals batch into a rare SDK major.
There is no version in the URL. No `/v1`, no `Api-Version` header, no date
pinning. That is a commitment, not an omission: the API only changes in ways
that existing callers survive, so there is nothing to pin to.
## What changes without warning?
These are safe because a tolerant client ignores what it does not recognise.
* A new field on a response
* A new optional parameter on a request
* A new endpoint, or a new method on the SDK
* A new accepted value on a request enum
* A new job type
Write clients that ignore unknown response fields. Every SDK we publish already
does.
## What counts as a breaking change?
* Removing or renaming a field, parameter, endpoint or method
* Making a response field nullable, or changing its type
* Narrowing what a request accepts
* Moving a field into or out of a union
When one of these looks necessary we look for the additive path first: a new
sibling field, a default, a new endpoint alongside the old one. We break only
when there is genuinely no additive option.
## How is something removed?
Three steps, in order, and the middle one lasts.
1. **Expand.** The replacement ships alongside the old surface. Both work.
2. **Deprecate.** The old surface is marked and keeps working. It is not
slowed, throttled, or degraded.
3. **Contract.** Removals are batched and released together in a single major.
A deprecated surface is one you can keep using while you migrate, not one that
is about to fail. `client.team.*` and the `/team/*` routes are deprecated today
and call exactly the same code as their replacements.
## How do I tell what is deprecated?
* **OpenAPI**: the operation carries `"deprecated": true` in
[the spec](https://api.rendobar.com/openapi.json). Generators surface this.
* **TypeScript**: the method carries `@deprecated`, so your editor strikes it
through and your build can warn.
* **Changelog**: every deprecation is announced at
[rendobar.com/changelog](https://rendobar.com/changelog/).
## How are SDK versions numbered?
[`@rendobar/sdk`](/docs/sdk) follows semantic versioning.
| Change | Release |
| - | - |
| Bug fix | patch |
| New method, new field, new optional argument | minor |
| A removal from the deprecation backlog | major |
Majors are rare and deliberate. Publishing one requires a human to approve that
exact version number, and CI refuses to push a major to npm without it. That
guard exists because an automated release once cut a major from a stray commit
footer, and we would rather fail a release than surprise you with one.
Pin what you depend on:
```json theme={null}
{ "dependencies": { "@rendobar/sdk": "^5.7.0" } }
```
A caret is safe here. It accepts every patch and minor, which by the rules above
cannot break you, and refuses the next major until you choose it.